
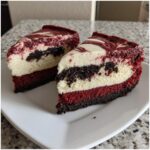
If you’re looking for that one dessert that stops every conversation when you bring it to the table, you’ve found it. There is nothing quite like a red velvet cheesecake that layers intense chocolate cocoa flavor with luxurious, tangy cream cheese filling, all sitting on an impossibly crunchy Oreo crust. Here at CravyBite Kitchen, we specialize in taking classic American comfort food and perfecting it for your modern table. I’m Jess Carter, and drawing on my background in nutrition science mixed with the home-cooking legacy passed down from my family—which you can read more about on our About Page—I guarantee this recipe delivers that stunning visual appeal without sacrificing an ounce of creamy, decadent flavor. Trust me, this showstopper dessert is worth every minute!
- Why This Classic Red Velvet Cheesecake Recipe is a Showstopper Dessert
- Gathering Ingredients for Your Red Velvet Cheesecake
- Step-by-Step Homemade Cheesecake Tutorial for the Red Velvet Cheesecake
- Ingredient Notes and Substitutions for Red Velvet Cheesecake
- Tips for Success When Making a Layered Red Velvet Cheesecake
- Serving Suggestions for Your Festive Red Desserts
- Storage and Reheating Instructions for Homemade Cheesecake
- Frequently Asked Questions About Red Velvet Cheesecake
- Sharing Your Experience with This Creamy Red Velvet Dessert
Why This Classic Red Velvet Cheesecake Recipe is a Showstopper Dessert
When I bring this red velvet cheesecake out, it’s always the first thing everyone gravitates toward. Seriously, forget plain desserts; this one commands attention! It’s perfect for those big celebrations or when you just need a festive moment, making it one of my top holiday cheesecake ideas.
- The vibrant, deep red color is instantly eye-catching.
- It offers three layers of texture in every single bite.
- It tastes much more complex than the simple steps suggest!
The Perfect Fusion: Cake Meets Cheesecake
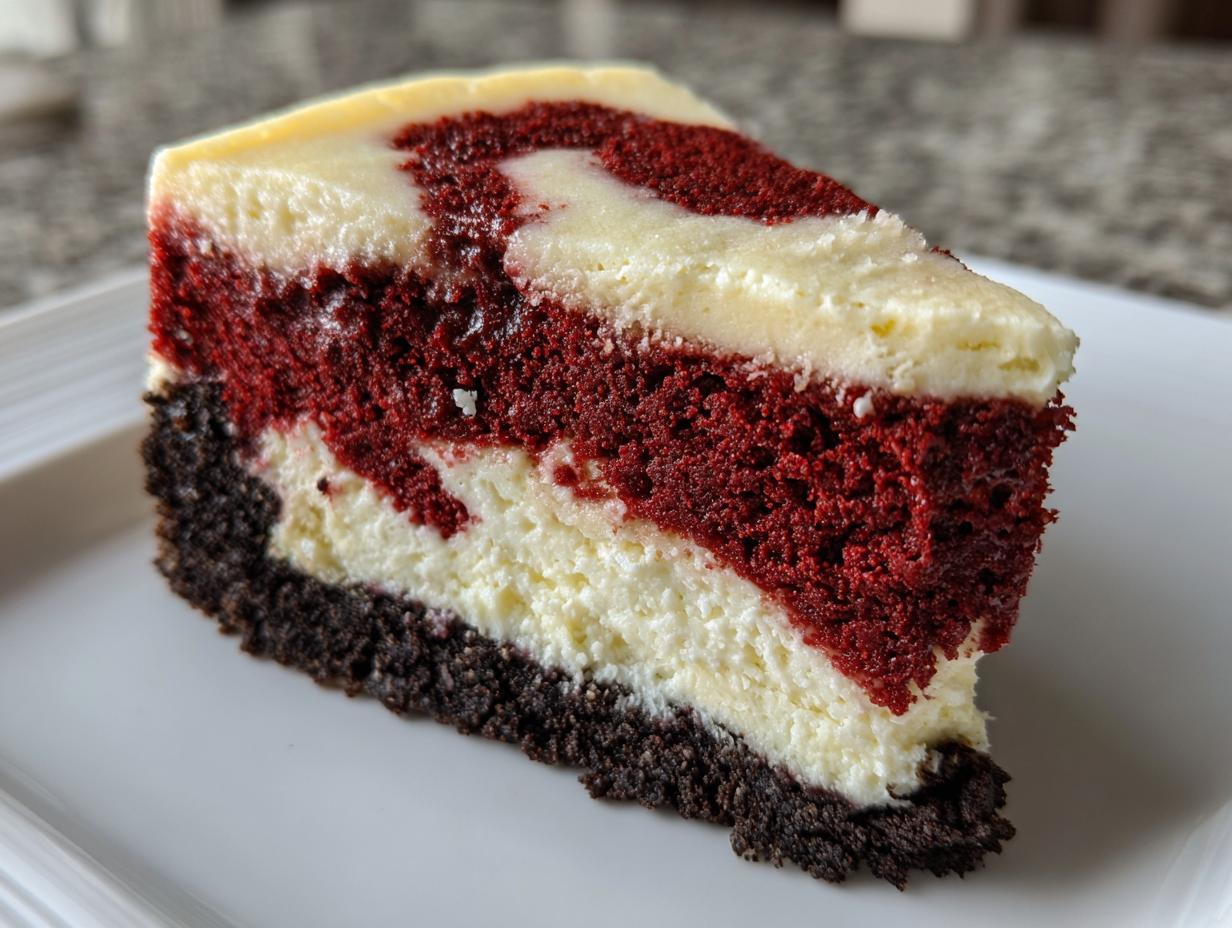
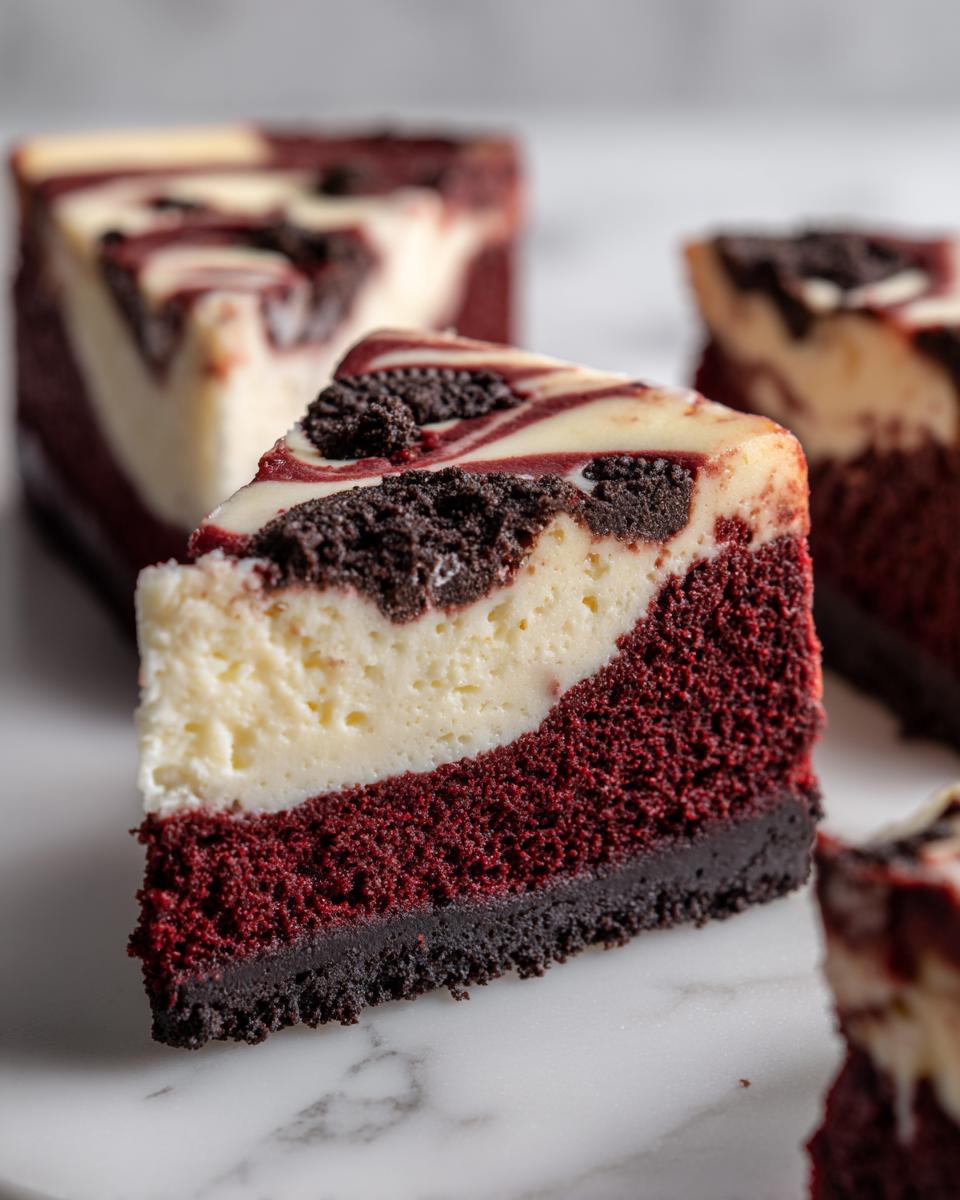
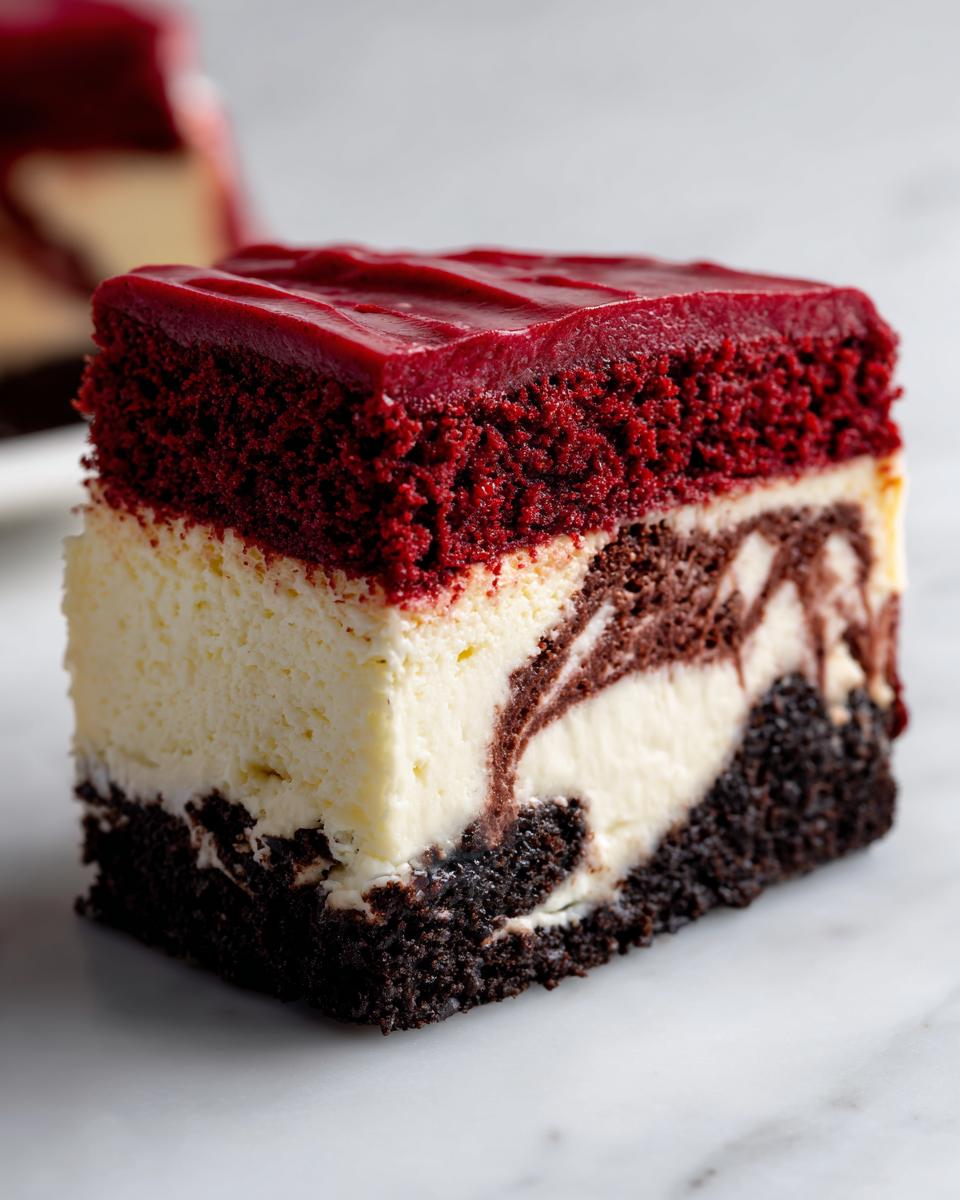
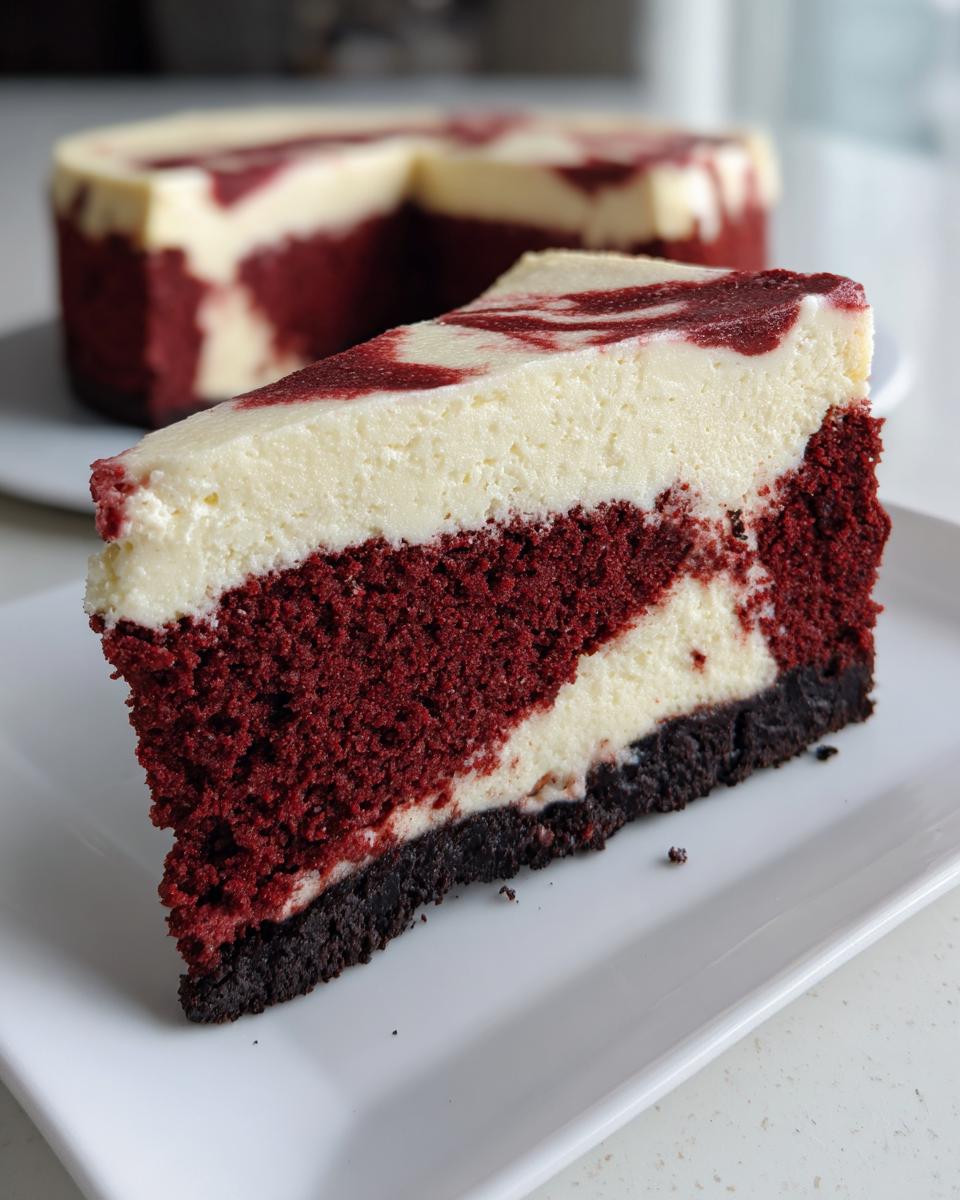
What I love most is that we aren’t just making one dessert; we are making three amazing ones and layering them up! You get that satisfying crunch from the Oreo crust, a soft, cocoa-infused red velvet cake layer, and then the entire thing is topped with rich, creamy cheesecake filling. It truly is the ultimate cake and cheesecake fusion.
Tips for Achieving a Creamy Red Velvet Dessert Texture
The secret to that melt-in-your-mouth, ultra-creamy outcome in this red velvet dessert isn’t about complicated additions; it’s about temperature control. Before you even think about mixing the filling, make absolutely sure that cream cheese is completely softened—I mean, room temperature soft! If you try to rush it, you’ll end up with lumps, and nobody wants a lumpy cheesecake experience.
Gathering Ingredients for Your Red Velvet Cheesecake
Okay, let’s talk supplies! Baking this spectacular red velvet cheesecake requires a few distinct component lists, so it helps to get everything organized before you start mixing. Remember what I always say: preparation is half the battle in the kitchen! Don’t substitute the cream cheese; it needs to be full-fat brick-style cheese, not the whipped stuff in a tub. We need that richness for the holiday calls this dessert receives!
For the Oreo Crust Cheesecake Base
- 1 1/2 cups crushed Oreo cookies (you can use the whole cookie, filling and all!)
- 6 tablespoons unsalted butter, melted
- 1 (8 ounce) package cream cheese, softened (this is for the crust only, don’t forget!)
For the Red Velvet Cake Layer and Cheesecake Filling
This is where we combine the cake magic with the creamy magic. Notice we use a box mix for the cake layer—that’s my secret for keeping this impressive layered cheesecake approachable!
- 1 box (15.25 ounces) red velvet cake mix
- Whatever ingredients the cake mix box calls for (usually eggs, oil, and water)
- 16 ounces cream cheese, softened (for the main filling)
- 1 1/2 cups granulated sugar
- 1 teaspoon vanilla extract
- 1/4 cup sour cream
- 2 large eggs
- 1/4 cup heavy whipping cream (we swap this for some of the water!)
- 1 teaspoon white vinegar
- 1/2 teaspoon red food coloring (optional, but go for the gel kind if you have it!)
Creating the Cream Cheese Swirl
This tiny little batch makes such a visual difference. You only need a few things for this stunning topping ripple:
- 4 ounces cream cheese, softened
- 1/4 cup powdered sugar
Step-by-Step Homemade Cheesecake Tutorial for the Red Velvet Cheesecake
Alright, now for the fun part! This is where we take all those beautiful ingredients and turn them into the showstopping red velvet cheesecake you’ve been dreaming about. Don’t let the layers scare you; we’re taking this slow, one easy step at a time. Because we are layering cake mix and cheesecake, we actually bake in two stages at two different temperatures—don’t worry, I’ll walk you through exactly when to change that dial.
Baking the Oreo Crust and Red Velvet Base
First things first, get your oven preheated to 350°F (175°C). For the crust, just mix your crushed Oreos, the melted butter, and that 8 ounces of cream cheese until it holds together. Really press that firmly into your 9-inch springform pan. Pop that in the oven for 10 minutes, then pull it out to cool down a bit. Next, make your red velvet cake batter—remember to use the heavy whipping cream and vinegar I mentioned earlier—and pour that gently over the crust. Bake that layer for about 20 to 25 minutes, until it just springs back. Pull it out, let it rest, and then immediately drop your oven temperature down to 325°F (160°C) for the cheesecake part.
Mixing the Smooth Cheesecake Filling
Now we focus on creamy bliss. In a big bowl, beat that 16 ounces of fully softened cream cheese with the granulated sugar until it’s perfectly smooth—no grains allowed! This is where I lean on my nutrition background: to get that beautiful, professional texture, you must add your 2 large eggs one at a time. Beat each egg in only until it disappears. If you dump them all in at once, you risk over-mixing the batter, which causes cracks later. Stir in the vanilla and sour cream last.
Assembling and Swirling Your Stunning Dessert Presentation
Before you assemble, whip up that small swirl mixture. Take half of your cheesecake batter and spread it over the red velvet layer. Dollop spoonfuls of that cream cheese swirl mix right on top. Then, gently take a butter knife or a thin skewer and drag it through the batter just a few times. Seriously, just a few passes! You want a gorgeous marble effect for your stunning dessert presentation, not a muddy mess.

The Critical Cooling and Chilling Process
Bake this beauty at 325°F (160°C) for about 50 to 60 minutes. You want the edges set but the middle still wobbly—that’s the sign of an amazing cheesecake! Here’s the trick to avoiding cracks: turn the oven off completely, crack the door open just a tiny bit, and let the cheesecake sit in that residual heat for a full hour. This slow transition is key. Afterwards, let it cool on the counter, run a knife around the edge to prevent sticking, and then it absolutely must chill for at least 6 hours, but overnight is way better. If you need help with troubleshooting, feel free to reach out on our contact page!
Ingredient Notes and Substitutions for Red Velvet Cheesecake
When you’re tackling a showstopper like this red velvet cheesecake, the ingredients you choose make a real difference in the final texture and how festive the color ends up being. I always encourage folks to read the notes section on the recipe card because these small decisions prevent baking disasters later on. Listen, if you’re worried about that vibrant red color, I have some quick tips that bridge my kitchen heritage with what works best today.
Achieving Deep Red Color Without Artificial Dyes
If you want that truly stunning, holiday-worthy red, liquid food coloring often just fades when baked. I find that using a good quality red gel food coloring gives you much more color saturation with less product. If you prefer to go more natural, make sure you are using a high-quality, deeper cocoa powder for the red velvet cake layer, which will give you a richer, darker chocolate background, even if the red isn’t quite as aggressive.
Making an Easy Layered Cheesecake without Cake Mix
Most people rely on the box mix because it’s easy, which is honestly why this recipe became so popular for busy home cooks! If you prefer to skip the oven entirely, don’t sweat it. You’ll just need to make a standard, small-batch red velvet cake layer from scratch. Focus on balancing the buttermilk and vinegar, and be sure to reduce the sugar in your scratch recipe slightly since the cheesecake layer is already quite sweet!
Tips for Success When Making a Layered Red Velvet Cheesecake
I know the idea of a cracked top sheet is everyone’s biggest fear when baking a cheesecake. While my slow-cooling method usually saves the day, I totally get wanting extra insurance, especially when you’re making something this gorgeous for a party! These little adjustments help ensure your dessert stays looking perfect from the oven to the serving platter.
Don’t forget, for more fantastic inspiration on creamy bakes, check out this delicious recipe while you’re here!
Water Bath Alternatives for Even Baking
Traditionally, cheesecakes cook in a water bath, which is just a pan of hot water set around your springform pan to shield the edges from intense heat. If you are extremely nervous about an uneven bake after pulling it out of the oven, you can certainly use one! Since this layered structure is a bit different, I recommend wrapping the *outside* of your springform pan airtight in heavy-duty foil—like, double-wrap it—before setting it into a larger roasting pan filled with an inch or two of boiling water. This keeps the cheesecake moist and guarantees that creamy middle texture we love so much.
Another quick tip: make sure you’re using room-temperature heavy cream and eggs for the main batter—cold ingredients are a number one cause of curdling!
Serving Suggestions for Your Festive Red Desserts
Since this red velvet cheesecake is such a showstopper on its own, you don’t need much fuss, but textures and temperature contrasts are always fun! For a stunning presentation, especially around Christmas or for a romantic Valentine’s Day cheesecake vibe, I love to keep the topping light.
Sometimes I just dust the perfectly chilled slice with powdered sugar. Other days, I might whip up a quick homemade cream cheese frosting—it cuts through the richness so nicely. For added flair, check out some of the amazing ideas over at this site! A small sliver of this decadence is perfect with a strong, dark coffee or maybe a glass of chilled sparkling cider.
Storage and Reheating Instructions for Homemade Cheesecake
The best part about making a giant, decadent dessert like this is that you usually have leftovers, right? Since this cheesecake is packed with cream cheese and cake layers, it needs proper storage to keep that texture perfect. Make sure you chill this completely—I mean it, the full 6 hours, but overnight is truly your friend here.
Once it’s chilled and set, cover the springform pan tightly with plastic wrap or transfer individual slices to airtight containers. It stays super fresh in the fridge for about four to five days. Trust me, it tastes even better on day two!
If you need to freeze it, that’s doable too! I recommend slicing it first, wrapping each slice individually in plastic wrap and then foil. You can freeze it for up to a month. Just let it thaw slowly in the refrigerator overnight before serving.
Frequently Asked Questions About Red Velvet Cheesecake
I know you probably have a few lingering questions after looking over this massive recipe. That’s totally fine! When you’re making a showstopper dessert like this, you want to feel confident. I tried to build this recipe with simple steps, but sometimes specifics matter when you’re aiming for that perfect, creamy red velvet dessert result.
Can I make a No Bake Red Velvet Cheesecake instead?
That’s a great question. You absolutely *can* make a no bake red velvet cheesecake, but it fundamentally changes the structure because we rely heavily on the baked cake layer here. If you want to skip the oven entirely, you’ll need to substitute that baked layer with a thicker layer of stabilized cream cheese filling—usually by adding dissolved gelatin or relying on a much higher ratio of whipped cream mixed into your cream cheese base. Remember, if you go no-bake, you must chill it for much longer, probably closer to 10 or 12 hours, to get it firm enough to slice!
How far ahead can I prepare this cheesecake?
For the absolute best flavor and texture, I always recommend chilling this dessert overnight. That allows the red velvet cake layer to really soak up some of that cheesecake moisture. If you’re planning for a weekend party, you can easily assemble and bake the entire thing on Friday afternoon, cover it well, and it will be perfect for Saturday serving. For longer storage, check out the notes on freezing, but for immediate enjoyment, overnight rest is golden.
If you’ve got any other burning questions about achieving that perfect swirl or need an alternative crust idea, feel free to check out some other seasoned bakers’ takes over at this page. Happy baking!
Sharing Your Experience with This Creamy Red Velvet Dessert
Well, that’s it! You’ve conquered the ultimate layered red velvet cheesecake, and I am so excited for you to dive in. Once you’ve tried a slice, please hop back here and let me know how it turned out for you. Seriously, your comments and ratings help CravyBite Kitchen keep growing our collection of tried-and-true, reliable recipes!
PrintShowstopper Red Velvet Cheesecake with Cream Cheese Swirl and Oreo Crust
Create a stunning, creamy Red Velvet Cheesecake featuring a rich Oreo crust and a beautiful cream cheese swirl. This recipe delivers a decadent, showstopper dessert perfect for holidays or special celebrations.
- Prep Time: 30 min
- Cook Time: 80 min
- Total Time: 9 hours 50 min
- Yield: 12 servings 1x
- Category: Dessert
- Method: Baking
- Cuisine: American
- Diet: Vegetarian
Ingredients
- 1 1/2 cups crushed Oreo cookies
- 6 tablespoons unsalted butter, melted
- 1 (8 ounce) package cream cheese, softened (for crust)
- 1 box (15.25 ounces) red velvet cake mix
- Ingredients required by cake mix box (usually eggs, oil, water)
- 16 ounces cream cheese, softened (for filling)
- 1 1/2 cups granulated sugar
- 1 teaspoon vanilla extract
- 1/4 cup sour cream
- 2 large eggs
- 1/4 cup heavy whipping cream
- 1 teaspoon white vinegar
- 1/2 teaspoon red food coloring (optional, for extra color)
- 4 ounces cream cheese, softened (for swirl)
- 1/4 cup powdered sugar (for swirl)
Instructions
- Prepare the crust: Preheat your oven to 350°F (175°C). Mix the crushed Oreos, 6 tablespoons melted butter, and 8 ounces softened cream cheese until combined. Press this mixture firmly into the bottom of a 9-inch springform pan. Bake for 10 minutes. Let cool slightly.
- Prepare the red velvet cake layer: Prepare the red velvet cake mix according to the package directions, substituting the liquid amount with 1/4 cup heavy whipping cream and adding 1 teaspoon white vinegar and red food coloring, if using. Mix until just combined.
- Pour the prepared red velvet cake batter over the cooled Oreo crust. Bake for 20 to 25 minutes, or until a toothpick inserted near the center comes out clean. Remove from the oven and reduce the oven temperature to 325°F (160°C).
- Prepare the cheesecake filling: In a large bowl, beat 16 ounces softened cream cheese and 1 1/2 cups granulated sugar until smooth. Beat in the vanilla extract, sour cream, and 2 large eggs one at a time, mixing well after each addition. Mix in the remaining red food coloring if you want a deeper color in the cheesecake layer.
- Prepare the cream cheese swirl: In a small bowl, beat the remaining 4 ounces softened cream cheese with 1/4 cup powdered sugar until smooth.
- Assemble the cheesecake: Gently spoon half of the cheesecake filling over the baked red velvet layer. Dollop spoonfuls of the cream cheese swirl mixture over the filling. Top with the remaining cheesecake filling. Use a knife or skewer to gently swirl the layers together for a marbled effect. Do not overmix.
- Bake the cheesecake: Bake at 325°F (160°C) for 50 to 60 minutes. The edges should look set, but the center should still have a slight wobble.
- Cool the cheesecake: Turn off the oven, crack the door open, and let the cheesecake cool inside the oven for 1 hour. This prevents cracking. Remove from the oven, run a thin knife around the edge, and cool completely on a wire rack. Chill in the refrigerator for at least 6 hours, or preferably overnight, before serving.
Notes
- For the best texture, ensure all cream cheese is fully softened to room temperature before mixing the filling.
- If you want a truly showstopper presentation, top the chilled cheesecake with homemade cream cheese frosting or a simple chocolate ganache drizzle.
- This recipe works well for Valentine’s Day or Christmas gatherings due to its festive color.
Nutrition
- Serving Size: 1 slice
- Calories: 450
- Sugar: 35g
- Sodium: 300mg
- Fat: 28g
- Saturated Fat: 17g
- Unsaturated Fat: 11g
- Trans Fat: 0.5g
- Carbohydrates: 45g
- Fiber: 1g
- Protein: 6g
- Cholesterol: 100mg