
Oh my gosh, you guys! As soon as those first crisp, cool breezes hit, my mind goes straight to layering desserts. There is just something magical about a handheld treat that combines sweet, tart, and totally decadent textures, right? Today, we are making my absolute favorite apple cheesecake bars—the kind that makes you forget all about pie crust struggles. I’m calling these the Ultimate Caramel Apple Cheesecake Bars with Streusel Topping because they have it all: that buttery snap, creamy cheesecake, warm spiced apples, and a crunchy topping begging for caramel.
Baking has always been central to my life. I’m Jess Carter, and while I spent years studying the science of food, I always come back to the heartwarming traditions I learned at home. That’s why I know this recipe is reliable; it’s built on flavor and technique that just works every single time. You can trust these bars to be rich, stable, and delicious for your next big gathering. If you want to know more about the cooking philosophy that drives CravyBite Kitchen, check out our story!
- Why You Will Love These Ultimate Apple Cheesecake Bars
- Essential Ingredients for Perfect Apple Cheesecake Bars
- Step-by-Step Instructions for Layered Apple Cheesecake Bars
- Tips for Making the Best Apple Cheesecake Bars
- Variations on Classic Apple Cheesecake Bars
- Storage and Reheating Instructions for Apple Cheesecake Bars
- Time Commitments and Yield for This Recipe
- Frequently Asked Questions About Apple Cheesecake Bars Recipe
- Estimated Nutritional Information for Apple Cheesecake Bars
Why You Will Love These Ultimate Apple Cheesecake Bars
I honestly believe these are some of the best apple dessert bars you will ever put on a plate. They just check every single box for a perfect fall bake, and honestly, they make cleanup so much easier than a whole pie! Here’s what makes them my go-to recipe whenever the air gets chilly:
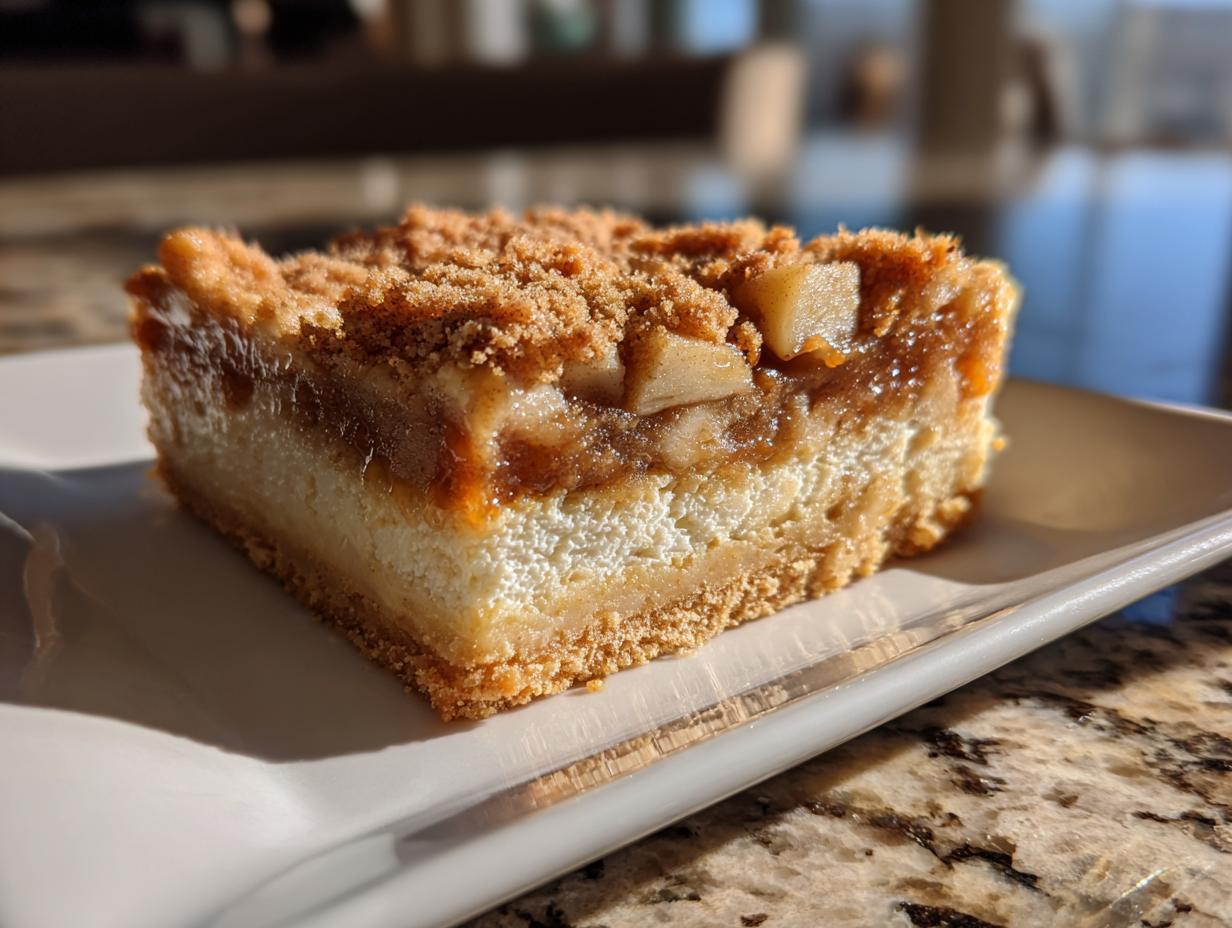
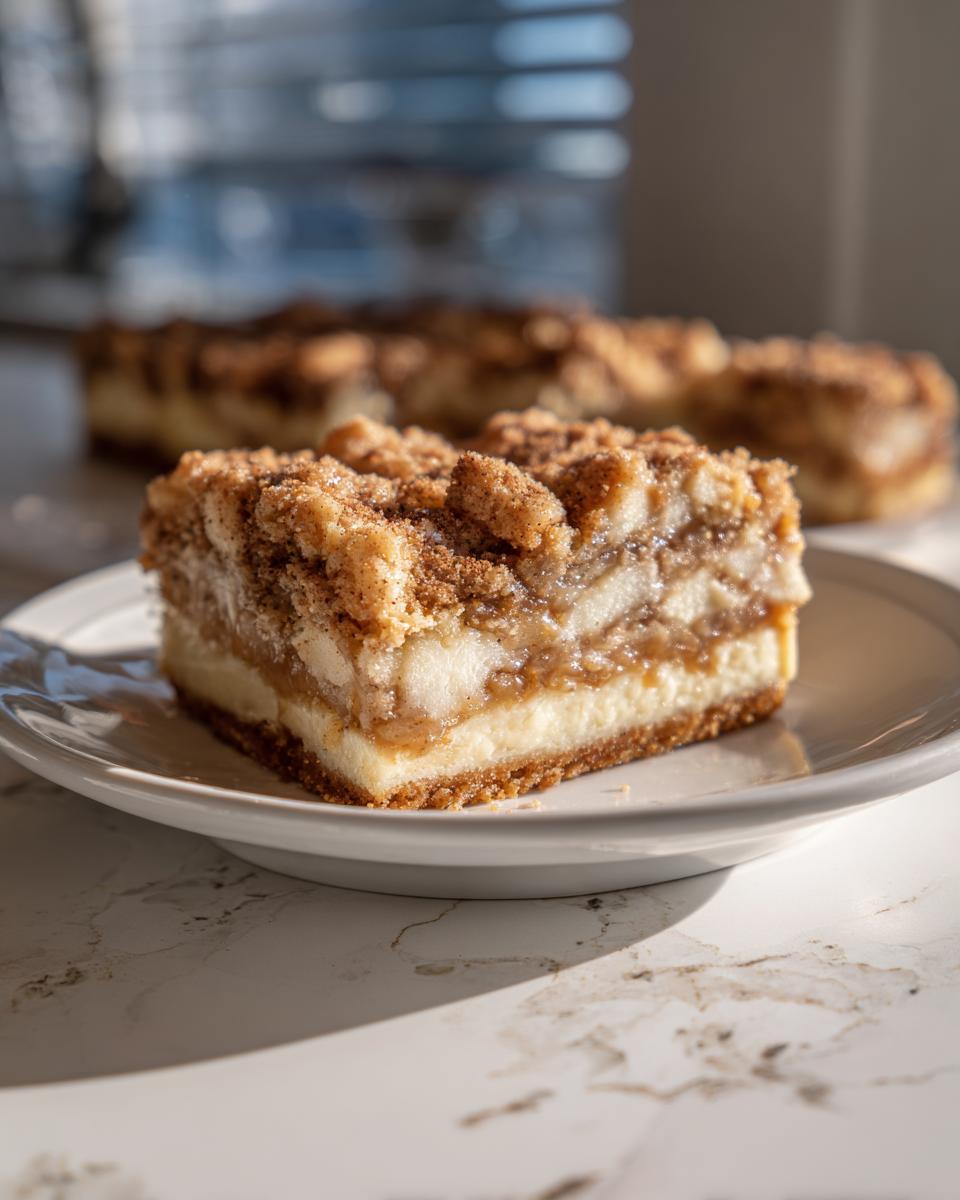
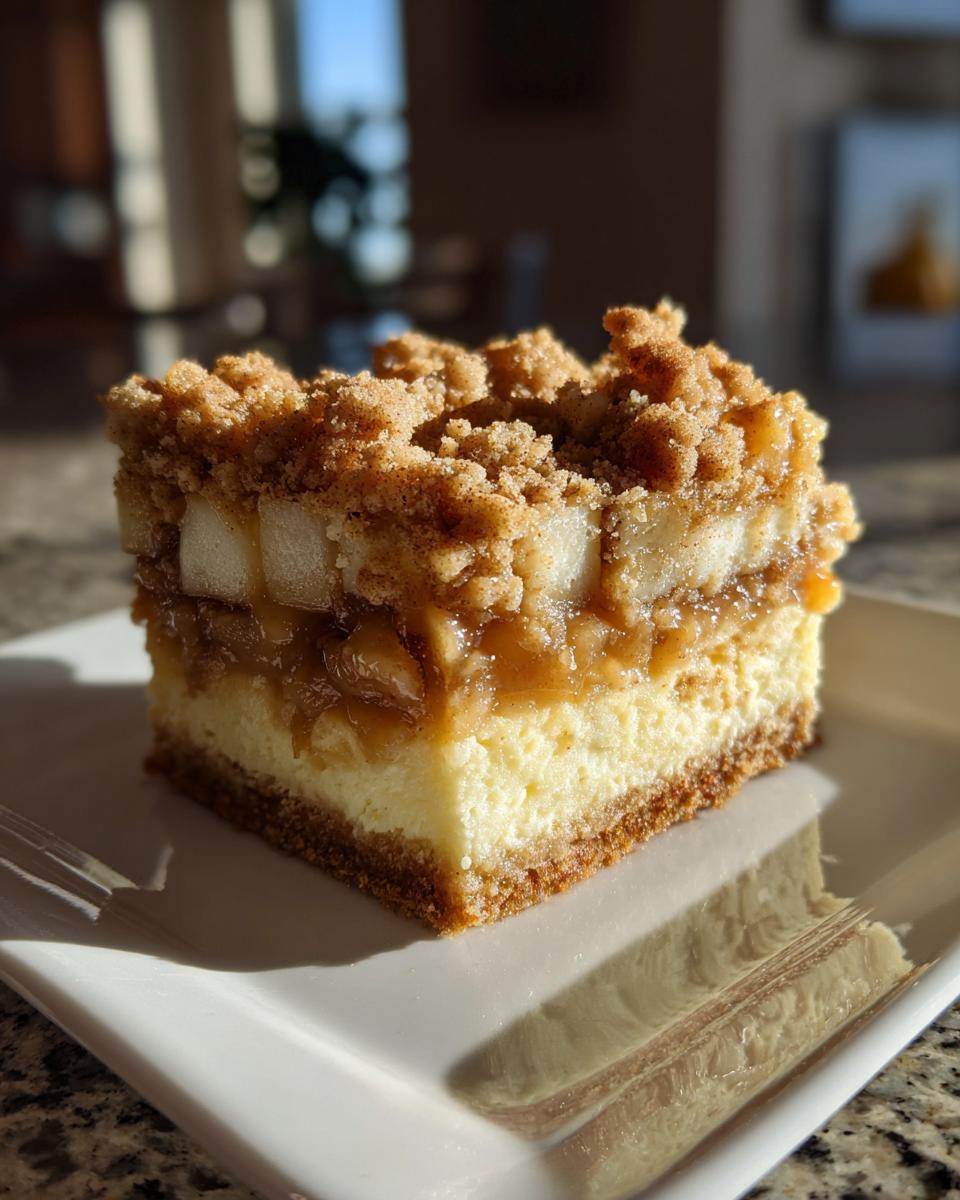
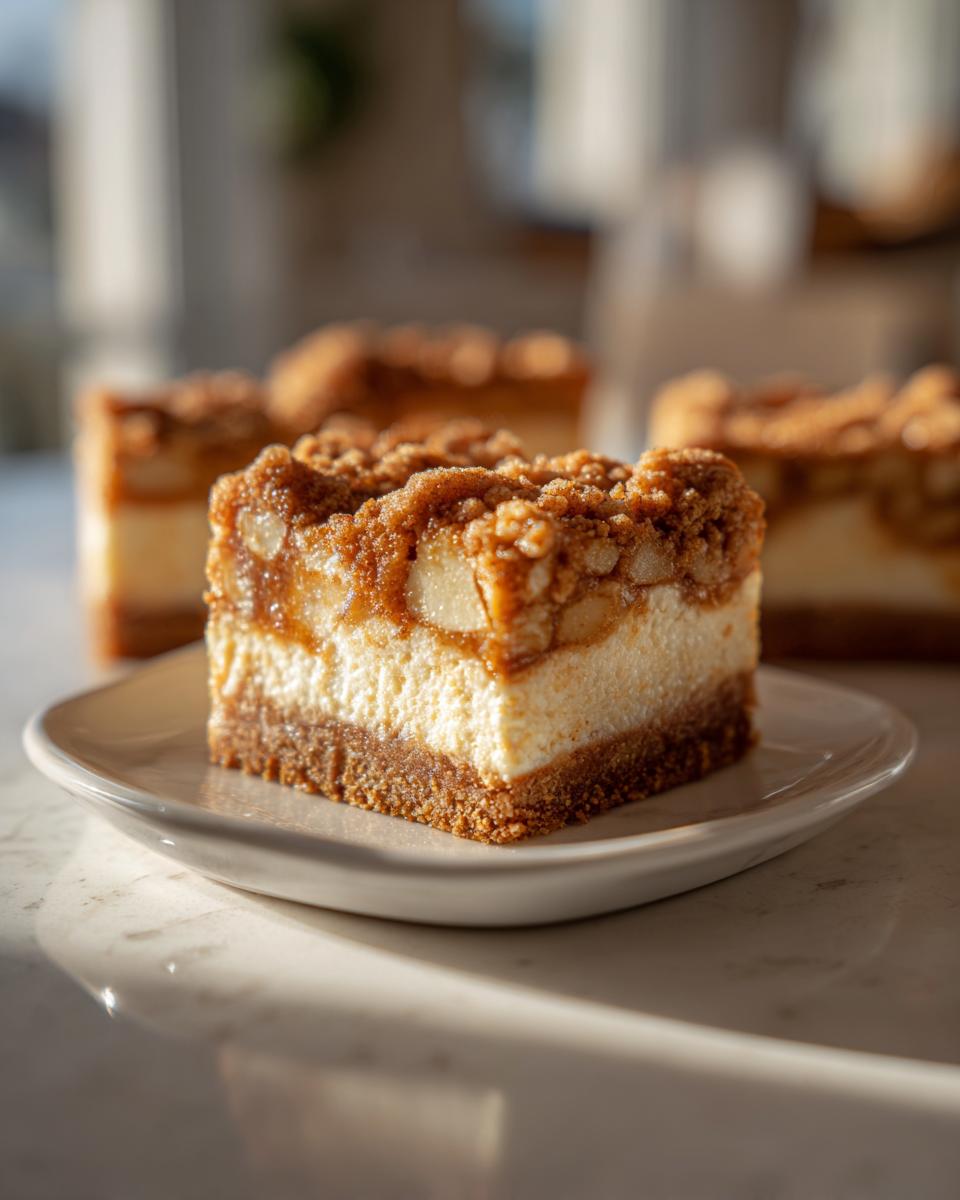
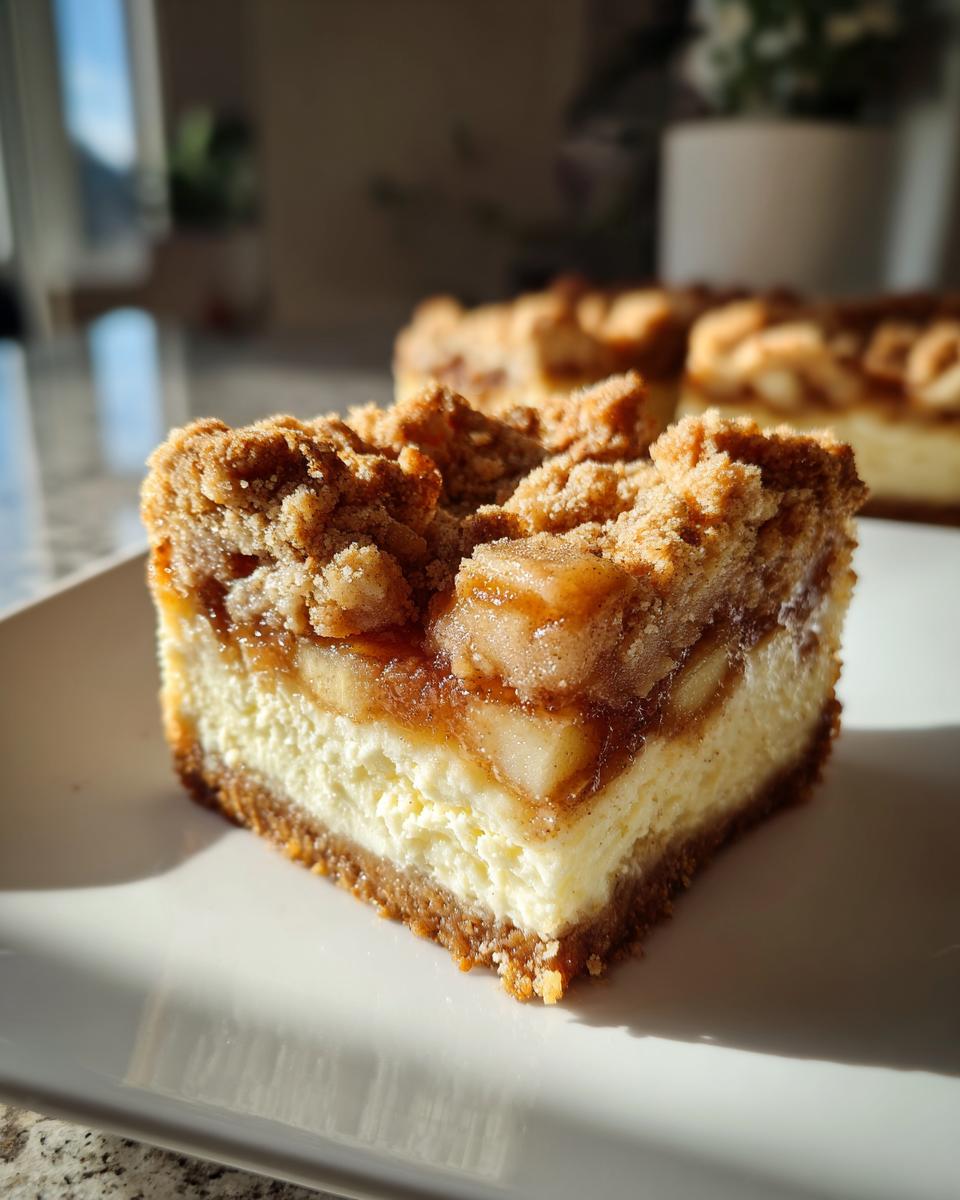
- Layers of Texture Heaven: You get that crisp, buttery graham cracker crust hugging a soft layer of spiced apples, all topped by that unbelievably smooth, cool cheesecake filling, and then—BAM!—a crunchy streusel on top. It’s a party in every bite!
- Perfectly Spiced Apples: We use just the right amount of cinnamon and a tiny bit of cornstarch so the apples are tender but never runny. They keep their shape beautifully against the rich cream cheese.
- Handheld Convenience: Forget trying to cut a perfect slice of pie! These bake up in a 9×13 pan and slice into perfect squares or bars. They are ideal for potlucks or serving a crowd without needing extra forks.
- The Cheesecake Dream: The filling is rich, tangy, and light all at the same time. It sets up perfectly firm once chilled, giving you that satisfying, smooth cheesecake experience without the water bath drama.
- Make-Ahead Magic: These actually taste better the next day! You can whip them up the day before your holiday party—think Thanksgiving or cozy autumn gatherings—and they’ll be perfectly chilled and ready to slice.
- Customizable Toppings: While the streusel is amazing on its own, they are begging for a drizzle of good caramel sauce, which totally elevates them into something show-stopping.
Essential Ingredients for Perfect Apple Cheesecake Bars
Okay, let’s talk parts. Since these apple cheesecake bars have four distinct layers, you need to keep your ingredients organized. Don’t worry, everything uses simple pantry staples, but the preparation of each component makes the difference between a good bar and an incredible one. Get everything measured out first, and organization is half the battle won!
For the Buttery Crust and Streusel Topping
This mix does double duty—it’s the foundation *and* the crumble topping, which I just love for streamlining things! You’ll need 2 cups of graham cracker crumbs. Make sure your butter is cold and cubed; that’s my non-negotiable rule for real crumb texture. Also in this bowl goes 1/2 cup granulated sugar, 1/2 cup all-purpose flour, and 1/2 cup packed brown sugar. Trust me, cutting in that cold butter makes the best little nuggets of goodness for both the bottom and the top!
For the Spiced Apple Layer
For the apples, I always go for Granny Smith because I love that sweet-tart punch against the cream cheese. You need about 4 medium apples, peeled, cored, and diced small. Toss those beauties with 1/4 cup granulated sugar, 1 teaspoon of ground cinnamon (smell that already?!), and 1 tablespoon of cornstarch. That starch is super important; it thickens up any apple juice that releases, stopping your gorgeous layers from getting soggy underneath. If you’re looking for alternative baking ideas like graham cracker toffee, the base ingredients here feel similar!
For the Creamy Cheesecake Filling
This part needs care, but it’s simple! You need 16 ounces of cream cheese, and I mean *softened*—room temperature, nice and pliable. Beat that with 1 cup of granulated sugar until it’s dreamy smooth. Then, add your 2 large eggs, but here’s the trick: add them in one at a time, mixing gently after each addition. You only want to mix until they are just incorporated. Over-beating the eggs is how you get those inevitable cracks later on!
Step-by-Step Instructions for Layered Apple Cheesecake Bars
Follow these steps closely, and you’ll have beautiful, professional-looking apple cheesecake bars that taste like they took all day. Trust me, this process is so straightforward—it’s why I love this Apple Streusel Bars Recipe so much for busy weekends. Make sure your oven is preheated to 350°F (175°C) before you start layering everything up!
Preparing the Crust and Pre-Baking
First things first: you need to make that crumb mixture we talked about. Combine your graham cracker crumbs, sugars, flour, and then cut in that cold butter until you get coarse crumbs. Take about two-thirds of that mixture and press it firmly and evenly into the bottom of your lined 9×13 pan. Don’t skip the pressing part; a solid base is everything! Pop that crust into your preheated oven and bake it for just 10 minutes. This step locks in the buttery flavor and stops the crust from getting totally soggy once the wet layers go on.
Assembling the Apple and Cheesecake Layers
While the crust is having its little bake, toss your spiced apples together in a bowl. Once the crust comes out, it needs to cool just slightly while you get the filling ready. Now, gently pour that smooth cream cheese mixture right over the warm crust. Next, spoon those fragrant, cinnamon-spiced apples evenly over the cheesecake layer. Finally, take that reserved crumb mixture—the one you set aside—and sprinkle it over the apples to create your beautiful streusel topping. This layering technique is what makes these fantastic Layered Dessert Bars. If you want to see how I tackle a pure cheesecake layer sometime, check out my classic New York-style recipe!
Baking, Cooling, and Serving Your Apple Cheesecake Bars
Time for the final bake! Put the assembled bars back into the 350°F oven for about 40 to 45 minutes. You are looking for the edges to be nicely set and the center should look mostly firm, maybe just a tiny wiggle left. The most important advice I can give you, learned from early baking mishaps, is this: you MUST let them cool completely on a wire rack first. Patience is key here! After they are cooled to room temperature, chill them in the refrigerator for at least 2 hours. This chilling time is what allows the cheesecake layer to firm up so you can slice them into beautiful, clean squares.
Tips for Making the Best Apple Cheesecake Bars
You’ve put in all the hard work building those gorgeous layers! Now, let’s talk about the nuances that take these apple cheesecake bars from good to legendary. Based on my years developing recipes—mixing the science I learned in nutrition class with the intuition from my family’s kitchen—I have a few golden rules for nailing the texture of every single component.
Choosing the Right Apples for Creamy Cheesecake with Apples
I already mentioned Granny Smith because, honestly, tart apples are your best friend here. They stand up to all that creamy, sweet cheesecake filling without getting mushy, and their bright flavor cuts through the richness perfectly. If you love a sweeter profile, try mixing half Granny Smith with half Honeycrisp or Fuji. But here’s the serious tip: that tiny bit of cornstarch in the apple layer is crucial. It absorbs any liquid the apples release while baking. If you skip it, you end up with a soupy mess between your crust and filling. Don’t skip the starch; it guarantees we get stable, ‘Creamy Cheesecake with Apples’!
Achieving a Flawless Cheesecake Set
We touched on this earlier, but it bears repeating: do not over-beat your cream cheese filling after the eggs are added! The minute the batter looks uniform, stop mixing. You’re building structure with air bubbles, but too many large bubbles mean cracks when they deflate in the oven or as they cool. Think gentle folding, not aggressive whipping, once those eggs go in.
My biggest fail, years ago when I first tried adapting a full cheesecake recipe into these bars, was cutting them too soon. I was serving them at a brunch and thought, “They look firm enough!” Nope. They immediately oozed everywhere. Seriously, you *need* that long chill time—at least two hours in the fridge, sometimes four if my kitchen is warm. Chilling is what transforms that soft baked layer into perfect, slicing-friendly, ‘Handheld Apple Cheesecake’ squares. It’s honestly non-negotiable for that clean presentation.
I also love using parchment paper when making these bars. It lets you lift the entire cooled slab out of the pan before slicing, which minimizes mess and keeps the integrity of all those layers intact. You can find my favorite method for prepping pans here at this chocolate chip cheesecake recipe—the lift-out technique works miracles for these bars too!
Variations on Classic Apple Cheesecake Bars
The beauty of these apple cheesecake bars is how easily they adapt to whatever you’re craving! If you’re looking for that ultimate comforting fall dessert flavor, you absolutely must try adding extra caramel. After the bars are completely chilled, take a jar of good quality caramel sauce and drizzle it generously back and forth over the top. It turns them into glorious Caramel Apple Cheesecake Squares!
For those who prefer a more autumnal, rustic feel, think about swapping out some of the streusel topping ingredients. If you want true Apple Crumble Cheesecake Bars, swap out half of the graham cracker crumbs in the streusel mixture for rolled oats. It adds a fantastic chewiness! If you’re feeling extra decadent and leaning into that salted caramel vibe, toss a handful of flaky sea salt over the top right before serving. You can explore more caramel ideas in my no-bake caramel apple trifle post, too. They’re so fun to customize!
Storage and Reheating Instructions for Apple Cheesecake Bars
When you manage to have leftovers of these incredible apple cheesecake bars—which, let’s be honest, is a genuine accomplishment because they disappear so fast—storing them correctly is key to maintaining that perfect layered texture.
Because we have that beautiful, fresh cream cheese filling, these bars absolutely need to stay chilled. Don’t even think about keeping them out on the counter overnight! Once they are fully cooled and sliced, arrange them in a single layer in an airtight container. If you have too many for one layer, don’t panic; use a piece of parchment paper or waxed paper between the layers. This stops the crumbly topping from sticking to the creamy layer above it. They will happily hang out in the refrigerator for up to four days. I promise, they are just as delicious on Day Three!
Now, here’s my personal preference on serving: you want them cold, but not straight-from-the-deep-freeze cold. If you pull them out of the fridge about 15 minutes before you plan to serve them, the cheesecake firms up just enough to hold its shape perfectly, but the flavors really bloom once they lose that initial icy chill. The crust retains just enough buttery crispness this way. I’ve never had luck “reheating” these, of course—they are not meant to be warm like an apple crisp! Serving them chilled is the best way to honor that creamy texture we worked so hard to achieve.
Time Commitments and Yield for This Recipe
Whenever I develop a layered dessert like this, the first question I always get is, “How long do I have to commit?” Because while these apple cheesecake bars taste like they took all day to assemble, the active time really isn’t too bad! I love showing off recipes that give you maximum payoff for minimum fuss, which is why I always try to keep my bakes approachable for weeknight efforts.
If you’re looking for Quick Apple Dessert Bars, you’ll be thrilled with this breakdown. Since we are mixing a couple of dough components and doing a pre-bake, the total time is a bit spread out, but your hands-on time is minimal:
- Prep Time: About 25 minutes. This covers the time it takes to mix the crust/streusel, dice the apples, and whip up the filling. Set a timer; it helps me keep moving!
- Cook Time: About 55 minutes total. That includes the 10 minutes for the crust, plus the 40–45 minutes for the final bake.
- Total Active Time: We’re looking at less than an hour of actual *doing*! That’s pretty great for such a show-stopping dessert, right?
Now, the hidden time commitment—and this is crucial, as we talked about before—is the chilling time. You need at least 2 hours in the fridge before you can cut them, but I always recommend 4 hours for the cleanest slices. If you need inspiration for dishes that come together even faster, check out my favorite quick and easy weeknight dinners!
As for how many delicious squares you get, this recipe is drafted specifically for a standard 9×13 inch pan, which yields a generous 18 servings. That’s perfect for taking to a party or just making sure you have enough to sneak a few squares throughout the week!
Frequently Asked Questions About Apple Cheesecake Bars Recipe
Whenever I put up a new recipe, I always get a flood of the same great questions. It tells me exactly what you all are worried about when you step into the kitchen, and I love clarifying those little details! Here are some of the most common things I hear about these beautiful apple cheesecake bars recipe variations.
What apples should I use for the best flavor and texture?
This is the number one question! For the ultimate contrast against the sweet cream cheese, you absolutely need a tart apple that holds its shape well. Granny Smith is my champion choice. They don’t break down into applesauce in the oven. If you use a softer apple like McIntosh, your apple layer might get too soft. I always recommend pairing Granny Smiths with something slightly sweeter, like a Fuji or Honeycrisp, just to create complexity in the **Sweet and Tart Apple Dessert**!
Can I skip chilling the bars and serve them warm?
Oh, I know the urge to dive right in is strong, especially when the kitchen smells like cinnamon and caramel! But please, resist! Cheesecake bars structurally rely on chilling to firm up properly. If you cut them warm, the filling, no matter how perfect your bake was, will ooze out—you’ll end up with a delicious mess, not clean Handheld Apple Cheesecake squares. A mandatory minimum of two hours in the fridge is required, and four hours is even better for that professional slice.
Is there an easy way to turn these into Caramel Apple Cheesecake Squares?
Absolutely! If you skipped the optional caramel drizzle in the main steps, you can easily layer on that gooey goodness at the end. Once your bars are fully baked and have cooled down to room temperature (but before you put them in the fridge!), warm up about a half-cup of good quality caramel sauce. Drizzle it back and forth over the entire surface. The warmth of the sauce helps it adhere nicely before you chill everything. This transforms them into amazing Caramel Apple Cheesecake Squares, perfect for your next holiday or Thanksgiving spread!
Can I adapt this recipe for a smaller 8×8 pan instead of 9×13?
You can, but you have to plan for extra baking time! Since the 9×13 pan gives you thinner, faster-baking layers, moving to an 8×8 pan means your vertical depth is much thicker. If you cut the recipe in half for an 8×8 pan, you’ll likely need to bake it for 20-25 minutes longer, maybe even more, and you’ll need to check for doneness very carefully. For simpler baking, especially if you’re looking for my **Easy Baked Cheesecake Bars**, I strongly recommend sticking to the larger pan size when you use this exact recipe.
If you’re curious about making other, simpler chilled desserts, I have a fantastic no-bake key lime cheesecake recipe that skips the oven entirely!
Estimated Nutritional Information for Apple Cheesecake Bars
I know that for many of us, tracking nutrition is just part of loving on our families, even when we are serving up something wonderfully decadent like these layered apple cheesecake bars. As a background in nutrition taught me, while these are certainly a treat, they are made with whole ingredients, which is always a win in my book!
Here is a general breakdown of what you can expect from one generous square of these Ultimate Caramel Apple Cheesecake Bars. Remember, since we are using fresh apples and homemade streusel, the exact numbers can shift a little based on the size of your apples or if you opt for that optional caramel drizzle! These figures are based on 18 servings as specified in the recipe details.
- Serving Size: 1 Bar
- Calories: Approximately 350 (This jumps up slightly if you add caramel!)
- Total Fat: Around 20g (A good chunk of that comes from our essential buttery crust!)
- Saturated Fat: About 12g
- Carbohydrates: Roughly 38g
- Sugar: About 30g (This accounts for natural sugars in the apples and the added sugars for structure and sweetness.)
- Protein: About 5g
- Cholesterol: Estimated at 65mg
This is just an estimate, of course. I always look at it like this: when you bake from scratch, you control exactly what goes in, which is miles better than anything store-bought! We’re feeding our families with love, and these beautiful Fall Apple Desserts are certainly made with the best care.
PrintUltimate Caramel Apple Cheesecake Bars with Streusel Topping
Make these layered apple cheesecake bars featuring a buttery crust, creamy filling, spiced apples, and a crunchy streusel topping. This recipe provides the perfect handheld dessert for fall gatherings or Thanksgiving.
- Prep Time: 25 min
- Cook Time: 55 min
- Total Time: 80 min
- Yield: 18 servings
- Category: Dessert
- Method: Baking
- Cuisine: American
- Diet: Vegetarian
Ingredients
- For the Crust/Streusel: 2 cups graham cracker crumbs, 1/2 cup granulated sugar, 1/2 cup all-purpose flour, 1/2 cup packed brown sugar, 1 cup (2 sticks) cold unsalted butter, cubed
- For the Apple Layer: 4 medium apples (like Granny Smith), peeled, cored, and diced, 1/4 cup granulated sugar, 1 teaspoon ground cinnamon, 1 tablespoon cornstarch
- For the Cheesecake Filling: 16 ounces cream cheese, softened, 1 cup granulated sugar, 2 large eggs, 1 teaspoon vanilla extract
- For the Caramel Drizzle (Optional): 1/2 cup caramel sauce
Instructions
- Prepare the crust and streusel: In a medium bowl, combine graham cracker crumbs, 1/2 cup sugar, flour, and brown sugar. Cut in the cold butter using a pastry blender or your fingers until the mixture resembles coarse crumbs. Set aside 1 1/2 cups of this mixture for the streusel topping; press the remaining mixture firmly into the bottom of a 9×13 inch baking pan lined with parchment paper. Bake the crust at 350°F (175°C) for 10 minutes.
- Prepare the apple layer: While the crust bakes, toss the diced apples with 1/4 cup sugar, cinnamon, and cornstarch in a separate bowl. Set aside.
- Prepare the cheesecake filling: In a large bowl, beat the softened cream cheese and 1 cup sugar until smooth. Beat in the eggs one at a time, then mix in the vanilla extract until just combined. Do not overmix.
- Assemble the bars: Pour the cheesecake filling evenly over the warm, pre-baked crust. Spoon the spiced apple mixture over the cheesecake layer. Sprinkle the reserved 1 1/2 cups of crumb mixture evenly over the apples to create the streusel topping.
- Bake: Bake at 350°F (175°C) for 40 to 45 minutes, or until the edges are set and the center is mostly firm.
- Cool and serve: Let the bars cool completely on a wire rack before chilling them in the refrigerator for at least 2 hours. Cut into squares. Drizzle with caramel sauce before serving if desired.
Notes
- For a more intense apple flavor, use a mix of tart and sweet apples.
- If you prefer a shortbread crust instead of graham cracker, substitute 1 cup of the graham cracker crumbs with all-purpose flour in the crust mixture.
- Chill the bars thoroughly; this helps the cheesecake layer set firmly for clean cuts.
Nutrition
- Serving Size: 1 bar
- Calories: 350
- Sugar: 30g
- Sodium: 210mg
- Fat: 20g
- Saturated Fat: 12g
- Unsaturated Fat: 8g
- Trans Fat: 0g
- Carbohydrates: 38g
- Fiber: 2g
- Protein: 5g
- Cholesterol: 65mg