

Isn’t it funny how the simplest fruits hold the most potential? You look at a bright orange sitting on the counter and think, “That’s just breakfast.” But I see magic! Today, we are perfecting the art of homemade candied orange slices, and I promise you, this is the easiest way to transform them into glossy, chewy, irresistible little jewels. Here at CravyBite Kitchen, we live by the idea that real food should feel special without needing a million complicated steps. These delicate citrus confections look gourmet, but they come together with simple pantry staples and a little bit of patience. If you want to know more about what drives our philosophy of no-fuss, heartfelt cooking, check out our story. Trust me, once you see how beautiful they are, you’ll be scrambling to find reasons to make them!
- Why This Is Your Go-To Recipe for Candied Orange Slices
- Gathering Ingredients for Homemade Candied Citrus
- Step-by-Step Instructions for Perfect Candied Orange Slices
- Optional Step: Making Chocolate Dipped Candied Orange Slices
- Tip for Success Making Candied Orange Slices
- Versatile Uses for Your Easy Citrus Garnish
- Storage and Keeping Your Chewy Orange Candy Fresh
- Frequently Asked Questions About Candied Orange Slices
- Estimated Nutritional Data for Candied Orange Slices
Why This Is Your Go-To Recipe for Candied Orange Slices
If you try to make these even once, I know you’ll skip every other recipe out there. Why? Because this method guarantees results! We take the guesswork out of preserving citrus so you get that wow factor every time without a ton of stress. This is the most reliable technique for beautiful candied orange slices.
- They dry perfectly glossy and translucent—no dull or sticky slices here!
- The texture is exactly what you want: wonderfully chewy when you bite in.
- They are so versatile; you can use them for everything from cocktail garnishes to snacks.
Achieving That Perfect Glossy and Chewy Texture
It all comes down to timing, honestly. That step where we bring them almost to a boil and then drain them—that’s the blanching. It coaxes the bitterness right out of the pith so you only taste the sweet orange. Then, the very long soak time, where they sit overnight in the syrup, lets that sugar fully penetrate the fruit cells. That deep absorption is what locks in moisture, creating that deeply set, chewy texture rather than a brittle one.
Gathering Ingredients for Homemade Candied Citrus
Okay, let’s talk supplies! For these incredible treats, you don’t need a specialty store trip—just a few simple things you likely have on hand. We need three oranges, three cups of water, and three cups of that essential white sugar. If you plan on going the extra mile (and trust me, you should!), grab four ounces of semi-sweet chocolate and some flaky sea salt for dipping later on. It’s amazing how these few items turn into something so vibrant!
Ingredient Notes and Substitutions
When you’re picking your oranges, look for ones that feel heavy for their size and have really bright, unblemished skin—that usually means they’ll be firm, which is key. We can’t have mushy slices! Don’t you dare pour that leftover sugar syrup down the drain after you pull the finished slices out. That nectar is liquid gold! It works beautifully to sweeten up plain black tea, or I sometimes use it to thin out a simple syrup for cocktails.
Step-by-Step Instructions for Perfect Candied Orange Slices
This is where the transformation happens! Don’t worry if it looks like a lot of steps; each one is really straightforward. We are slow-cooking these beauties to get that gorgeous, see-through look. Once you get the hang of it, you’ll see why I call this the easiest way to make candied orange slices. First, let’s handle those oranges so they don’t taste bitter at all.
Preparing and Blanching the Orange Slices
First things first, wash those oranges really well! Then, you need to slice them thinly. I aim for about 1/8 of an inch thick—not too thick, or they take forever to candy. Trim off the ends too. Now, for removing that bitter pith: take your slices and put them in a pan, cover them with cold water, and bring it to a boil. Once it boils, dump the water out right away. You have to do that whole process—boil, drain, repeat—three times total. Yes, three times! It feels redundant, but it’s vital because it pulls out that harsh flavor so the sugar can take over completely.
The Slow Simmer and Overnight Soak for Candied Orange Slices
After blanching, it’s syrup time! In the same pot (less washing, yay!), whisk together the three cups of sugar and three cups of water until that sugar dissolves when you heat it up. Slice those blanched beauties back into the simple syrup. You want a very gentle simmer here, not a rolling boil. Keep it low and slow for about an hour, stirring every once in a while so nothing sticks to the bottom. Once they start going translucent, you’re almost done with the active cooking! Then, you kill the heat and just let them sit. Seriously, let them soak in that sweet syrup overnight, or at least eight hours. That long soak is the secret weapon for truly incredible candied orange slices.
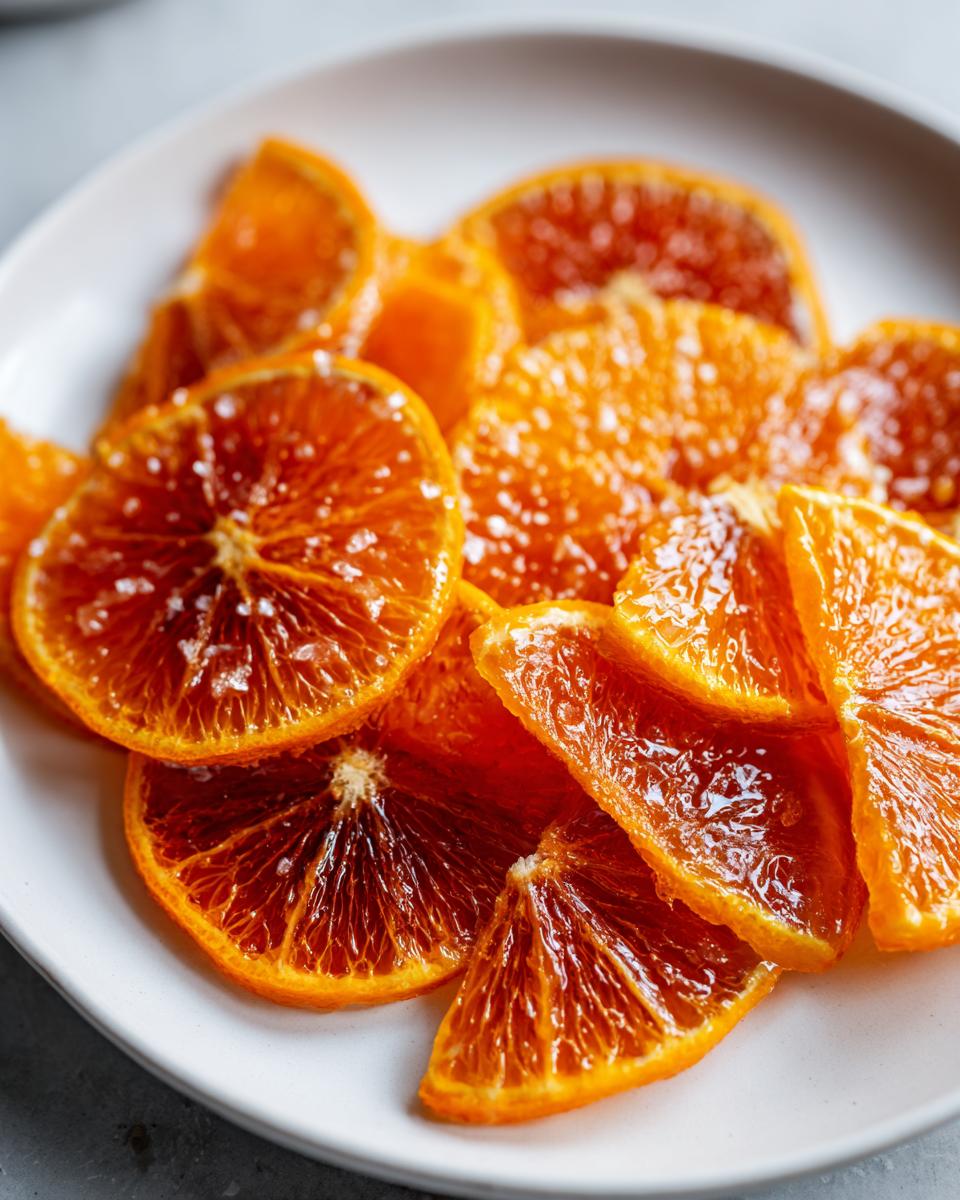
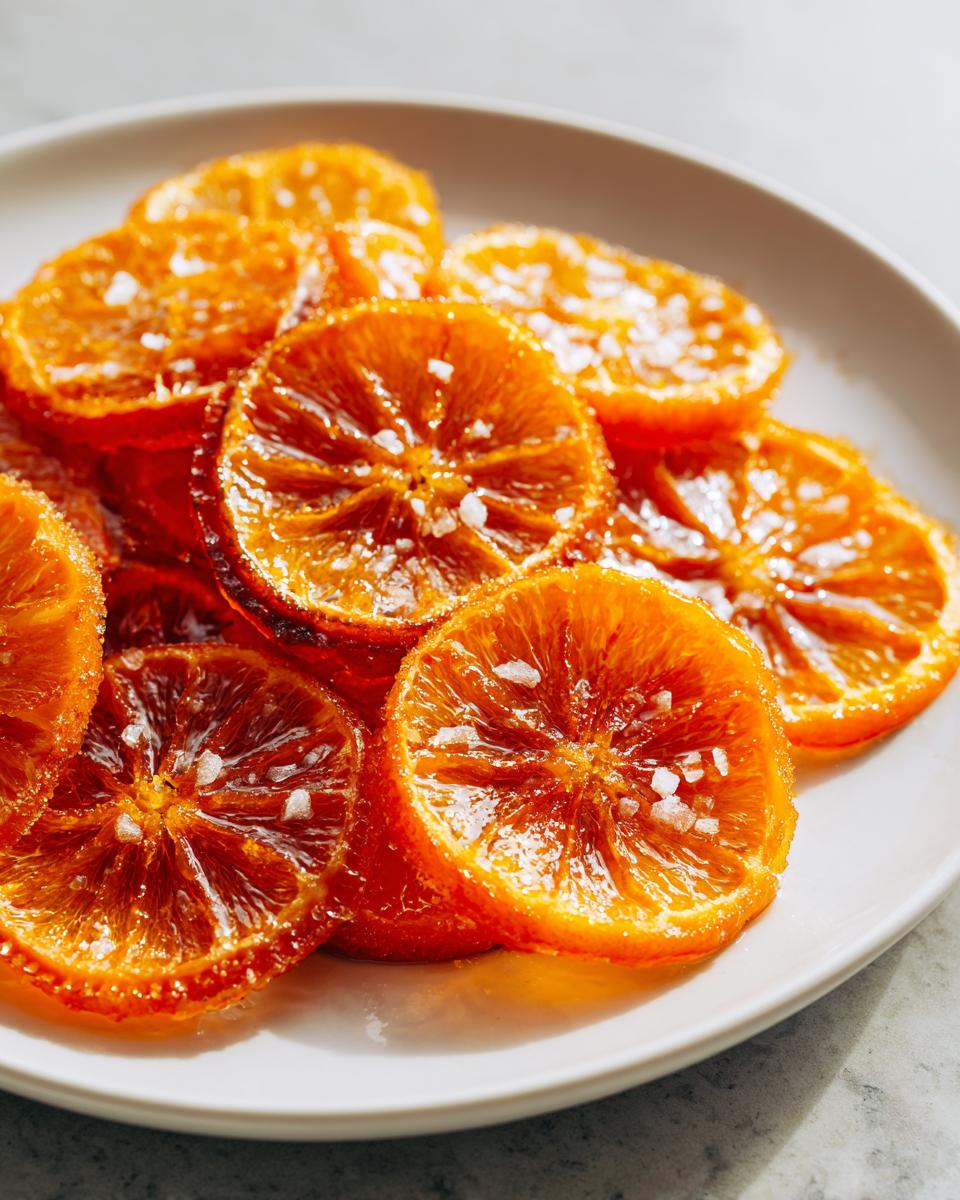
Drying Your Sweet Orange Slices Recipe Results
The next day, gently fish them out with a slotted spoon and let the extra syrup drip off—don’t shake too hard! Place them on a wire rack set over a baking sheet. They need air circulation to dry nicely. They should dry at room temperature for about 12 to 24 hours. The perfect texture is when they feel tacky to the touch, but no wet syrup comes off on your finger. If you’re in a hurry, you *can* bake them at a super low oven temp, like 175°F, for an hour or two, but keep an eye on them! If you’re wondering how to use this incredible flavor in a cake, check out my moist orange juice cake recipe!
Optional Step: Making Chocolate Dipped Candied Orange Slices
Once your beauties are fully dry and wonderfully chewy, it’s time for the decadent optional step: turning these into incredible chocolate dipped orange slices! This addition takes them straight from a lovely snack to a true gourmet dessert topper. It’s honestly so simple; you just need to melt about four ounces of good semi-sweet chocolate. I usually do this gently in a double boiler, but the microwave works too—just do it in short bursts so you don’t scorch it.
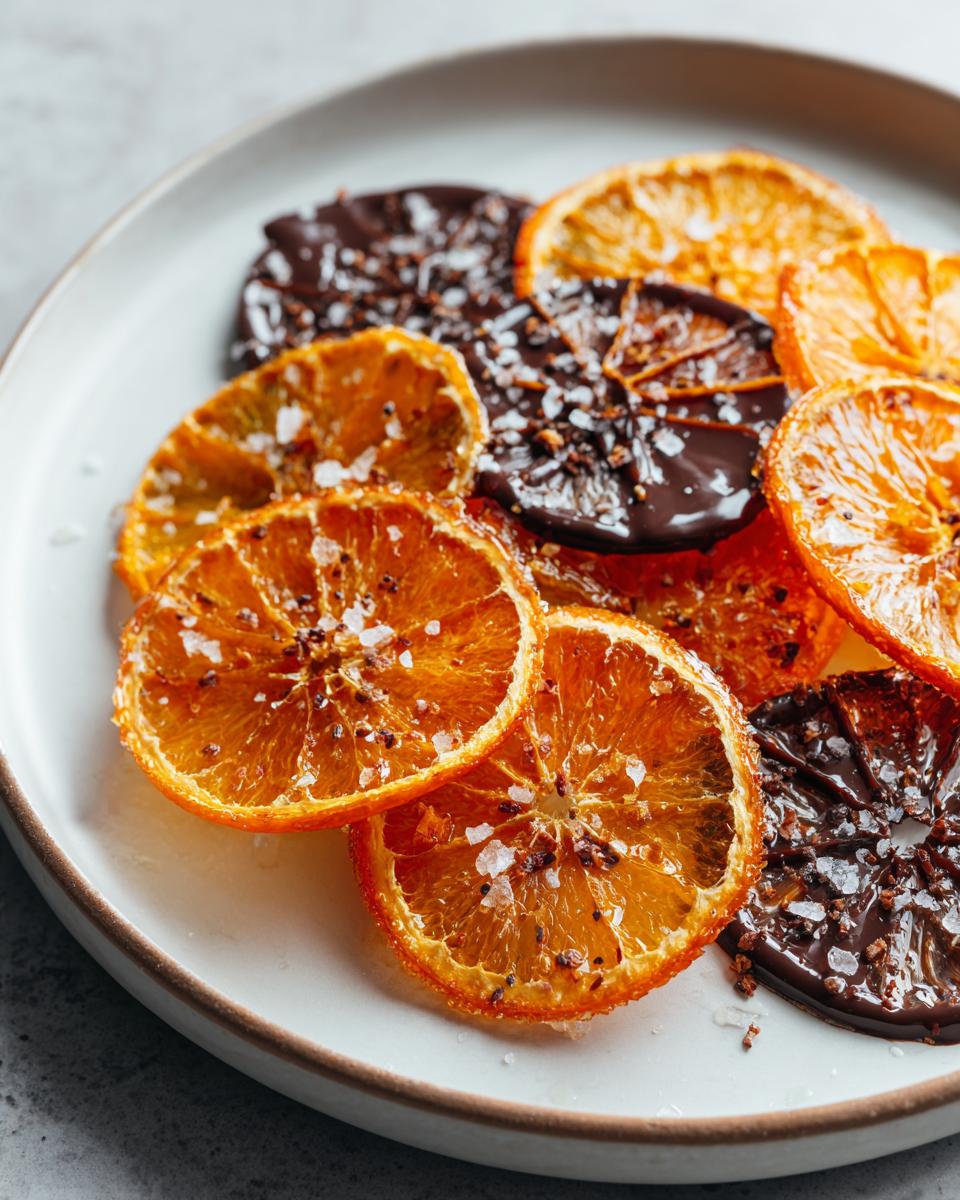
When the chocolate is silky smooth, grab your perfectly dried candied orange slices. Dip about half of the slice into the melted chocolate, letting the excess drip off back into the bowl. Lay them back on that same wire rack immediately. For the absolute best flavor, sprinkle a tiny pinch of flaky sea salt right on top of the wet chocolate before it sets.
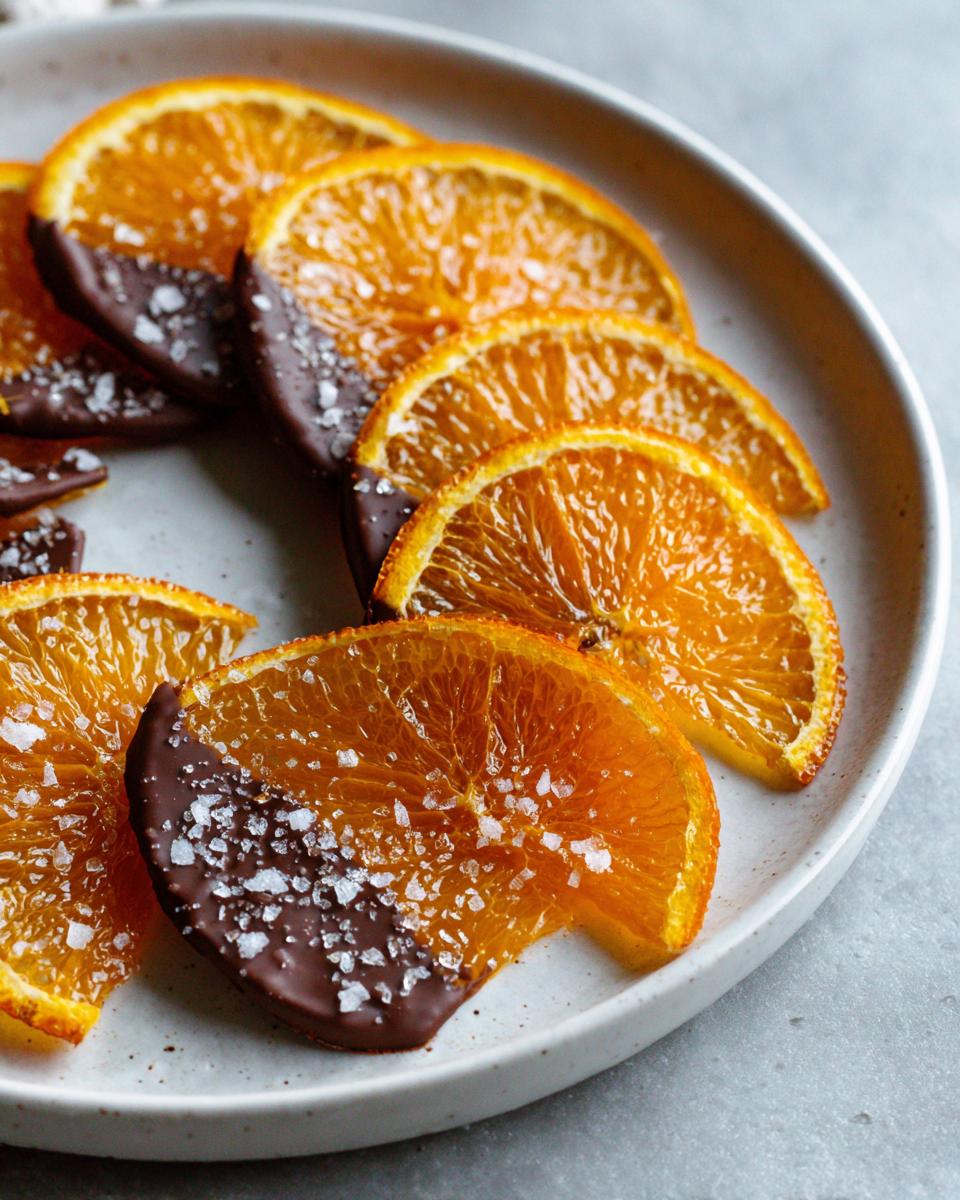
Give them an hour or so at room temperature for the chocolate coating to firm up completely. These finished chocolate dipped orange slices are unbelievable when paired with a dark chocolate cake or just eaten straight out of the fridge. They make the most stunning, edible decorations for cakes!
Tip for Success Making Candied Orange Slices
I want you to feel totally confident when you make these, so I have a couple of little insider secrets—Jess’s Pro Tips, if you will—to keep everything running smoothly. When you are simmering the oranges, really watch that heat. If the syrup starts bubbling too hard, those poor slices can break apart, and you’ll end up with sticky bits instead of perfect rounds! Keep it at a bare, slow simmer when they are cooking for that hour.
Also, when it comes time to dry your beautiful candied orange slices, resist the urge to rush them with high heat or cover them. They need airflow! If the top dries faster than the bottom, they can get a strange texture. If you notice them sticking to the rack at all while drying, just gently nudge them with a small offset spatula; they usually release fine once they’ve firmed up a bit.
Versatile Uses for Your Easy Citrus Garnish
Once you have mastered making these beautiful, chewy orange discs, the fun really begins! Seriously, they go way beyond just being a tasty snack. I always make a double batch because they are such an easy citrus garnish that elevates everything instantly. They bring that stunning, slightly old-fashioned flair to whatever mug or platter they land on. You’ll be amazed how quickly you use up a whole batch just by finding little ways to dress things up!
I find myself using them most often during the holiday season—think cheese boards or little festive goodie bags—but they are fantastic year-round too. They are also wonderful just stacked in a little jar on the counter for an afternoon tangy sweet snack when you need a hit of sunshine.
Candied Orange Slices as Gourmet Dessert Toppers
If you want your baking to suddenly look like it came from a fancy bakery, this is how you do it! These slices are perfect as gourmet dessert toppers. Think about topping a rich, dark chocolate cheesecake or a classic bundt cake—the bright orange cuts through the richness so beautifully. They look incredibly sophisticated as edible decorations for cakes, especially when you use the chocolate-dipped ones we talked about earlier. They truly shine right alongside coffee-flavored desserts or anything with espresso or almond notes. I’ve even used them to make homemade syrup for vanilla ice cream—pure luxury!
Storage and Keeping Your Chewy Orange Candy Fresh
The best thing about making candied orange slices is that they are basically preserved! That long process in the sugar syrup is what makes them last so long. Once your slices are totally dry—and I mean totally dry, no stickiness allowed—place them right into an airtight container. I prefer keeping mine at cool room temperature; don’t worry about the fridge, as that can sometimes make them feel weirdly damp.
Stored properly, treated like a true preserved orange slices tutorial guide, these incredible chewy orange candy treats will stay perfect for several weeks. Enjoy your tangy sweet snack for a long time!
Frequently Asked Questions About Candied Orange Slices
Are candied orange slices vegan?
They absolutely are! Since this recipe only calls for oranges, water, and sugar, it fits perfectly into a vegan diet. It’s a natural choice if you’re looking for a delicious vegan candied fruit recipe. You just need to make sure that if you dip them in chocolate, you use a dark chocolate that doesn’t contain any milk solids. Easy peasy!
Can I make these without blanching the oranges?
Oh, please don’t skip that part! I know it feels like an extra chore when you’re excited, but blanching those slices three times is critical. If you skip it, that bitter pith flavor just won’t go away, no matter how much sugar you use. You’ll end up with a mostly white, slightly bitter slice rather than a shiny, chewy, sweet treat. Taking those few extra minutes to boil and drain ensures you get that bright flavor profile you’re looking for.
How long does it take to make candied orange slices?
This is one of those recipes where the “active time” is short, but the “waiting time” is long, which is great for busy afternoons! The actual cooking—the blanching and the simmering—only takes about an hour and a bit. However, for the best results, you must let them soak in the syrup overnight (that’s eight hours minimum). Then, you need another 12 to 24 hours for them to dry completely on the rack. So, you’re looking at about ten hours total, but most of that time, they are just sitting happily on the counter all by themselves!
Estimated Nutritional Data for Candied Orange Slices
Here’s the breakdown for folks who like to keep track! Remember, this is just an estimate, and these numbers sit right in the middle of the range because they don’t account for that amazing chocolate dip we talked about, which adds a bit more fat and sugar. If you skip the optional chocolate, these are a fantastic, vibrant, tangy sweet snack!
Based on one slice (not dipped in chocolate):
- Serving Size: 1 slice (about 1/40th of the batch)
- Calories: 120
- Sugar: 30g (Yes, it’s sugar-preserved fruit, so it’s sweet!)
- Sodium: 2mg
- Fat: 0.1g
- Carbohydrates: 31g
- Protein: 0.2g
These figures are based on the core recipe using only oranges and the sugar syrup. If you decide to smother half of them in semi-sweet chocolate, you should definitely look closer at the nutrition panel on your chosen chocolate bar—it will push those fat and sugar numbers up a bit. But hey, they are for special occasions, right? Everything in moderation, even homemade goodness!
PrintEasy Homemade Candied Orange Slices Recipe

You can make glossy, chewy candied orange slices using this simple recipe. These sweet and tangy citrus confections are perfect for garnishing cakes, decorating cocktails, or enjoying as an edible gift.
- Prep Time: 20 min
- Cook Time: 1 hour 15 min
- Total Time: 9 hours 35 min
- Yield: About 40 slices 1x
- Category: Dessert
- Method: Simmering
- Cuisine: American
- Diet: Vegan
Ingredients
- 3 small oranges or tangelos
- 3 cups water
- 3 cups white granulated sugar
- Optional: 4 ounces semi-sweet chocolate for dipping
- Optional: Flaky sea salt for finishing
Instructions
- Prepare the oranges: Wash the oranges well. Slice them thinly, about 1/8 inch thick. Discard the ends.
- Blanch the slices: Place the orange slices in a saucepan and cover them with cold water. Bring the water to a boil, then immediately drain the slices. Repeat this boiling and draining process two more times to reduce the bitterness of the pith.
- Make the syrup: In the same saucepan, combine the 3 cups of water and 3 cups of sugar. Heat over medium heat, stirring until the sugar dissolves completely.
- Simmer the oranges: Add the blanched orange slices to the sugar syrup. Bring the mixture to a gentle simmer. Reduce the heat to low and cook slowly for about 1 hour, or until the slices look translucent. Stir occasionally to prevent sticking.
- Cool and soak: Remove the pan from the heat. Let the orange slices soak in the syrup overnight, or for at least 8 hours, to fully absorb the sugar.
- Drain the slices: Remove the slices from the syrup using a slotted spoon. Let excess syrup drip off.
- Dry the slices: Place the slices in a single layer on a wire rack set over a baking sheet. Allow them to dry at room temperature for 12 to 24 hours until they feel tacky but not wet.
- Optional chocolate dip: If desired, melt the chocolate in a double boiler or microwave. Dip half of each dried slice into the melted chocolate. Place them back on the wire rack. Sprinkle immediately with flaky sea salt, if using.
- Final dry: Let the chocolate set completely before serving or storing.
Notes
- For the best results, use firm, brightly colored oranges.
- You can use the leftover sugar syrup to sweeten tea or make simple syrup for cocktails.
- These preserved orange slices store well in an airtight container at room temperature for several weeks.
- If you want a quicker dry time, you can bake them in a very low oven (175°F) for 1 to 2 hours, checking frequently.
Nutrition
- Serving Size: 1 slice
- Calories: 120
- Sugar: 30g
- Sodium: 2mg
- Fat: 0.1g
- Saturated Fat: 0g
- Unsaturated Fat: 0g
- Trans Fat: 0g
- Carbohydrates: 31g
- Fiber: 0.5g
- Protein: 0.2g
- Cholesterol: 0mg