
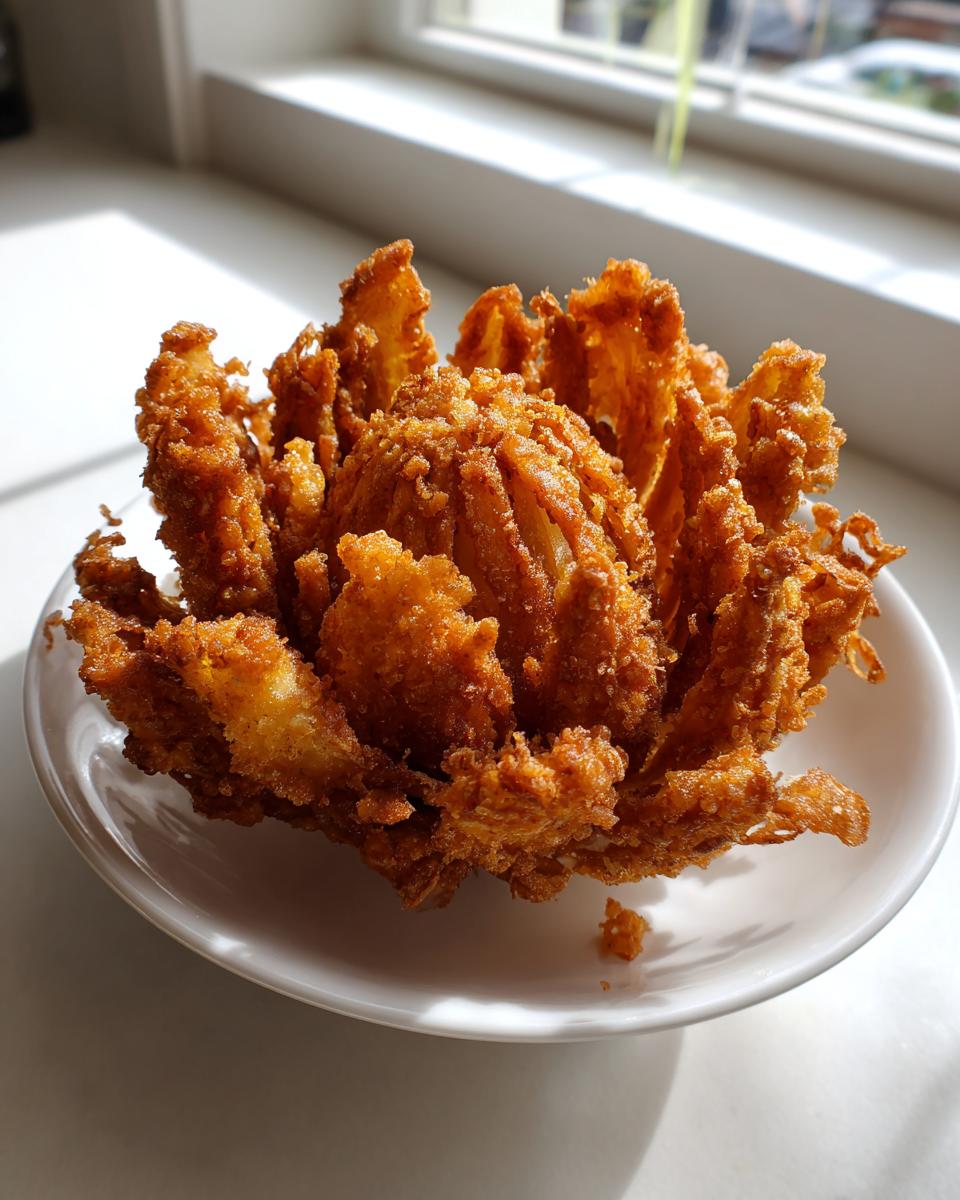
You know that moment when you’re at a restaurant, and that gorgeous, crispy, onion flower arrives at the table? Don’t tell me you don’t feel a rush! For years, I thought making incredible blooming onions at home was some secret technique only chefs could master. Trust me, after too many failed attempts where my onion just flopped over, I finally cracked the code.
This isn’t just another recipe; this is the ultimate, easy-to-follow guide to achieving that perfect, spicy-seasoned crunch that separates the petals just right. We’re going to nail the tricky cut and develop a batter that actually clings, so you can recreate that signature restaurant style onion appetizer right in your own kitchen. Get ready for the crispiest appetizer you’ve ever made!
- Why This Homemade Blooming Onion Recipe Is Your New Favorite Crowd Pleasing Party Appetizer Fried
- Ingredients for the Ultimate Blooming Onion Recipe
- How to Cut a Blooming Onion: Mastering the Technique
- Creating the Best Blooming Onion Batter
- Step-by-Step Instructions for Frying Your Blooming Onions
- Tips for Success with Your Copycat Blooming Onion
- Serving Suggestions for This Signature Onion Appetizer
- Storage and Reheating Instructions for Leftover Blooming Onions
- Frequently Asked Questions About Making Blooming Onions
Why This Homemade Blooming Onion Recipe Is Your New Favorite Crowd Pleasing Party Appetizer Fried
I’ve tried so many versions over the years, and honestly, most of them look sad and soggy when they come out of the pot. Not this one! When I finally figured out the perfect spice blend for the coating—you know, the one that tastes exactly like *that* place—I knew I had a winner.
This homemade blooming onion recipe is worth the small effort because:
- The club soda in the batter creates tiny air pockets, giving you unbelievable crispiness that lasts.
- We rely on fresh, potent spices, so the flavor beats any restaurant style onion appetizer. Seriously!
- My cutting technique, which I’ll show you next, is foolproof and guarantees a beautiful bloom every time.
Forget fussy starters; this crowd pleasing party appetizer fried sensation is what happens when you actually trust your own kitchen skills. It’s impressive, delicious, and shockingly simple once you know the tricks!
Ingredients for the Ultimate Blooming Onion Recipe
When I first tried making a copycat blooming onion, I kept messing up the coating because I wasn’t organized. You need a plan! Laying out your ingredients clearly makes the whole deep-frying process much calmer. Everything for the onion itself goes in one group, and the unbelievably good dipping sauce gets its own lineup.
You need one absolutely massive, beautiful sweet onion for this—Vidalia is my go-to because it handles the heat without totally falling apart. The oil, of course, needs to be ready, but for now, let’s gather all our dry goods and liquids. Once you have these ready, you are halfway to frying this incredible fried onion flower recipe!
If you love making things from scratch like I do, you might also want to check out my recipe for a rich French Onion Dip sometime soon, but for right now, focus on this beauty!
Ingredients for the Spicy Blooming Onion Dipping Sauce Recipe
Don’t skip the sauce, seriously! This is what takes your appetizer from good to absolutely legendary. It’s creamy, it’s got that horseradish kick, and it plays so well with the spice in the batter. You just whisk these together and chill—no cooking required!
- 1 cup mayonnaise (Use the good stuff!)
- 2 tablespoons ketchup
- 1 tablespoon prepared horseradish (Use the creamy kind here)
- 1 teaspoon paprika
- 1/2 teaspoon cayenne pepper (For that requested slow burn!)
- 1 teaspoon Worcestershire sauce
How to Cut a Blooming Onion: Mastering the Technique
Alright, listen up, because this is where most people mess up their fried onion flower recipe. If the cuts aren’t right, the onion won’t bloom when it hits the hot oil—it’ll just look like a weird, slightly exploded onion ball. The goal is to get those ‘petals’ to peel back beautifully. Take your peeled, large, sweet onion—honestly, bigger is better here, so grab the fattest one you can find!
You need the root end to stay perfectly intact; this is the anchor that holds the whole thing together. Start by making a vertical cut near the root, but stop about half an inch away from the base. Then, simply rotate the onion about 45 degrees and make another cut, continuing until you have about 16 to 20 wedges. Don’t worry about perfection yet; just get those deep scores in.
Once you’ve cut it all the way around, gently set it cut-side down on your cutting board and give it a reassuring little press. Poof! It should start opening up like it’s stretching after a long nap. My little trick, which I learned from my grandpa, is to put the onion into a bowl of really cold ice water for about 15 minutes after cutting. This shocks the layers and helps them separate even more dramatically when they fry. Don’t skip that ice bath!
Creating the Best Blooming Onion Batter
Okay, now that our onion is chilled and ready to bloom, we’ve got to make sure the coating sticks and gets super crispy. This isn’t just flour; we are building flavor and texture into what I honestly believe is the best blooming onion batter on the planet. In my first bowl, I mix all the dry ingredients—the flour, the cornstarch (that’s our secret to extra crunch!), plus all those savory spices like paprika and garlic powder.
In the second bowl, we combine our eggs, milk, and here’s a little something that makes all the difference: club soda! That fizzy water introduces lightness. When it hits the hot oil, it creates unbelievable texture in your blooming onions. Now, for my expert tip: whisk the wet into the dry until they are *just* combined. I mean it—a few little streaks of flour are totally fine! Overmixing builds gluten, and we do not want a tough coating; we want flaky and crisp. If you’re looking for another great crispy bite, check out my cheese straws recipe next!
Step-by-Step Instructions for Frying Your Blooming Onions
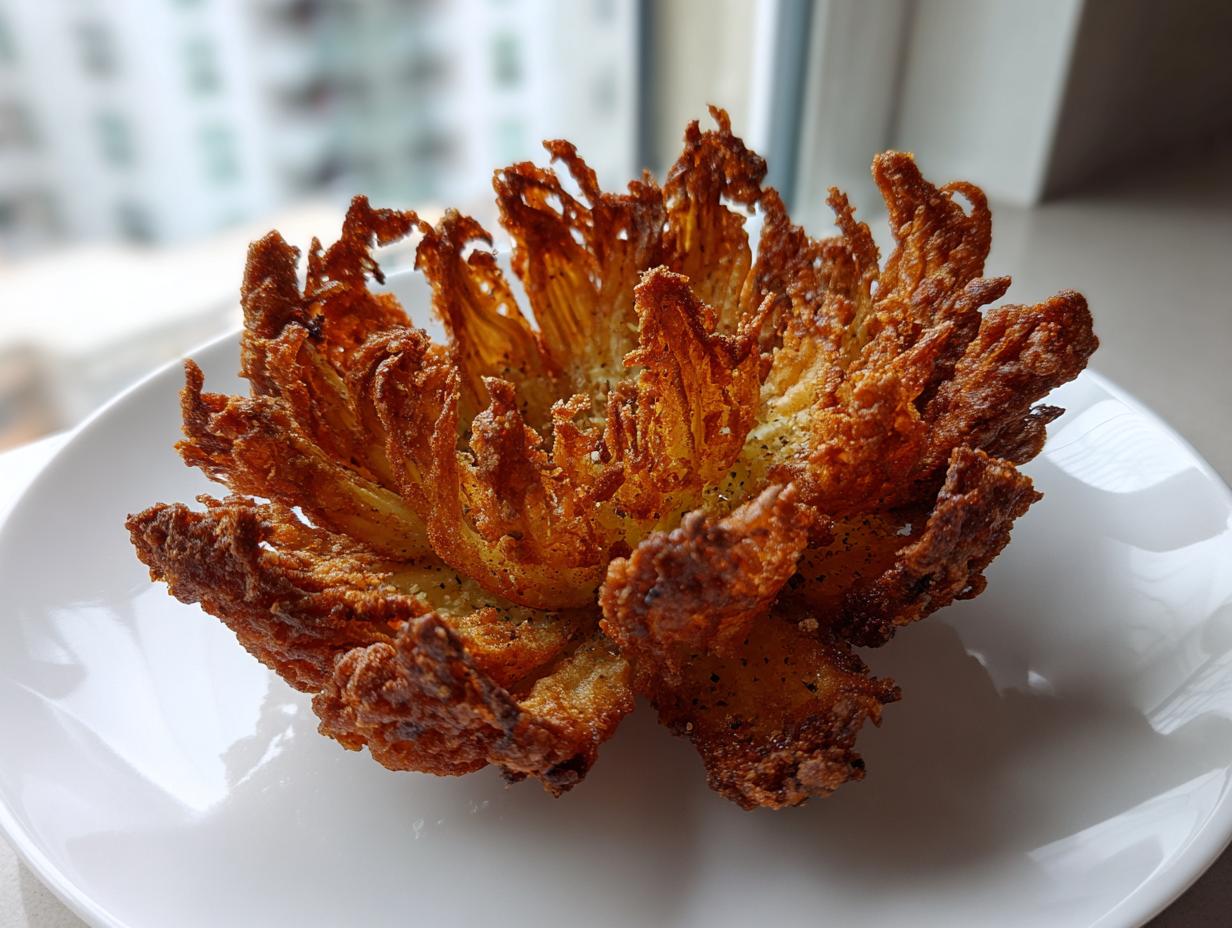
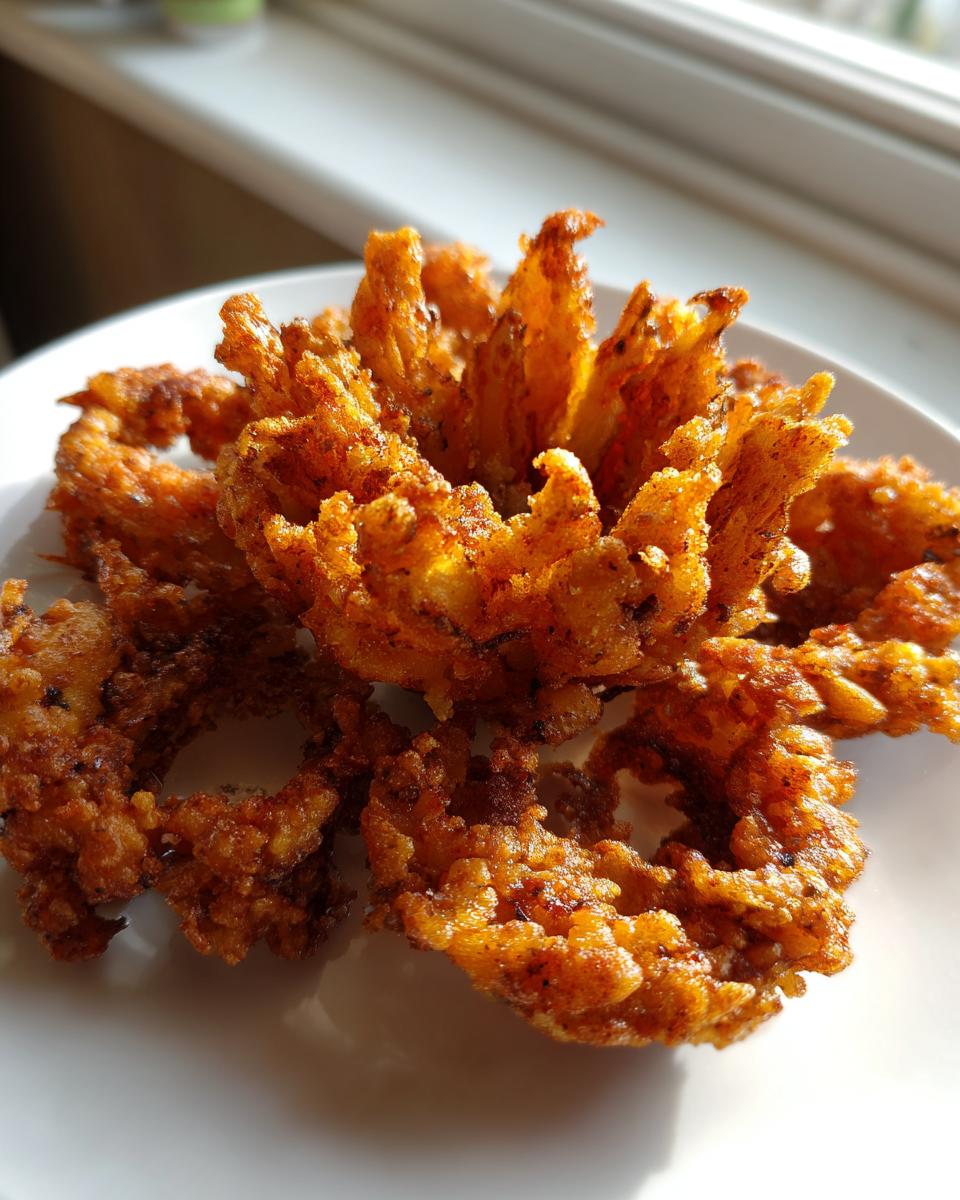
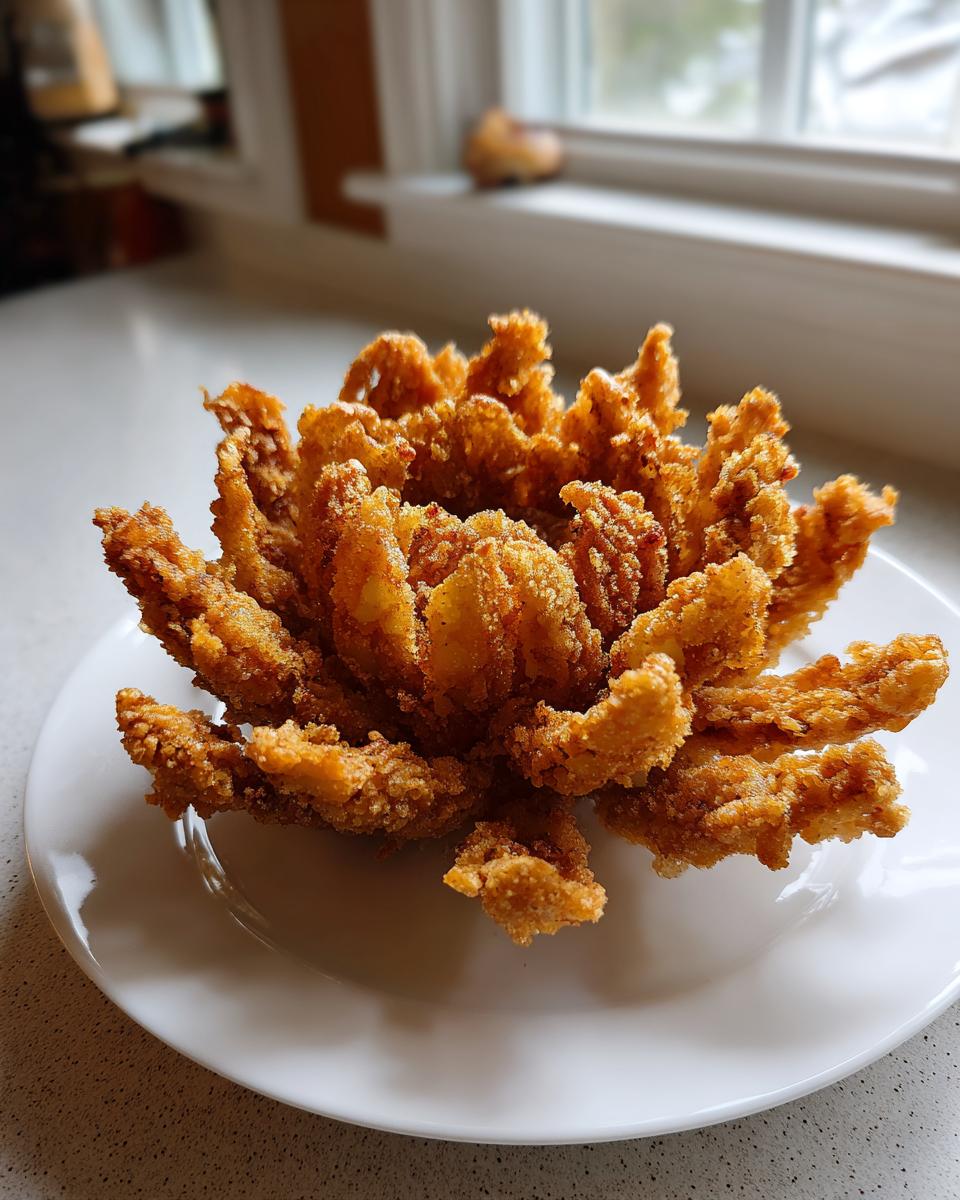
This is the moment of truth, friend! If you’ve done your prep work right—the ice water soak and the perfect batter—this is going to be smooth sailing. First thing’s first: get your oil ready. You need good vegetable oil (about three inches deep in a heavy pot) heated precisely to 375 degrees F. Temperature is everything here; too cool and your blooming onions get greasy, too hot and the batter burns before the thick onion cooks through.
Next, you have to dry that onion from the ice bath. Use tons of paper towels and really pat it down. Any water will cause a violent oil reaction, and honestly, we need to keep things a little calmer than that! Once it’s totally dry, dip that opened flower into your batter. Make sure every single layer and crevice gets covered. Lift it up and let the excess drip off for a good 15 seconds.
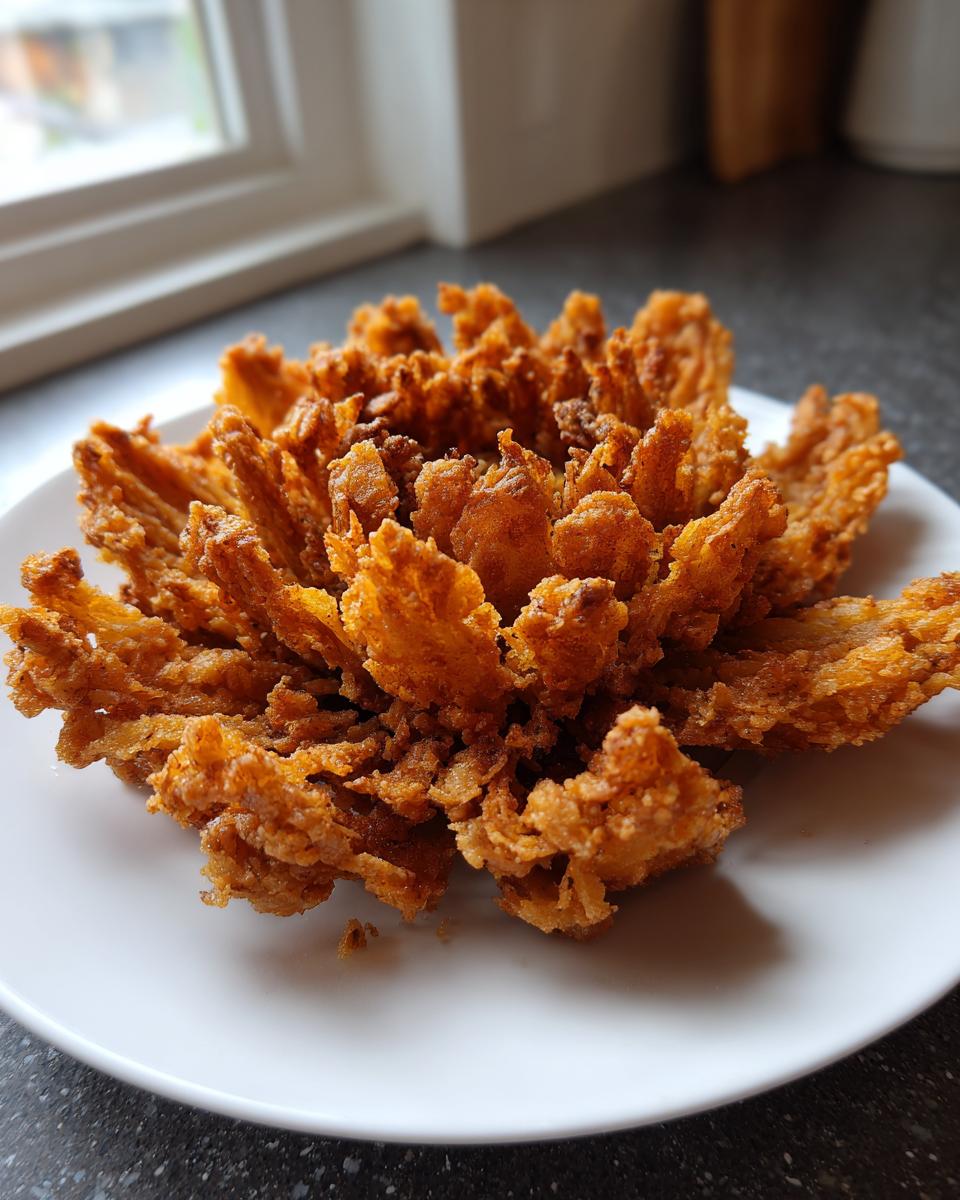
Now, the tricky part. You have to feed it to the hot oil carefully. Hold onto that root end while you slowly lower the onion in. You need to hold it for about 30 seconds until you feel that spiced batter firm up in the heat—this helps keep the petals suspended! After that, let go and let it fry for about 5 to 7 minutes total. Be sure to gently turn it every so often so you get that gorgeous, even golden-brown color all around. When it comes out, drain it on a wire rack and immediately sprinkle on some extra salt. If you love that rich, fried crunch, you have to try my fried pickles recipe next!
Tips for Success with Your Copycat Blooming Onion
I want you to have the best possible experience making this amazing appetizer! The little things make all the difference when you’re aiming for that perfect copycat blooming onion. Remember how I mentioned soaking it in ice water? You must dry it after that soak. I mean *really* dry it with paper towels—like you’re trying to prove a point to the water. Any residual moisture equals dangerous hot oil splattering, and frankly, soggy batter!
Once that gorgeous, golden bloom comes out of the oil, don’t wait a second! Sprinkle on a little extra salt immediately while the surface is still tacky. That salt is going to stick perfectly and give you that savory punch. For those days when I’m trying to keep things lighter, I sometimes try the air fryer blooming onion method, which I briefly covered in the notes. You still need to use that thick batter but spray it like crazy with cooking oil before putting it in the basket!
Serving Suggestions for This Signature Onion Appetizer
Wow, you made it! Now that you have this giant, beautiful basket of fried goodness, what are you serving it with? Since this is such a rich, decadent signature onion appetizer, I always pair it with something light to cut through that fried richness. Honestly, though, the key pairing is that spicy dipping sauce we just made—it’s practically mandatory!
If you happen to have extra sauce left over, it’s fantastic on fries or even as a spread on a deli sandwich. For a full spread, try balancing it out with something fresh, like my easy bruschetta dip or maybe some crisp celery sticks for crunch. Enjoy every single petal!
Storage and Reheating Instructions for Leftover Blooming Onions
Okay, let’s be real: a blooming onion is truly best enjoyed the minute it comes out of the fryer—those petals are at their absolute crispiest. It’s a tough job trying to save leftovers, because deep-fried stuff just isn’t very cooperative the next day, right?
However, if you happen to have any surviving pieces, you need to store them correctly immediately. Don’t even think about putting them back into an airtight container in the fridge; they’ll just turn into soggy pillows, and we absolutely cannot have that!
Instead, let any cooled pieces rest on a paper towel-lined plate, but only for a short time before covering them loosely with foil and tucking them into the fridge. The trick to reheating is all about getting the heat *dry* enough to battle the grease.
Forget the microwave—it’s the enemy of crispiness! Your best bet is to use a conventional oven or, even better, an air fryer if you have one that fits the onion pieces. Preheat your oven to about 375 degrees F. Lay the leftover pieces out in a single layer on a baking sheet lined with foil or parchment paper. Pop them in for about 8 to 10 minutes. You want to heat them just long enough to dry out the exterior coating and bring back a little bit of that wonderful texture. It won’t be exactly the same as fresh, but trust me, this method is your best shot at saving your restaurant style onion appetizer for round two!
Frequently Asked Questions About Making Blooming Onions
It’s funny how making one impressive appetizer can bring up so many questions! I get asked about size, speed, and whether you can use shortcuts all the time. Don’t worry if you’re wondering about the details; that’s what being a good home cook is all about—asking why and how things work best. We want this to be reliable for your next party, so let’s tackle the most common queries about your blooming onions.
If you’re looking for ways to squeeze this into a busy night, remember that many of my best recipes, like the quick easy weeknight dinners, focus on speed, but this special appetizer is worth the dedicated time!
Can I make an air fryer blooming onion instead of deep-frying?
Yes, absolutely you can! If you’re trying to avoid deep frying, the air fryer is a great way to get a crispy finish on your fried onion flower recipe. You still have to get that batter on there nicely, but instead of submerging it, you want to lay it gently in the basket and spray the entire outside liberally with cooking oil spray. You’re basically creating a protective crisp layer with the spray. Cook it at 375 degrees F, flipping it carefully halfway through, until it’s golden brown.
What type of onion works best for a perfect bloom?
Picking the right onion is crucial for getting those petals to separate nicely, which is the whole point of the fried onion flower recipe! You absolutely need a large, sweet onion. I always reach for a Vidalia or another sweet variety. These onions have layers that separate more cleanly than standard yellow onions, and their natural sugar mellows out beautifully when fried. Smaller onions just don’t have enough layers to create that satisfying flower effect we are looking for in a copycat blooming onion.
What makes your blooming onion dipping sauce recipe so much better than store-bought?
It’s all about the balance of heat and creaminess! Store-bought sauces often lean too heavily on sugar or artificial flavors. My secret sauce, which is featured in the ingredients list above, uses prepared horseradish. That ingredient provides a sharp, sinus-clearing heat that cuts through the richness of the fried batter so perfectly. Plus, the combination of ketchup and Worcestershire sauce gives it a depth you just won’t find in a plain mayo-based dip. It’s the key to making this taste exactly like the ultimate bloomin onion experience!
Is it okay if my batter is a little lumpy?
Oh my gosh, yes! In fact, I encourage it! When you are mixing up your best blooming onion batter, I always tell people to stop mixing once they see just a few small streaks of dry flour remaining. If you keep whisking until it’s perfectly smooth, you are activating the gluten, and that will lead to a heavy, tough coating that won’t be light and airy. Lumps mean you have less gluten, and less gluten means a lighter, crispier blooming onion shell that shatters perfectly when you bite into it!
PrintUltimate Homemade Blooming Onion Recipe
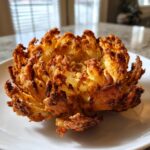
Make the signature restaurant-style fried onion appetizer at home with this easy-to-follow recipe, complete with the best batter and spicy dipping sauce.
- Prep Time: 20 min
- Cook Time: 10 min
- Total Time: 30 min
- Yield: 4 servings 1x
- Category: Appetizer
- Method: Deep Frying
- Cuisine: American
- Diet: Vegetarian
Ingredients
- 1 large sweet onion (Vidalia or similar)
- 2 cups all-purpose flour
- 1 cup cornstarch
- 1 tablespoon paprika
- 1 tablespoon garlic powder
- 1 tablespoon onion powder
- 1 teaspoon cayenne pepper
- 1 teaspoon dried oregano
- 1 teaspoon salt
- 1/2 teaspoon black pepper
- 1/2 teaspoon dried thyme
- 2 large eggs
- 1 cup milk
- 1 cup club soda or seltzer water
- Vegetable oil, for deep frying
Instructions
- Prepare the onion: Peel the onion. Make a vertical cut near the root end, stopping about 1/2 inch from the base. Rotate the onion 45 degrees and make another cut, repeating until you have 16 to 20 wedges. Do not cut all the way through the root. Gently press the onion down on a cutting board to open it like a flower. Place the opened onion in a bowl of ice water for 15 minutes to help it bloom further.
- Prepare the batter: In a large bowl, whisk together the flour, cornstarch, paprika, garlic powder, onion powder, cayenne pepper, oregano, salt, pepper, and thyme.
- In a separate bowl, whisk the eggs, milk, and club soda until combined.
- Pour the wet ingredients into the dry ingredients and whisk until just combined. The batter should be thick but pourable. Do not overmix.
- Heat the oil: Pour vegetable oil into a deep, heavy-bottomed pot or deep fryer to a depth of about 3 inches. Heat the oil to 375 degrees F (190 degrees C).
- Dredge the onion: Remove the onion from the ice water and pat it very dry with paper towels. Dip the entire onion into the batter, ensuring all crevices are coated. Lift it out and let excess batter drip off.
- Fry the onion: Carefully lower the battered onion into the hot oil, holding the root end until the batter sets slightly (about 30 seconds). Then, release it. Fry for 5 to 7 minutes, turning occasionally, until deep golden brown and cooked through.
- Remove the onion from the oil and place it on a wire rack lined with paper towels to drain excess oil. Sprinkle immediately with a little extra salt. Serve hot with dipping sauce.
Notes
- For the best ‘bloom,’ use a large, round onion. Make sure your cuts are deep enough but leave the root intact to hold the structure together.
- If you prefer an air fryer blooming onion, use less batter, spray heavily with cooking spray, and cook at 375 degrees F for 15-20 minutes, flipping halfway.
- The dipping sauce is key: Mix 1 cup mayonnaise, 2 tablespoons ketchup, 1 tablespoon prepared horseradish, 1 teaspoon paprika, 1/2 teaspoon cayenne pepper, and 1 teaspoon Worcestershire sauce.
Nutrition
- Serving Size: 1 wedge
- Calories: 350
- Sugar: 5
- Sodium: 450
- Fat: 22
- Saturated Fat: 4
- Unsaturated Fat: 18
- Trans Fat: 0
- Carbohydrates: 35
- Fiber: 2
- Protein: 5
- Cholesterol: 50