
Oh, my friends, if there is one smell I wish I could bottle up and sell, it’s the aroma of a perfectly baked loaf of crusty Italian bread filling the kitchen. That sound—that glorious, sharp crackle as the hot loaf rests on the cooling rack—sighs pure comfort to me. When I first started baking, I thought getting that bakery-style crunch at home was impossible; it seemed reserved only for professional bakers who kneaded dough for ages.
But I’m here to tell you that you can absolutely achieve that golden, shattery crust and the soft, chewy interior you dream about, and guess what? We’re not even going to knead it! This is my favorite, rock-solid recipe for **crusty Italian bread**. It uses simple pantry staples and a long, slow rest, which is my secret weapon for developing deep flavor without having to slave over a mixer for an hour. Trust me, making this amazing homemade Italian bread is my absolute joy, and now it’s going to be yours too! You’ll want to check out the full method here: get the recipe.
- Why This No-Knead Crusty Italian Bread Recipe Works (Expert Tips)
- Simple Ingredients for Your Crusty Italian Bread
- Step-by-Step Instructions for Homemade Italian Bread
- Tips for Success When Making Crusty Italian Bread
- Serving Suggestions for Your Rustic Italian Loaf
- Storing and Reheating Your Crusty Italian Bread
- Frequently Asked Questions About Crusty Italian Bread
- Estimated Nutritional Snapshot for Crusty Italian Bread
- Share Your Perfect Crusty Italian Bread Creations
Why This No-Knead Crusty Italian Bread Recipe Works (Expert Tips)
I know, I know, baking bread without kneading sounds suspect. But this method for achieving that true **bakery style bread** right in your home oven is based on solid science, which is why I trust it completely. The structure you want, that gorgeous, open, **chewy interior bread**, all comes down to two key things that replace all that messy kneading:
We aren’t beating the gluten; we are letting time do the hard work for us. Combine that long wait with incredible, consistent heat, and you’ve got a winner. If you’ve ever been curious about making your own starter, you might want to check out my guide on how to make sourdough starter from scratch, although this loaf definitely doesn’t need one!
The Magic of Long Fermentation for Crusty Italian Bread
That 12-to-18-hour rest on the counter is non-negotiable, folks. This slow fermentation is where the flavor develops—it’s what makes this **crusty Italian bread** taste complex and yeasty, not just bland white flour. During this time, the yeast gently works, creating those big air bubbles we love inside, which gives the crumb its open, airy structure. It’s pure patience paying off!
Achieving the Golden Crust Bread with Steam
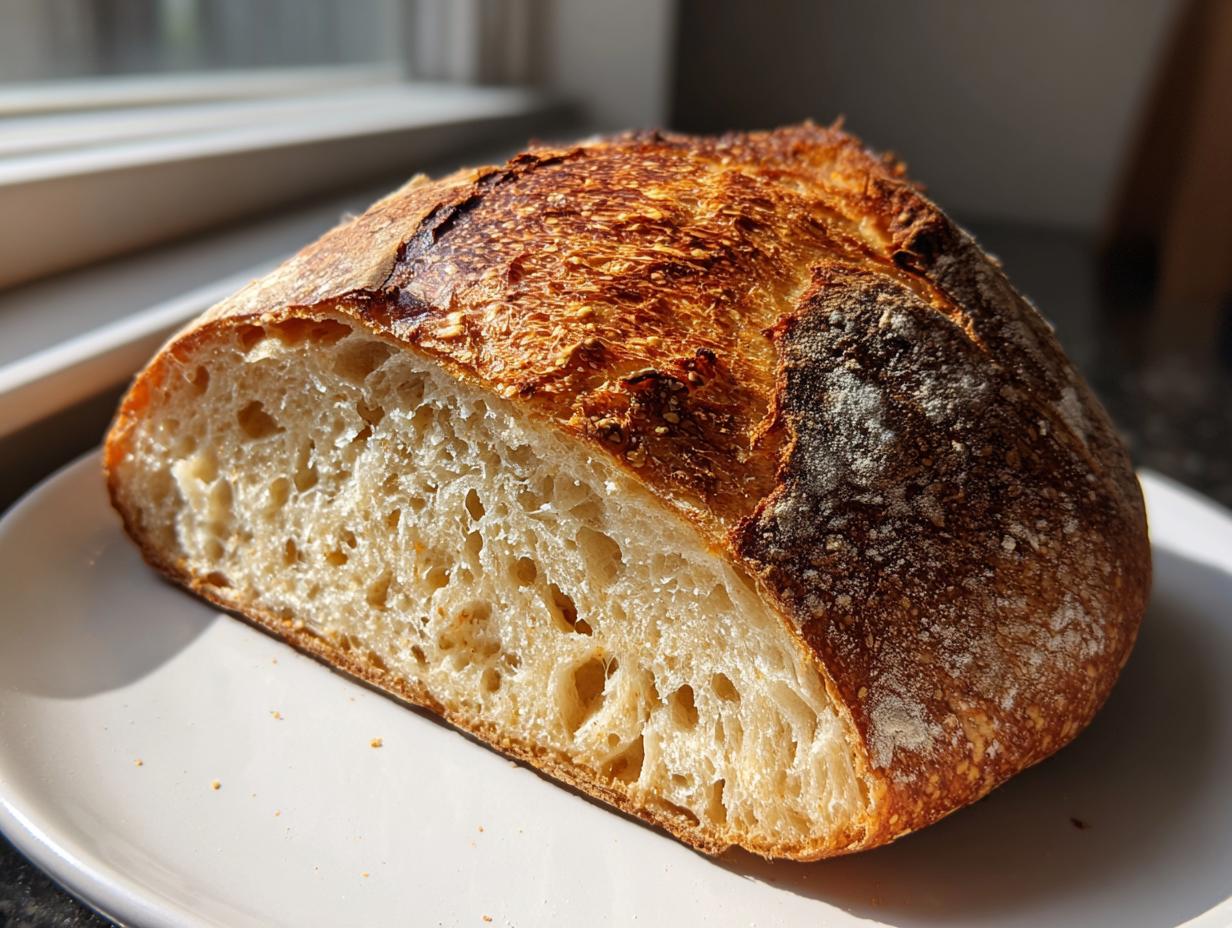
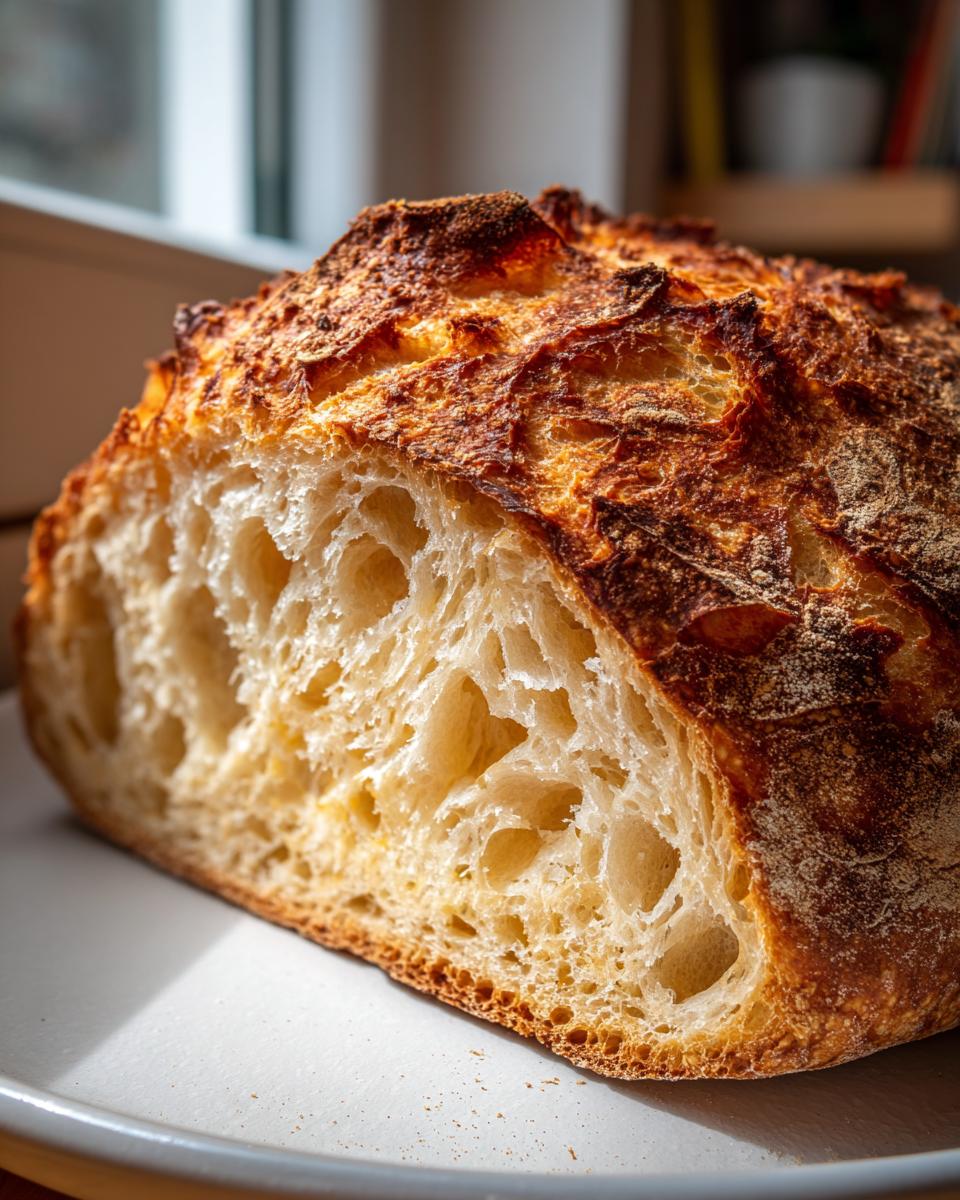
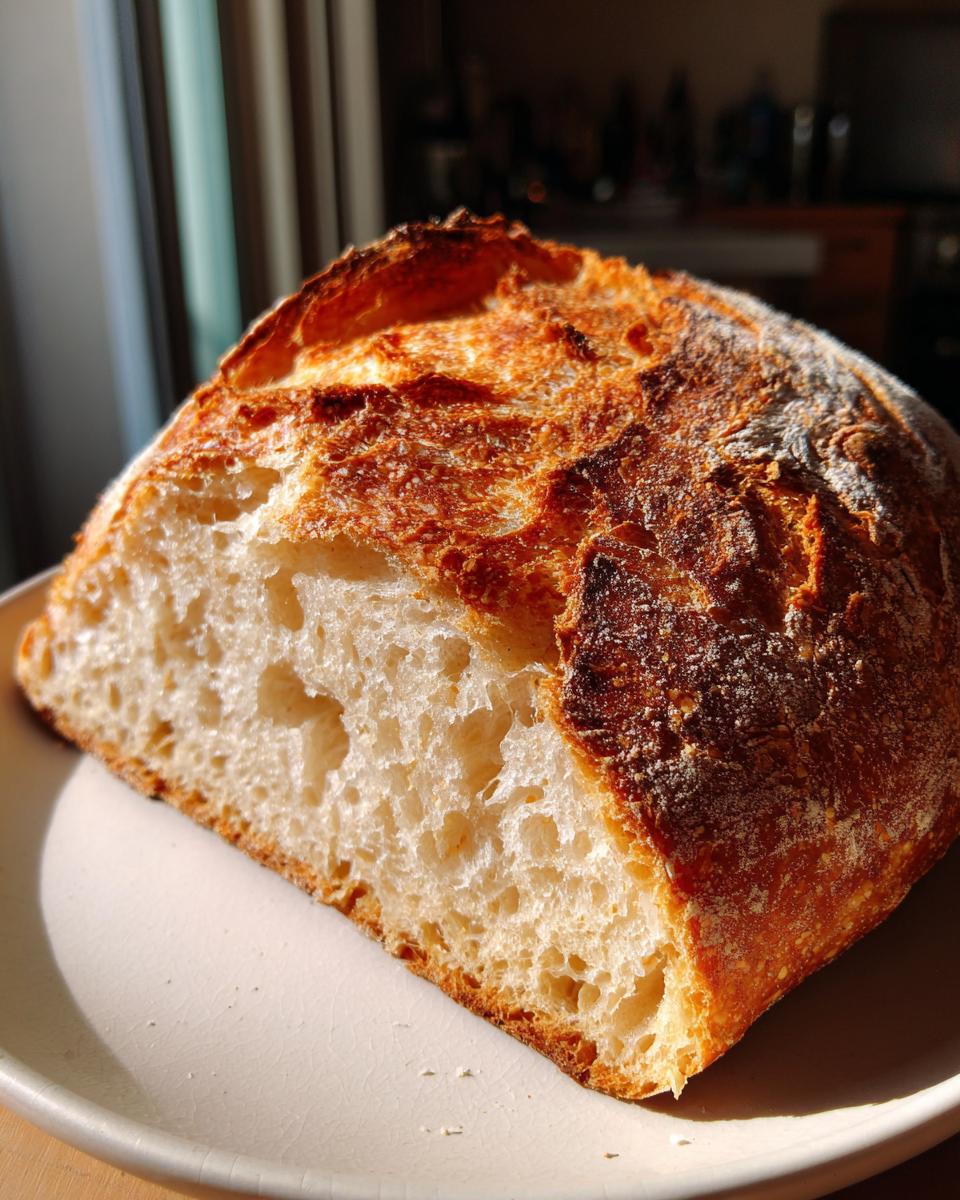
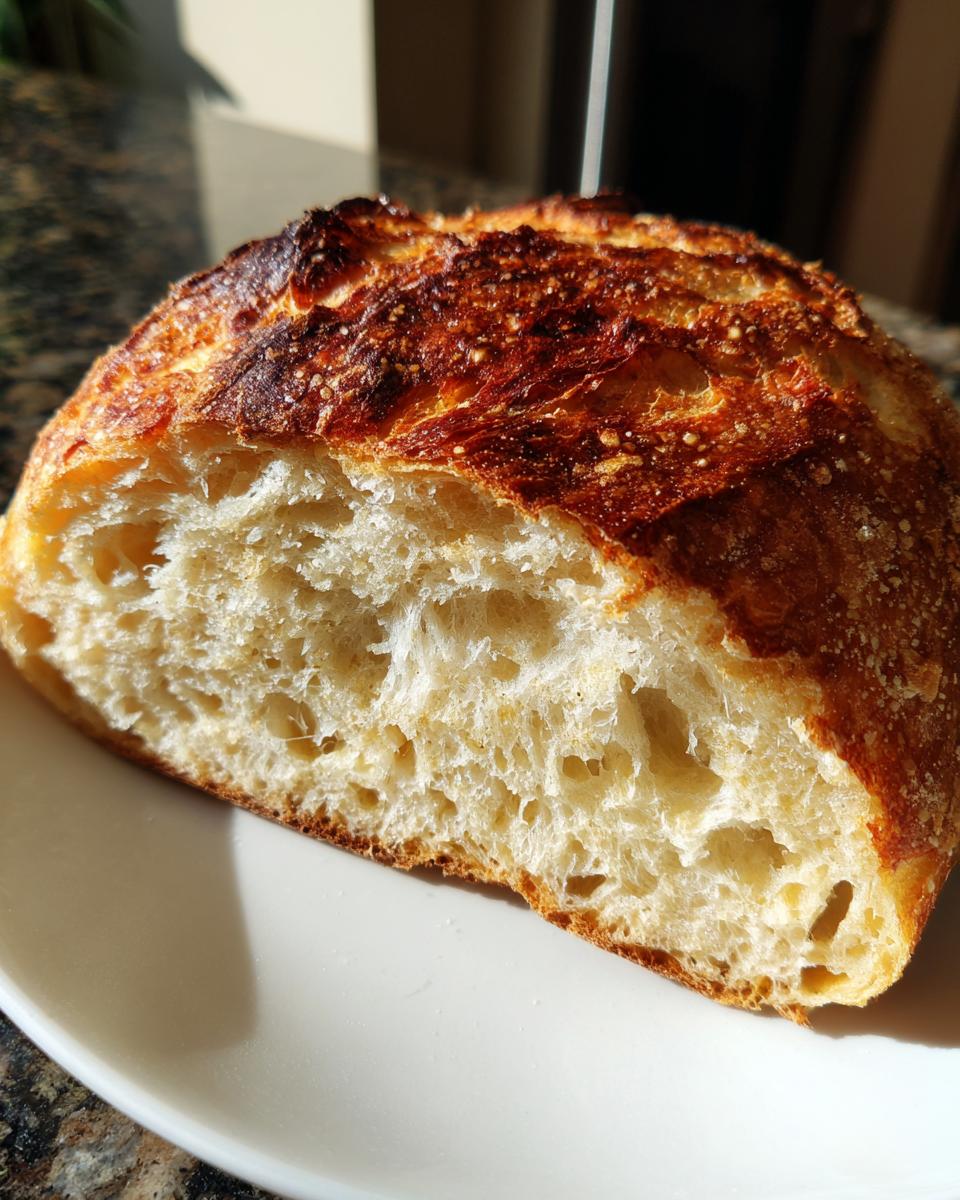
The second secret is the Dutch oven! Baking in cast iron traps all the moisture released by the dough. This moisture creates steam inside the pot, which is exactly what commercial bakeries pump into their ovens. That steam keeps the surface of the dough soft just long enough for it to fully expand. Once that steam clears, you get that perfect, crisp, **golden crust bread** finish every single time. It’s the easiest way to nail an **artisan bread recipe**!
Simple Ingredients for Your Crusty Italian Bread
See? I told you this was easy! Honestly, the beauty of making **crusty Italian bread** at home is that you probably have everything you need sitting on your shelf right now. There’s no fancy equipment required except the mighty Dutch oven we just talked about. We are sticking to four core items, plus a little extra flour for dusting when we get ready to shape it.
For this recipe, you’ll need:
- 3 cups all-purpose flour
- 1 1/2 teaspoons salt
- 1/4 teaspoon instant yeast (don’t swap this for active dry, instant works best here!)
- 1 1/2 cups cool water
- Extra flour for dusting
That’s it! Simple pantry staple bread, made easy. You can find some great ideas for using up your loaf on my simple lunch recipes page when you’re done baking!
Step-by-Step Instructions for Homemade Italian Bread
Okay, let’s get baking! Since this is an **easy bread recipe**, we let time do most of the heavy lifting, which means our actual hands-on time is super short. You just need to be organized around that long rest period. For all you **beginner bread baking** fans out there, pay close attention to the folding part; that’s what builds structure without the kneading!
We are heading straight into the method outlined in the full recipe right here: easy bread sticks recipe.
Mixing and Long Rest for the Crusty Italian Bread Dough
First things first: grab a big bowl and whisk together your flour, salt, and instant yeast. Make sure everything is married together before you add the water. Now, pour in that cool water. Use a sturdy wooden spoon, and only mix until you see no dry spots remaining. I mean it—stop mixing! The dough needs to look shaggy and sticky; it should absolutely NOT be smooth. This is crucial whether you’re making a tiny roll or a full **crusty Italian bread** round! Cover it super tight with plastic wrap and leave it alone for 12 to 18 hours. Yes, that long! Trust me on this one.
Shaping and Final Proofing for a Perfectly Baked Loaf
After the long rise, lightly flour your countertop. Scrape the sticky dough out—it might look a bit bubbly, which is great! Very gently, fold the dough over onto itself just a few times to create a rough ball shape. We want to keep those air pockets intact! Place this dough onto a sheet of parchment paper, cover it loosely, and let it chill out for 30 minutes. This short rest helps it settle before it goes into the heat, which is key for a **perfectly baked loaf**.
The Dutch Oven Method for Ultimate Crusty Italian Bread
Time to turn up the heat! About 20 minutes before that 30-minute rest is up, put your Dutch oven, lid and all, into the cold oven and set the temperature to 450°F (232°C). We need it screaming hot! Once preheated, carefully pull that hot pot out (wear serious mitts!) and use that parchment paper as a sling to gently lower your dough right into the center of the **dutch oven bread**. Put the lid on and bake it sealed for 30 minutes—that’s where the steam magic happens! After 30 minutes, take the lid off and keep baking another 15 to 20 minutes until that crust is deep, rich brown. Then, get it out and let it cool completely so you can hear that gorgeous crusty shatter!
Tips for Success When Making Crusty Italian Bread
We’ve got the method down, but a few little secrets help make this crusty Italian bread truly shine. Remember to follow the recipe notes exactly, especially regarding yeast! Using instant yeast really makes this a fast-prep bread overall, even with the long rest.
For an extra, extra crackly exterior, try adding a quick spritz of water inside the oven walls during those first 15 minutes of baking before you take the lid off the Dutch oven. That burst of steam is pure heaven for the crust!
And here’s my favorite personal tip for any **warm bread recipe**: don’t rush the cooling! You absolutely have to let the loaf rest completely on the rack. When it cools, you’ll hear that signature *crackle* sound—that’s your bread talking to you, telling you the crust is hardening perfectly. If you slice it early, the steam escapes, and you lose that beautiful crunch. If you’re looking for something amazing to put on that fresh loaf, check out my easy homemade garlic butter recipe!
Serving Suggestions for Your Rustic Italian Loaf
Now that you have this incredible **rustic Italian loaf** drying on the rack—fresh baked bread aroma and all—the actual dilemma begins: what do you eat it with? Honestly, I feel guilty just waiting for dinner, because this bread is wonderful all on its own. The texture is perfect for handling anything you throw at it.
Of course, if you are serving this alongside a hearty bowl of tomato soup, this is the ultimate **bread for soup dipping**! Soak up every last drop. If you’re thinking lunch, you need to build the best Italian sandwich bread you’ve ever had. Pile it high with mozzarella, cured meats, and fresh basil.
And don’t forget the simplest joy: just tear off a piece, drizzle it generously with good quality olive oil—maybe add a tiny shake of cracked black pepper—and savor it immediately. If you want an upgrade for that dipping moment, check out my recipes for a best garlic bread dip recipe or my easy bruschetta dip recipe!
Storing and Reheating Your Crusty Italian Bread
We sure don’t want that beautiful crust getting soft overnight, right? If you have leftovers of your **crusty Italian bread**, the trick is to keep the air away from it once it’s completely cooled. Store it cut-side down in a clean paper bag, not plastic wrap! The paper lets it breathe a little.
If you find your loaf has gone a little stale the next day, don’t fret! Just spritz the outside lightly with water and pop it back into a hot oven (about 375°F) for 5 to 8 minutes. That short blast of dry heat will reactivate the crust, bringing back most of that wonderful, satisfying crunch. It’s like magic!
Frequently Asked Questions About Crusty Italian Bread
I always get so many questions when I post this recipe because everyone wants that perfect loaf! It seems simple, but baking really relies on technique. Here are some of the questions I hear most often when people are trying this **simple yeast bread** for the first time.
Can I skip the 12-to-18-hour rest? Can I make this a quick Italian bread?
Oh, I wish you could! While you absolutely *can* rush it by using more yeast and letting it proof for about an hour—turning it into a very basic white loaf—you lose all that amazing flavor development. The long, cold fermentation is what gives authentic **crusty Italian bread** its character. If you rush it, you get soft bread, not that hearty texture we are aiming for!
What if I don’t have a Dutch oven? Can I still get that crust?
Yes, you can! If you don’t have a Dutch oven, the trick is to create steam in your oven for the first half of the bake. Preheat your oven to 450°F with a empty, sturdy baking sheet or pan on the bottom rack. When you slide your dough onto a baking stone or preheated metal pan, immediately pour a cup of very hot water into that bottom pan and quickly shut the door. This steam helps create a beautiful crust, though the Dutch oven is still my favorite method for **golden crust bread**!
Why is my dough so sticky? Is this normal for homemade Italian bread?
It is totally normal! Seriously, don’t panic if you think you’ve made soup instead of dough. This **homemade Italian bread** relies on a very high hydration level—that means lots of water—to get that open, chewy interior. You mix it until it’s just combined, making it incredibly shaggy and sticky. We fold it gently instead of kneading it vigorously to keep that precious moisture in the dough. If you’re looking for faster prep for busy nights, you can find some of my quick, easy weeknight dinners!
Estimated Nutritional Snapshot for Crusty Italian Bread
I always think it’s important to know what you are putting into your body, even when it’s something as wonderfully rustic as this loaf. Since this recipe yields one big loaf, these numbers are based on slicing it into about 12 satisfying portions. Remember, this is just an **estimate** based on the simple pantry ingredients we’re using, so take it as a friendly guideline!
For every slice of this **crusty white bread**, here is what you can expect:
- Calories: Around 180 per slice. Hearty but not heavy!
- Carbohydrates: About 38g. That’s the energy you need for a big meal.
- Protein: Roughly 6g. Flour does a good job for you here!
- Fat: Very low, about 0.5g. We use hardly any fat in the dough itself, keeping it clean and simple.
- Sugar: Minimal, just 0.5g, coming mostly from what the yeast consumes.
See? This is honest food, made from scratch. Simple flour, water, salt, and yeast creating something incredible!
Share Your Perfect Crusty Italian Bread Creations
Wow, I’ve shared my most cherished secrets for achieving that perfect, shattery crust and soft interior in this **easy bread recipe**. Now, it’s your turn to step up to the counter and give it a whirl! Baking is all about community and sharing those wins, big or small. I truly want to know how your **rustic Italian loaf** turned out.
Did that Dutch oven do the trick? Did you get the crackle you were hoping for? Please, please leave a rating below—it tells me which recipes are working best for my CravyBite family, and it helps other new bakers feel confident enough to try this **beginner bread baking** method.
If you snapped a photo of your beautiful, golden loaf—especially if you showed off how great it looks next to a bowl of homemade pasta sauce—I would absolutely love to see it! Tag me on social media or send me a message through my contact page. Connecting with you while you create comfort food in your own kitchen is the best reward. Happy baking, everyone!
Print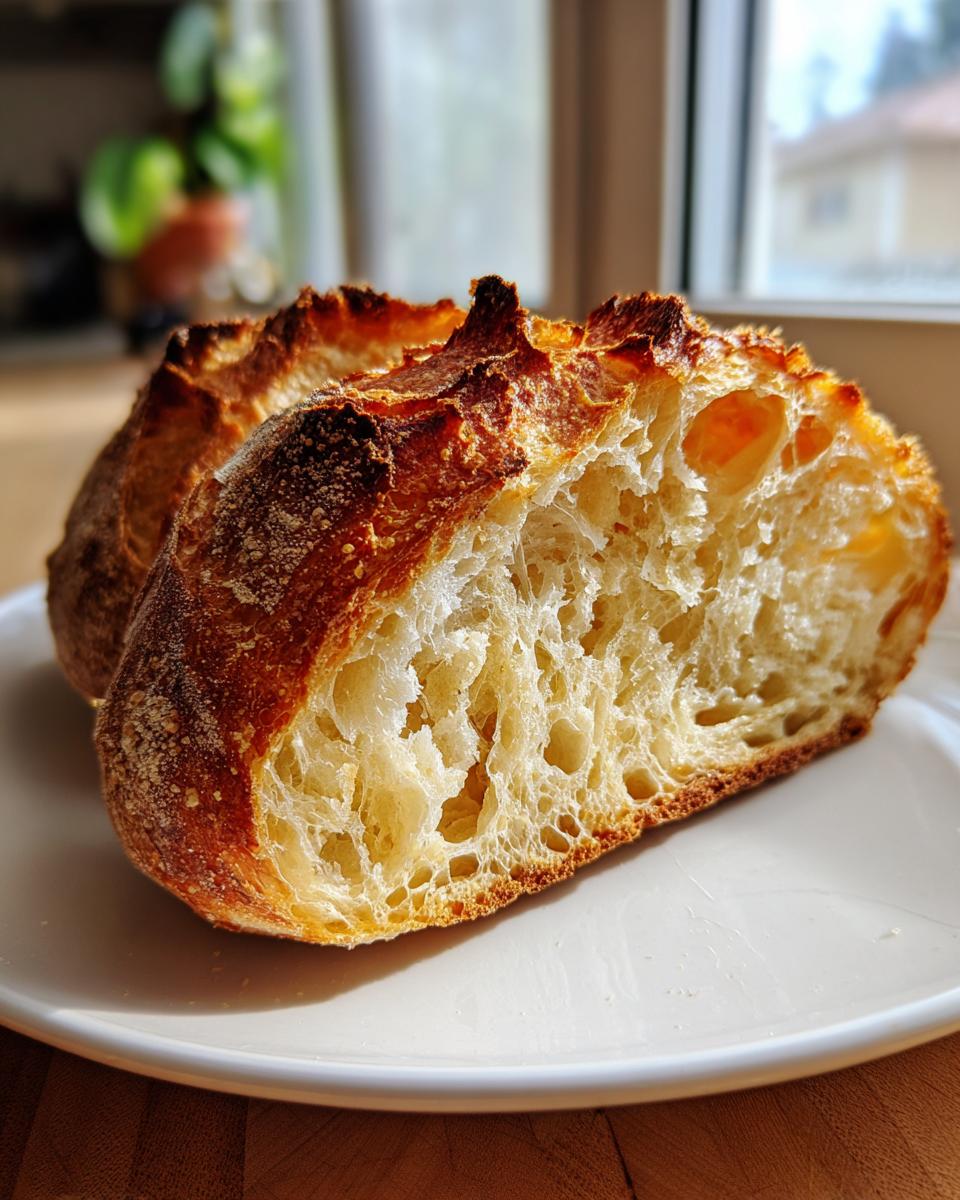
Easy No-Knead Crusty Italian Bread with Bakery-Style Crunch
Bake authentic, bakery-style crusty Italian bread at home using simple pantry staples. This easy, no-knead recipe delivers a golden, crackling crust and a soft, chewy interior, perfect for dipping in olive oil or making hearty sandwiches.
- Prep Time: 10 min
- Cook Time: 50 min
- Total Time: 13 hours 0 min
- Yield: 1 large loaf 1x
- Category: Bread
- Method: Baking (Dutch Oven)
- Cuisine: Italian
- Diet: Vegetarian
Ingredients
- 3 cups all-purpose flour
- 1 1/2 teaspoons salt
- 1/4 teaspoon instant yeast
- 1 1/2 cups cool water
- Extra flour for dusting
Instructions
- In a large bowl, whisk together the flour, salt, and instant yeast.
- Pour in the cool water and mix with a wooden spoon until just combined. The dough will be shaggy and sticky. Do not knead.
- Cover the bowl tightly with plastic wrap and let the dough rest at room temperature for 12 to 18 hours. This long, slow fermentation develops flavor.
- After the long rise, lightly flour a work surface. Gently scrape the dough out of the bowl. Fold the dough over itself a few times to form a rough ball.
- Place the dough ball on a piece of parchment paper. Cover loosely with plastic wrap or a clean kitchen towel and let it rest for 30 minutes.
- About 20 minutes before the second rest ends, place a Dutch oven with the lid inside your oven. Preheat the oven to 450 degrees Fahrenheit (232 degrees Celsius).
- Carefully remove the hot Dutch oven from the oven. Use the parchment paper as a sling to lower the dough into the hot pot.
- Cover the Dutch oven and bake for 30 minutes.
- Remove the lid and continue baking for another 15 to 20 minutes, or until the crust is deep golden brown and crisp.
- Carefully remove the bread from the Dutch oven and let it cool completely on a wire rack before slicing.
Notes
- For an extra crackly crust, you can lightly spritz the inside of the oven walls with water during the first 15 minutes of baking (before removing the lid).
- This recipe is ideal for making bread for soup dipping or the best Italian sandwich bread.
- If you do not have a Dutch oven, you can bake this on a baking stone, placing a pan of hot water on the bottom rack to create steam.
Nutrition
- Serving Size: 1 slice
- Calories: 180
- Sugar: 0.5
- Sodium: 380
- Fat: 0.5
- Saturated Fat: 0.1
- Unsaturated Fat: 0.4
- Trans Fat: 0
- Carbohydrates: 38
- Fiber: 1.5
- Protein: 6
- Cholesterol: 0