The Ultimate Beginner’s Guide: How to Make and Maintain an Active Sourdough Starter from Scratch (7-Day Timeline)
Learn how to create your own active, bubbly sourdough starter from scratch using only flour and water. This guide provides simple, day-by-day instructions perfect for beginners to establish a reliable wild yeast culture for artisan bread making.
- Prep Time: 5 min
- Cook Time: 0 min
- Total Time: 7 days (active time is minimal)
- Yield: 1 active starter culture 1x
- Category: Baking Foundation
- Method: Wild Fermentation
- Cuisine: American Home Cooking
- Diet: Vegetarian
Ingredients
Scale
- 100g Whole Wheat or Rye Flour (for initial activation)
- 100g Unbleached All-Purpose Flour (for subsequent feedings)
- 100g Unchlorinated Water (room temperature)
Instructions
- Day 1: Mix 50g of whole wheat or rye flour with 50g of room temperature water in a clean jar. Stir until fully combined. Cover loosely and let it sit at room temperature (68-75°F) for 24 hours.
- Day 2: You may see small bubbles or nothing at all. Discard half of the mixture. Add 50g of all-purpose flour and 50g of water to the remaining starter. Mix well, cover loosely, and wait 24 hours.
- Day 3: You should see some activity. Discard half. Feed with 50g of all-purpose flour and 50g of water. Mix and wait 24 hours.
- Day 4: Discard half. Feed with 50g of all-purpose flour and 50g of water. If the starter smells strongly acidic, you may switch to feeding twice a day (every 12 hours).
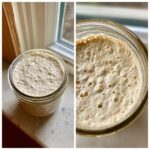
- Day 5 & 6: Continue the discard and feed process every 12-24 hours, using 50g flour and 50g water. Look for consistent doubling in size within 4-8 hours after feeding. This shows you have an active bubbly starter.
- Day 7: Your sourdough starter should reliably double in volume a few hours after feeding and show many bubbles. It is now ready to use for baking with sourdough starter.
- Maintenance: To keep your homemade sourdough culture alive, feed it daily if kept at room temperature, or once a week if stored in the refrigerator. Always use the discard for recipes like sourdough discard pancakes.
Notes
- Use unchlorinated water, as chlorine can inhibit wild yeast growth.
- Maintain a consistent temperature between 70-75°F for faster activity during the initial week.
- If you see mold, discard the entire batch and start over. Gray or dark liquid (hooch) on top means your starter is hungry; pour it off or stir it in before feeding.
- This process creates a wild yeast baking guide foundation for no yeast bread making.
Nutrition
- Serving Size: 100g (Unfed)
- Calories: 250
- Sugar: 0.5
- Sodium: 1
- Fat: 0.5
- Saturated Fat: 0.1
- Unsaturated Fat: 0.4
- Trans Fat: 0
- Carbohydrates: 55
- Fiber: 3
- Protein: 8
- Cholesterol: 0