
Oh, friend, if you are anything like me, sometimes you just need a culinary hug, right? And what delivers that hug better than the absolute king of comfort food? We are diving deep into the recipe for the **ultimate creamy baked mac and cheese** today! I’m talking about a dish that stays velvety smooth right down to the last scoop—no grainy textures, no sad, dry edges here. Seriously, this is the one guaranteed to feature a perfectly golden, satisfyingly crunchy breadcrumb topping. Coming from my background, blending my time studying nutrition with the treasured family recipes I grew up on, I can promise you this bake is both technically sound and absolutely bursting with soul. Get ready to make a family favorite that truly lives up to the hype—it’s rich, it’s decadent, and you can pair it with something lighter, like my recipe for creamy cheesy twice-baked potatoes!
- Why This Is The Ultimate Creamy Baked Mac and Cheese Recipe
- Gathering Ingredients for Your Baked Mac and Cheese
- Step-by-Step Instructions for Perfect Baked Mac and Cheese
- Expert Tips for Non-Grainy Baked Mac and Cheese
- Variations on Classic Baked Mac and Cheese
- Serving Suggestions for This Cheesy Comfort Food
- Storage and Reheating Your Leftover Baked Mac and Cheese
- Frequently Asked Questions About Baked Mac and Cheese
- Nutritional Estimates for This Indulgent Macaroni Bake
Why This Is The Ultimate Creamy Baked Mac and Cheese Recipe
I know what you’re thinking: “Another mac and cheese recipe?” But trust me, this one solves all the heartbreaking problems that usually come with baking pasta. We aren’t aiming for ‘good enough’ here; we are aiming for legendary. If you usually end up with a dry mess or that weirdly grainy sauce, this recipe is your new best friend. Check out why this decadent dish is everything you ever wanted in a no dry mac and cheese secrets guide!
- Zero-Grain Guarantee: We build our sauce by adding cheese gradually, taking the pan *off* the heat before stirring it in. This is the crucial trick that keeps our sauce silky smooth.
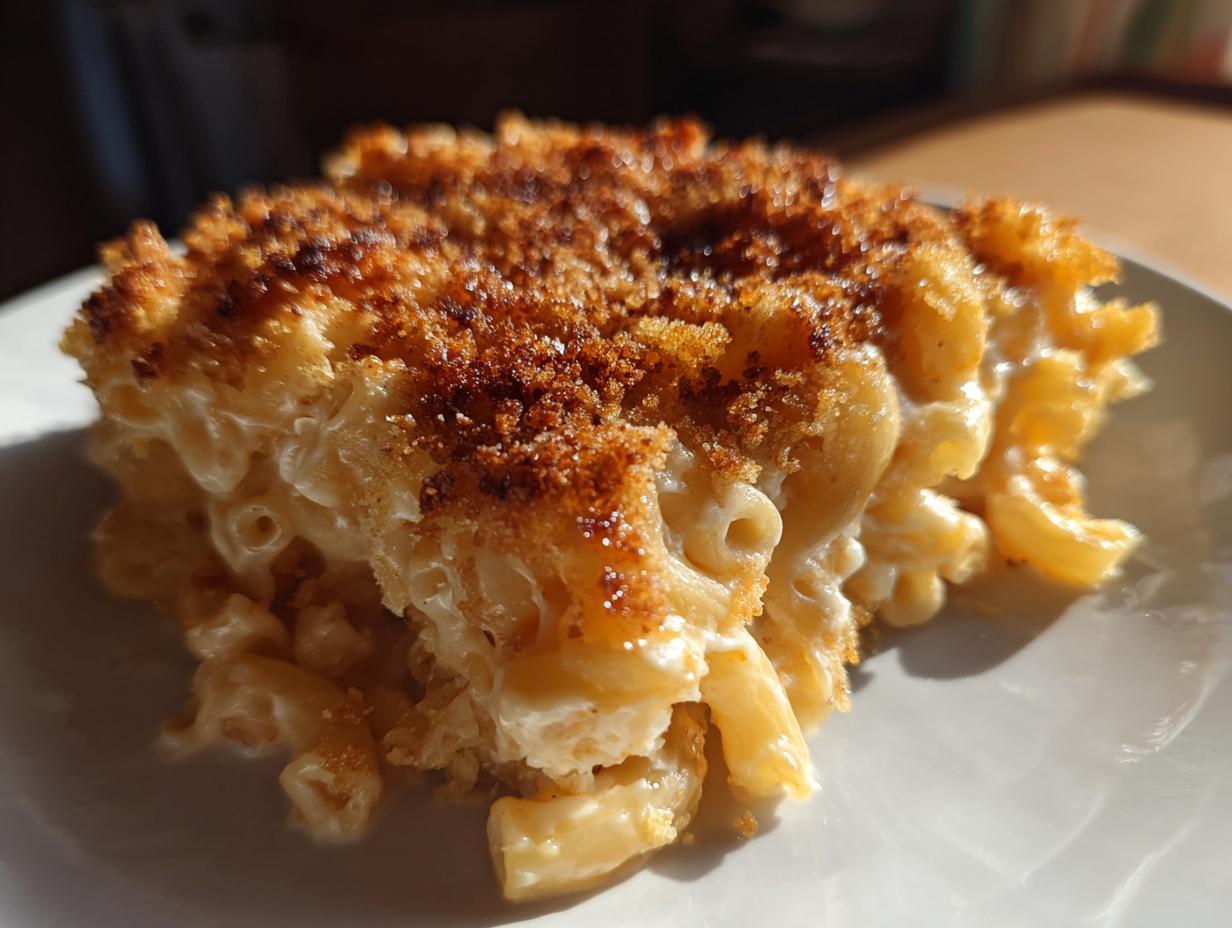
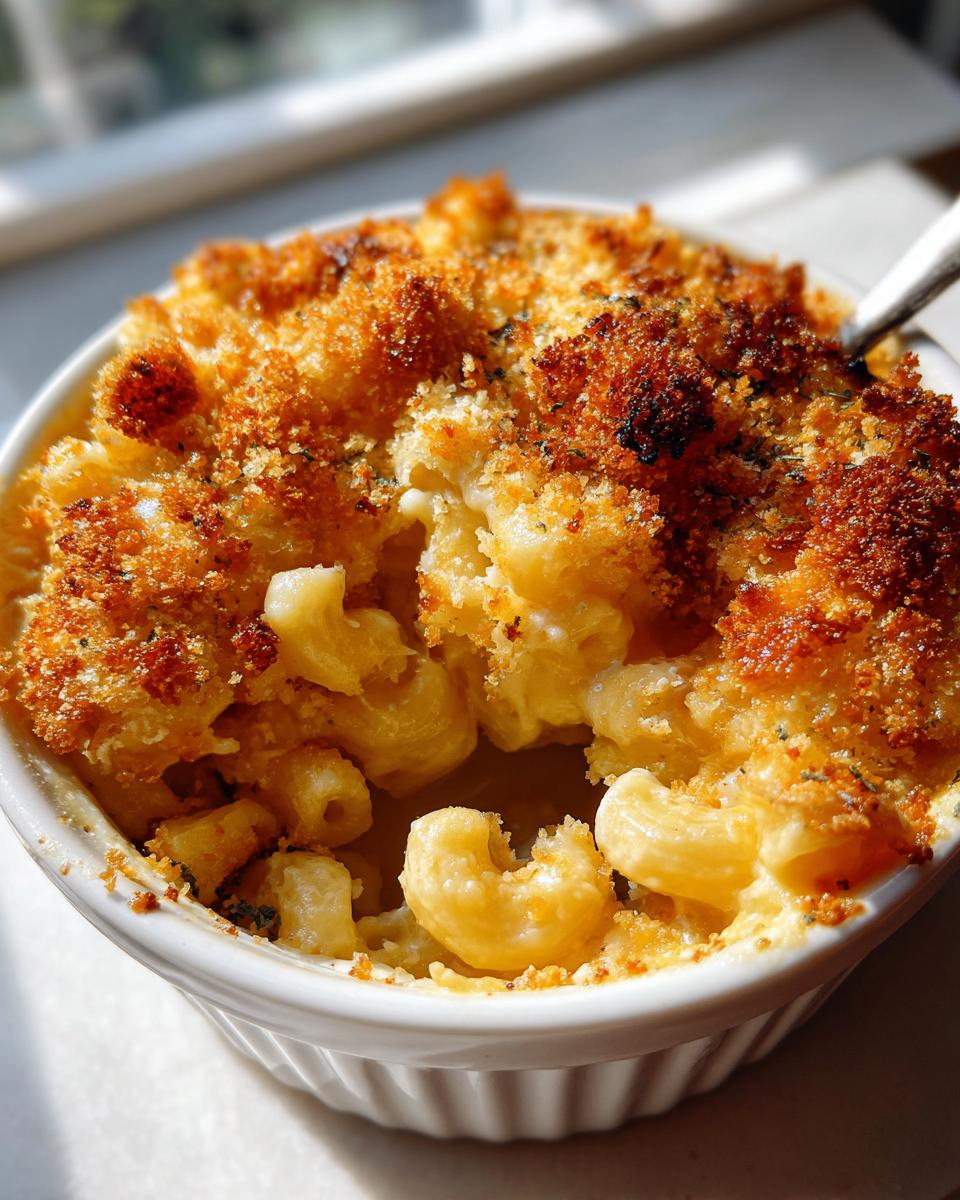
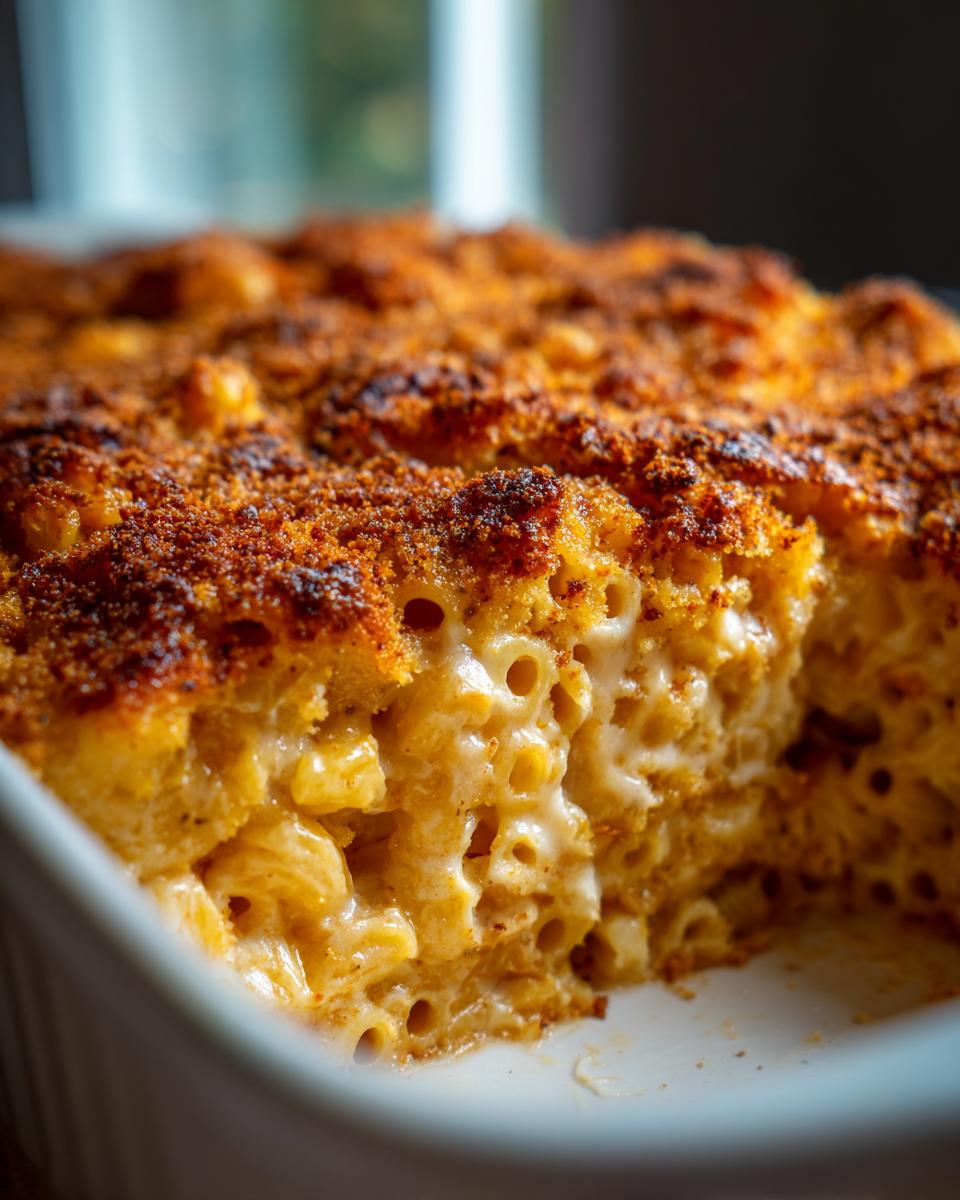
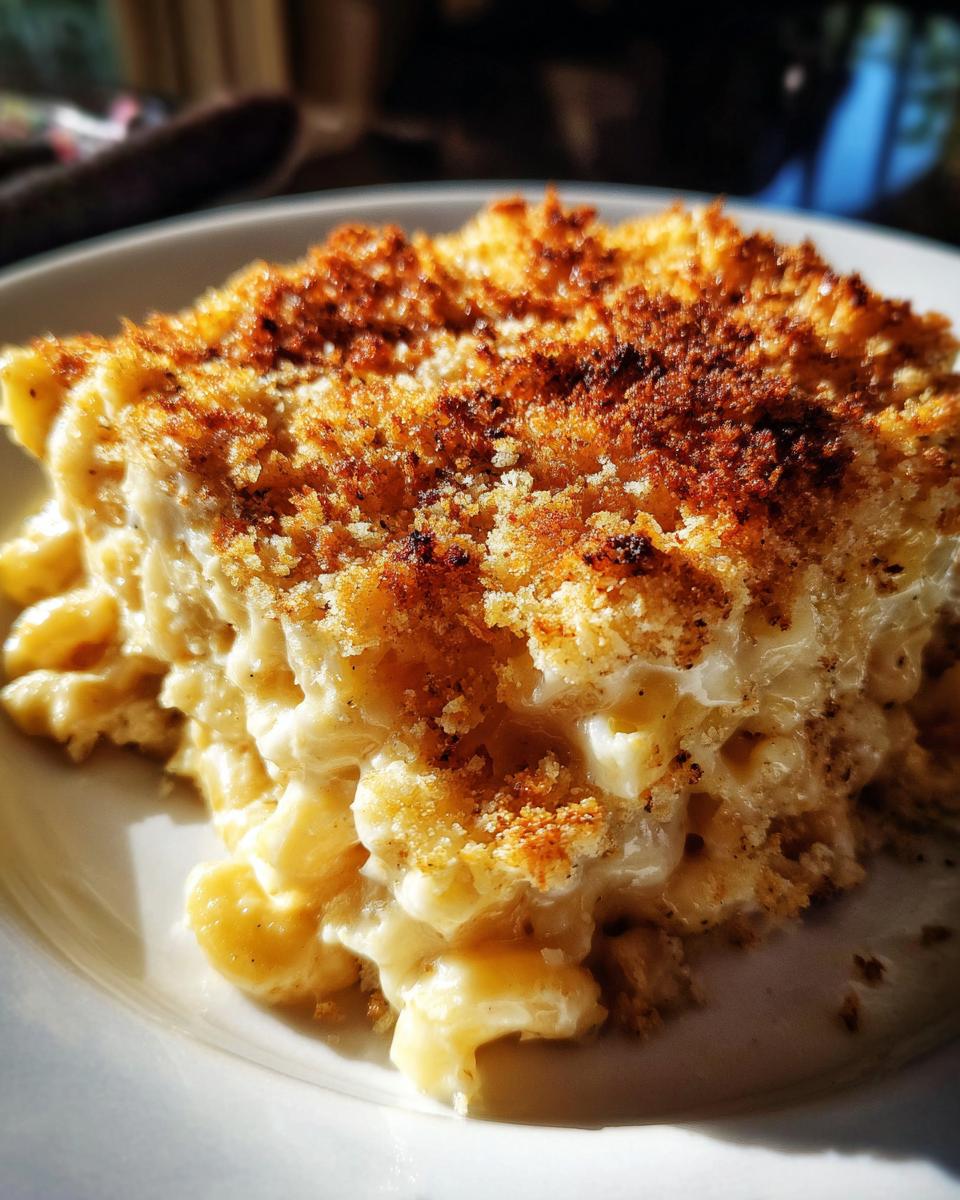
- The Perfect Texture Contrast: It’s ultra-creamy inside, but we top it with a buttery, toasted Panko crust. That crisp, golden top layer is non-negotiable for the ultimate cheesy bake experience!
- Flavor Depth You Can Taste: We skip the boring single-cheese approach. Using a blend of sharp Cheddar for tang, Gruyère for nuttiness, and Fontina for ultimate melt keeps every bite interesting.
- Moisture Retention Power: Because this recipe focuses on keeping the sauce rich, it stays wonderfully moist even after it cools down or when you reheat leftovers. You get that indulgent macaroni bake feel every time. This is truly the ultimate comfort food!
Gathering Ingredients for Your Baked Mac and Cheese
Okay, let’s talk supplies! For this ultimate cheesy bake, you need to treat your ingredients right, especially the cheese. I cannot stress this enough: please, please shred your own cheese! Pre-shredded stuff has stuff in it to stop clumping, and we absolutely do *not* want that interfering with our silky-smooth sauce base. Grab your best sharp cheddar recipes staples, warm up that milk—it helps prevent lumps later—and let’s get ready for some serious comfort food magic.
- 1 pound elbow macaroni
- 6 tablespoons unsalted butter
- 1/2 cup all-purpose flour
- 4 cups whole milk, warmed
- 1 teaspoon salt
- 1/2 teaspoon black pepper
- 1/4 teaspoon nutmeg
- 1/4 teaspoon cayenne pepper
- 8 ounces sharp cheddar cheese, shredded (freshly shredded!)
- 4 ounces Gruyère cheese, shredded
- 4 ounces Fontina cheese, shredded
- 1 cup panko breadcrumbs
- 2 tablespoons melted butter (for topping)
Step-by-Step Instructions for Perfect Baked Mac and Cheese
Now we put all that science and love together! Following these exact steps ensures you get that amazing, rich, and creamy pasta casserole without any fuss. Remember how I talked about technique being key? That starts right here. We want a baked mac and cheese that holds up beautifully, so pay close attention to the heat management during the sauce stage. Everything comes together in under an hour, which is perfect for a Saturday night but still special enough for a big holiday spread. If you are looking for tips on transitioning from stovetop to baked pasta seamlessly, these instructions are gold!
Preparing the Pasta and Oven
First things first, get that oven preheated to 375°F (190°C) and lightly grease your 9×13 inch baking dish—we don’t want any sticking when it’s time to serve! Next, cook your elbow macaroni according to the package directions, but pull it out about two minutes *before* the box says. We cook it to al dente because trust me, it finishes cooking (and soaking up that gorgeous sauce) in the oven. Drain it really well and set it aside while you make magic on the stove.
Building the Rich Cheese Sauce for Baked Mac and Cheese
This is where the moisture lives! In a large pot over medium heat, melt your 6 tablespoons of butter. Once melted, whisk in the flour vigorously and let it cook for about a minute—that’s your roux, the base of everything smooth. Now, slowly whisk in that warmed whole milk, bit by bit, until it’s all combined and starts looking thick enough to coat the back of a spoon. Turn the heat down slightly so it simmers gently, stirring often. Once it coats the spoon, take the whole pot COMPLETELY OFF the heat. This is the secret for an ultimate cheesy bake! Stir in your seasonings. Then, add the shredded Cheddar, Gruyère, and Fontina in small handfuls, stirring until each batch melts flawlessly before you add the next. No graininess allowed here!
Assembly and Achieving the Crunchy Breadcrumb Topping
Once that decadent sauce is perfectly smooth, fold in your drained macaroni gently until every piece is swimming in cheesy goodness. Pour this whole mixture evenly into your prepared baking dish.
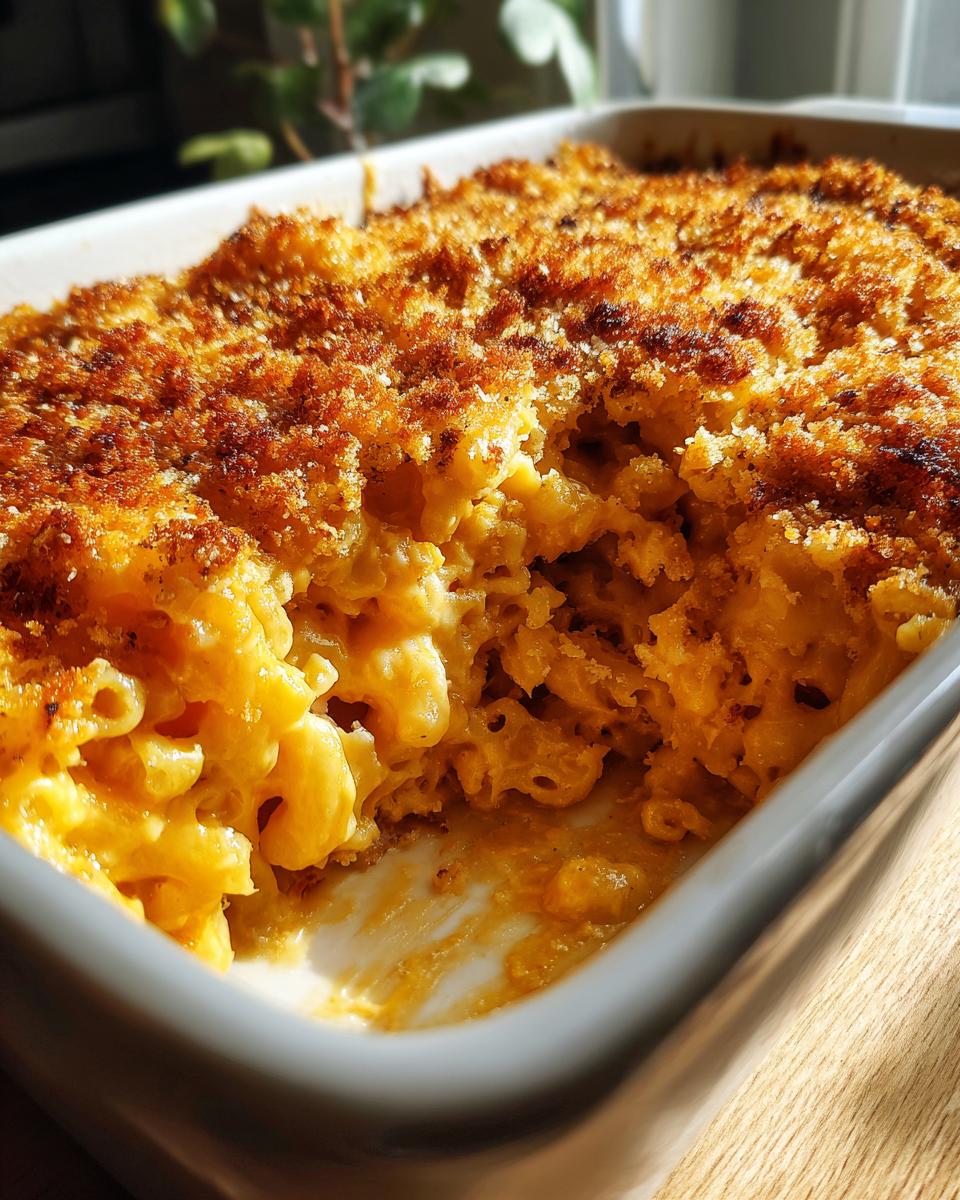
For that unbeatable crunch, toss your Panko breadcrumbs with the 2 tablespoons of melted butter until they are all coated. Sprinkle that buttery Panko evenly right over the top. Bake it for 20 to 25 minutes until the sauce is bubbly, and the topping is deeply golden brown. You absolutely must let it rest for 5 to 10 minutes before serving—this helps the sauce settle down so it doesn’t all run out when you scoop it!
Expert Tips for Non-Grainy Baked Mac and Cheese
If you’ve ever had that heartbreak where your **baked mac and cheese** turns gritty, you know we have to fight that! Baking is really just organized chemistry, and my background helps me nail these technical bits every time. We are talking serious rich cheese sauce tips here to keep things luscious.
Rule number one is the one I mentioned: Cheese goes in *after* you take the pot off the heat. When the temperature is too high, the proteins seize up and squeeze out the fat, and boom—you have grain city. Stick to freshly shredded cheese, too; those anti-caking powders confuse the sauce structure. We want that sauce to be totally velvety, just like they talk about when sharing secrets for a silky creamy bake. Remember, temperature control is everything when you want the ultimate cheesy bake!
Variations on Classic Baked Mac and Cheese
I love that this recipe works as a fantastic base, but sometimes you need to switch things up, right? This ultra-creamy pasta casserole becomes a totally different experience with just a few tweaks. Whether you are looking to honor tradition or sneak in some fancy flavors for a crowd, we can get creative while keeping that signature baked mac and cheese texture intact. If you’ve made my creamy Southern sweet potato pie recipe, you know I love an authentic twist!
Making Southern Style Baked Mac and Cheese
If you are planning for a potluck or just craving that classic, slightly firmer texture you get in the South, you need to make a couple of small changes. The texture in Southern style mac and cheese is usually denser because it’s meant to hold its shape when sliced. To achieve this, we skip the Gruyère and Fontina and swap them out for extra sharp Cheddar and maybe some Monterey Jack for stretch. The biggest change? You need to whisk in one large egg into your finished, off-heat cheese sauce right before you fold in the pasta. That egg acts as a binder, helping everything set up beautifully when it bakes. It creates a perfectly satisfying, sliceable, cheesy comfort food!
Gourmet Additions for Your Baked Mac and Cheese
When I’m making this for a nice dinner party, I like to treat it like a true gourmet cheese sauce. The base recipe is already killer, but a little extra something takes it over the top. You can try swapping out a quarter of the Fontina for some smoked Gouda—that smoky note is unbelievably good with sharp cheddar. Another trick I absolutely adore is adding a tiny drizzle of white truffle oil right into the finished sauce before baking; it gives it this amazing earthy aroma that people go crazy for. If you want a little kick without getting spicy, toss in half a teaspoon of smoked paprika with your cayenne pepper. It adds phenomenal color and depth to your ultimate cheesy bake!
Serving Suggestions for This Cheesy Comfort Food
Okay, so this rich, decadent baked mac and cheese is the star of the show, no question. But even the star needs a good supporting cast, especially when you’re serving it for holiday side dishes or a big family favorite dinner! Because this casserole is so indulgent and heavy on the cheese, the best pairings are bright, fresh, and maybe even a little acidic to cut through all that richness. I always lean towards green things.
You can’t go wrong with something quickly roasted or lightly dressed. A simple vinaigrette on some crisp greens does the trick. Honestly, my go-to companion is my recipe for quick broccolini roasting—a little char and lemon juice make everything sing next to this cheesy comfort food. A sharp, vinegary coleslaw works wonders too, trust me!
Storage and Reheating Your Leftover Baked Mac and Cheese
Don’t you just hate when the amazing, creamy magic from last night turns into starchy cement in the fridge? Me too! But with this recipe, we have a few tricks up our sleeve to keep your leftovers tasting fresh and luscious—we have to protect those beautiful creamy pasta casserole layers!
For refrigeration, this is really easy. Just let your baked mac and cheese cool down until it’s just warm, cover the dish tightly with plastic wrap or transfer it to an airtight container. It’ll keep beautifully in the fridge for about four days. If you made a double batch destined for potlucks later, you can freeze it! Cool it completely, seal it well (a double layer of foil stops ice crystals), and it lasts about two months. Make sure you use my recipe for easy homemade garlic butter to toss over it before you pop it in the oven next time!
Restoring Creaminess After Cooling
Here is the non-negotiable step for reheating leftovers and ensuring you still get that ultimate creamy texture: you *must* add moisture back in. If you are reheating a small portion in the microwave, stir in a splash—maybe a tablespoon or two—of whole milk or heavy cream per serving before you heat it up. Cover it lightly so it steams, and heat it in short bursts.
If you’re reheating a big pan of it, cover the whole dish tightly with foil and bake it in a 350°F oven until it’s hot all the way through, maybe 20 minutes. Adding that extra liquid before heating keeps the sauce from seizing up and stops it from drying out. This simple addition is one of my top secrets for keeping this comfort food recipes perfect!
Frequently Asked Questions About Baked Mac and Cheese
I always get questions after people try this recipe for the first time because it’s just that good! Let’s clear up any last little details so you can serve up the best comfort food recipes without a second thought. Sometimes folks ask about things totally outside of mac and cheese, like dessert! If you’re looking for a sweet finish after this rich cheese masterpiece, you should totally check out my recipe for easy homemade chocolate syrup.
Can I make this baked mac and cheese ahead of time?
Yes, you totally can, and it saves so much time when you are dealing with holidays or big meals! The key is *when* you bake it. You can assemble the entire dish—pasta tossed with sauce, topping sprinkled on—and seal it up with plastic wrap or foil. Keep it in the fridge for up to 2 days. When you are ready to eat, just pull it out about 30 minutes before you want to bake it so it loses that deep chill. Then, pop it into the oven as directed, but you might need to add 5 to 10 minutes to the baking time since it’s starting colder.
What is the secret to a truly creamy pasta casserole?
It all boils down to managing the temperature when melting that glorious cheese into your sauce! Remember what we talked about? The absolute secret to achieving that perfectly creamy pasta casserole texture is the three-part process: first, make your roux (butter and flour). Second, whisk in the warm milk slowly until it thickens *on* the heat. Third, and most important, pull the whole thing OFF the heat before adding your shredded cheese blend. Add the cheese in small increments, stirring until smooth after each addition. If you do that, you absolutely stop the cheese protein from seizing, and you eliminate graininess forever. It’s foolproof!
Can I skip the breadcrumb topping on my baked mac and cheese?
Sure, you *can* skip it, but I honestly wouldn’t recommend it if you want that full experience! The crunchy breadcrumb topping is half the fun. Without it, you just have a really, really excellent stovetop mac and cheese that got warm in the oven. The beauty of this recipe is the textural contrast we get between the silky interior and that crunchy, buttery Panko crust on top. If you are running out of time, at least try sprinkling a little extra shredded Parmesan cheese on top before baking to add *some* crispness. If you skip the topping entirely for an easy baked pasta dish, just reduce your bake time by about 5 minutes!
Nutritional Estimates for This Indulgent Macaroni Bake
Now, I know when we are making something this divine and cheesy, we aren’t usually counting every single calorie, but I believe in transparency, which is why I try to offer some estimates here. Because my background is in nutrition science, I always run these numbers just so we all know what we’re getting into with this ultimate cheesy bake. Remember, because this is homemade using fresh ingredients and high-quality dairy, these numbers are based on standard calculations and can shift depending on the exact brands of cheese or milk you use.
Think of this as a guide—a reminder that this indulgent macaroni bake is truly a treat! If you are looking for lighter snacks, you could check out my recipe for easy protein balls, but for this classic comfort food, we embrace the indulgence!
Estimated Nutrition Per Serving:
- Serving Size: 1 serving
- Calories: 650
- Fat: 38g
- Saturated Fat: 22g
- Carbohydrates: 55g
- Protein: 28g
- Sodium: 750mg
We use a lot of sharp cheddar and high-quality milk in this recipe, which is what drives up the fat and sodium slightly—but hey, that’s the richness we aim for! Enjoy every decadent bite, knowing exactly what you’re eating when you choose this truly family favorite dinner.
PrintThe Ultimate Creamy Baked Mac and Cheese with a Crispy Breadcrumb Topping
This recipe delivers the ultimate comfort food experience: baked mac and cheese that stays incredibly creamy, never dry, and features a satisfyingly crunchy, golden top layer. We focus on building a rich cheese sauce that avoids graininess.
- Prep Time: 15 min
- Cook Time: 35 min
- Total Time: 50 min
- Yield: 6 servings 1x
- Category: Dinner
- Method: Baking
- Cuisine: American
- Diet: Vegetarian
Ingredients
- 1 pound elbow macaroni
- 6 tablespoons unsalted butter
- 1/2 cup all-purpose flour
- 4 cups whole milk, warmed
- 1 teaspoon salt
- 1/2 teaspoon black pepper
- 1/4 teaspoon nutmeg
- 1/4 teaspoon cayenne pepper
- 8 ounces sharp cheddar cheese, shredded
- 4 ounces Gruyère cheese, shredded
- 4 ounces Fontina cheese, shredded
- 1 cup panko breadcrumbs
- 2 tablespoons melted butter (for topping)
Instructions
- Preheat your oven to 375°F (190°C). Lightly grease a 9×13 inch baking dish.
- Cook the macaroni according to package directions until al dente. Drain well and set aside.
- Prepare the cheese sauce: In a large saucepan over medium heat, melt the 6 tablespoons of butter. Whisk in the flour and cook for 1 minute, stirring constantly, to create a roux.
- Gradually whisk in the warm milk until the mixture is smooth. Continue cooking, stirring often, until the sauce thickens enough to coat the back of a spoon, about 8-10 minutes. Do not let it boil rapidly.
- Remove the sauce from the heat. Stir in the salt, pepper, nutmeg, and cayenne pepper.
- Add the shredded cheeses (cheddar, Gruyère, and Fontina) to the sauce in handfuls, stirring until each addition is completely melted and smooth before adding the next. This off-heat melting technique prevents graininess.
- Fold the cooked macaroni into the cheese sauce until everything is evenly coated.
- Pour the macaroni mixture into the prepared baking dish.
- In a small bowl, toss the panko breadcrumbs with the 2 tablespoons of melted butter. Sprinkle this mixture evenly over the top of the macaroni.
- Bake for 20 to 25 minutes, or until the sauce is bubbly and the breadcrumb topping is golden brown and crisp.
- Let the baked mac and cheese rest for 5 to 10 minutes before serving to allow the sauce to set slightly.
Notes
- For the creamiest texture, warm your milk slightly before adding it to the roux. Cold milk can cause lumps.
- Use freshly shredded cheese. Pre-shredded cheeses often contain anti-caking agents that can make your cheese sauce grainy.
- If you prefer a Southern style mac and cheese, substitute the Gruyère and Fontina with Monterey Jack and an extra sharp cheddar, and consider adding one egg to the sauce mixture before baking for a firmer casserole texture.
Nutrition
- Serving Size: 1 serving
- Calories: 650
- Sugar: 6
- Sodium: 750
- Fat: 38
- Saturated Fat: 22
- Unsaturated Fat: 16
- Trans Fat: 1
- Carbohydrates: 55
- Fiber: 3
- Protein: 28
- Cholesterol: 110