
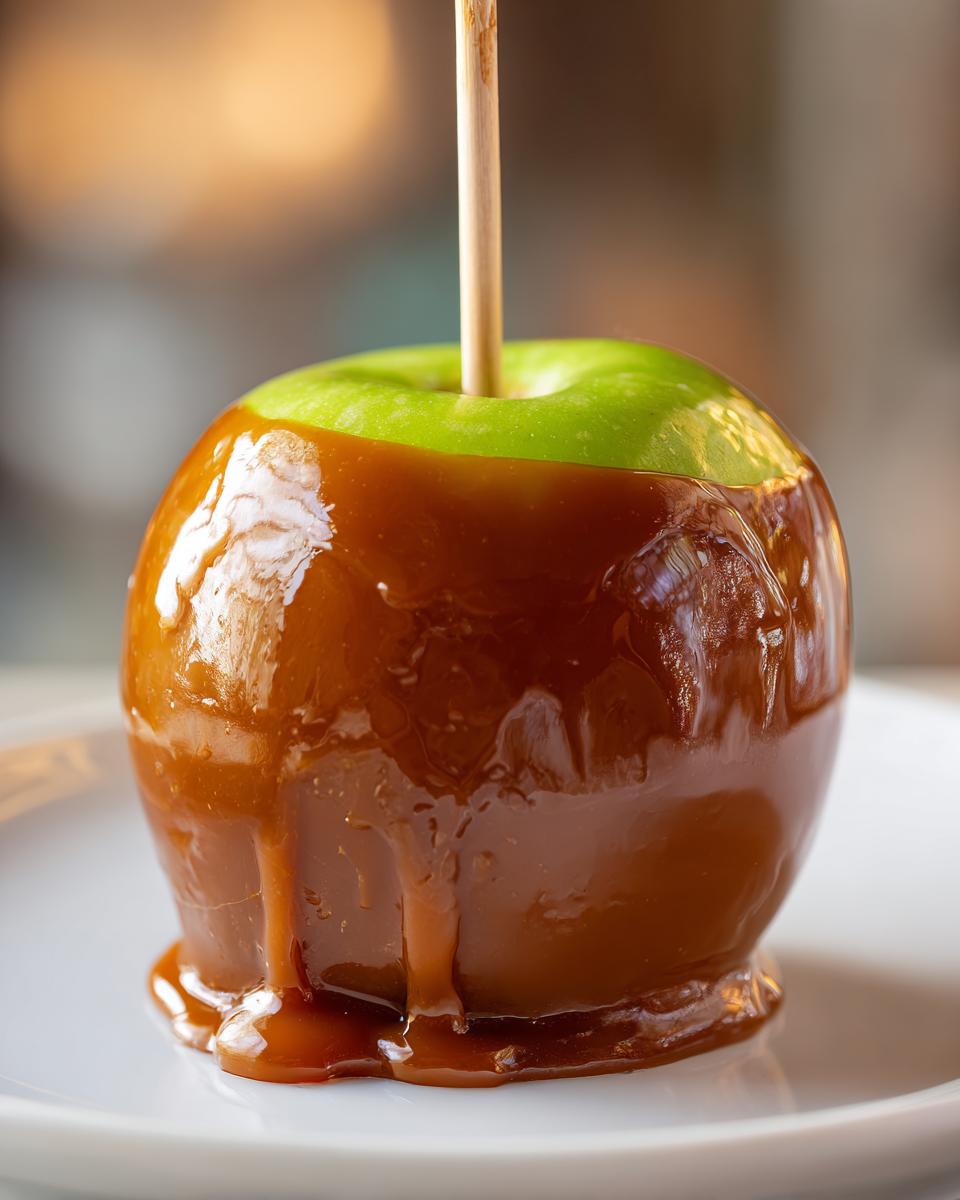
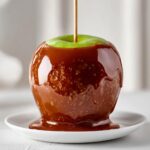
Oh, if there’s one thing that smells like pure, cozy autumn magic, it’s the scent of homemade caramel bubbling on the stove! We all love those bakery-style treats, but let’s be real: trying to make caramel apples at home often ends in a sticky, sliding disaster, right? Well, that stops today. I want to share the absolute foolproof recipe you need for that perfect, addictively chewy coating that actually sticks to the apple—no more caramel puddles on the counter!
As someone who spent years studying the science of food at university but finding my real passion back in my family’s kitchen, I know the difference between guesswork and guaranteed success. This recipe blends that solid technique with treasured tradition, giving you the easiest, most reliable way to master these classic fall favorites. If you loved my recipe for easy moist gingerbread cupcakes, you’ll know I value reliability!
We’re making caramel apples that are beautifully chewy, never too hard, and designed to be the star of any Halloween party or holiday gathering. Get your sticks ready; this is going to be fun!
- Why This Is the Best Chewy Homemade Caramel Apples Recipe
- Ingredients Needed for Classic Caramel Apples
- How to Make Foolproof Caramel Apples: Step-by-Step Instructions
- Expert Caramel Apple Dipping Tips for Beginners
- Gourmet Caramel Apples Tutorial: Variations and Toppings
- Storage and Reheating Instructions for Caramel Apples
- Frequently Asked Questions About Making Caramel Apples
- Nutritional Estimates for Classic Caramel Apples
- Share Your Homemade Caramel Apples Creations
Why This Is the Best Chewy Homemade Caramel Apples Recipe
Look, you need reliability when you’re dealing with hot sugar, right? These aren’t just any caramel apples; these are the ones you want when company shows up. If you’ve spent time fighting sticky caramel that melts into a puddle before it even hits the counter, then this recipe is your new best friend.
- Guaranteed to be perfectly chewy—never that hard, shell-like candy coating!
- The coating adheres so well, you’ll never have to worry about the dreaded caramel slide.
- It’s surprisingly straightforward once you know the two non-negotiable steps.
If you loved how reliably I laid out my Graham Cracker Toffee, you’ll appreciate the precision here!
Achieving Caramel Apples That Stick Every Time
This is where most people mess up, I swear! You think you’re starting clean, but apples come waxed from the store. We have to strip that coating off first—a quick dip in boiling water works wonders. After that, they have to be bone dry. I mean it, dry as a bone! If there is one single drop of moisture, your beautiful caramel will slide right off because we are gunning for those perfect caramel apples that stick.
The Secret to Perfectly Chewy Caramel Apples
The secret isn’t in the ingredients; it’s in the chemistry! To get that rich, satisfying, chewy texture instead of a brittle candy shell, you absolutely must trust your candy thermometer. We are aiming for exactly 245 degrees Fahrenheit—that’s the Firm Ball Stage. If you cook it way past that, you get hard candy. Cook it lower, and it stays runny. 245°F is the magic number for caramel apples that pull apart gorgeously when you bite in.
Ingredients Needed for Classic Caramel Apples
Okay, let’s talk supplies! Getting the mix right is the first huge step toward success, especially for these chewy homemade caramel apples. Don’t try to eyeball the sugar or the milk; precision matters when we hit the thermometer stage later on. I’ve laid out everything you need for the coating below, plus the absolute must-haves for the fruit itself.
I’m providing the exact amounts for six apples, which is usually a good test batch. If you end up with extra caramel, don’t panic! That’s what the recipe notes are for—you can just whip up a simple chocolate dip for the leftovers or just dip some strawberries, honestly.
- Buttery Base: 1 cup (that’s two full sticks!) of cold, unsalted butter.
- Sweetener: 2 cups of light brown sugar, and make sure you pack it into the cup—don’t just scoop loosely!
- Binder: 1 cup of light corn syrup. This helps keep things smooth.
- Creaminess/Moisture: 1 (14 ounce) can of sweetened condensed milk (not evaporated milk, that’s a different beast!).
- Flavor Boosters: 1 teaspoon of pure vanilla extract and 1/2 teaspoon of salt.
- The Star: 6 large, firm apples and 6 wooden or paper lollipop sticks.
- Optional Extras (for gourmet flair!): Chopped nuts (pecans are my favorite!), fun sprinkles, coarse sea salt, or melted chocolate for drizzling later on.
Choosing the Best Apples for Caramel Apples
This is super important, guys. If you use a soft apple, you’ll end up with a mushy core before you even finish dipping. We need apples that are firm and crisp to stand up to the heavy, rich caramel. You want a good balance of tartness and sweetness to cut through that sugar!
My absolute favorites for this recipe are Granny Smith—they are tart enough to balance the sweetness perfectly. If you prefer something a little sweeter but still crisp, go for Honeycrisp. Whatever you choose, make sure they are perfect specimens! No bruises allowed on these beauties.
How to Make Foolproof Caramel Apples: Step-by-Step Instructions
Alright, deep breath! We are tackling the main event now. Making great caramel apples might seem intimidating, but honestly, it’s all about following the sequence and not rushing the temperature steps. I promise, once you see them all lined up glistening on the counter, you’ll feel like a total baking rockstar. This is where that reliability I mentioned really comes into play!
We’re going to break this down into three crucial stages: prep, cook, and dip. Don’t get distracted during the cooking phase, though; that’s when things can go sideways if you aren’t careful! If you happen to have extra caramel after dipping, you can always use it later in my wonderful caramel apple trifle recipe!
Preparing the Apples for Optimal Caramel Adhesion
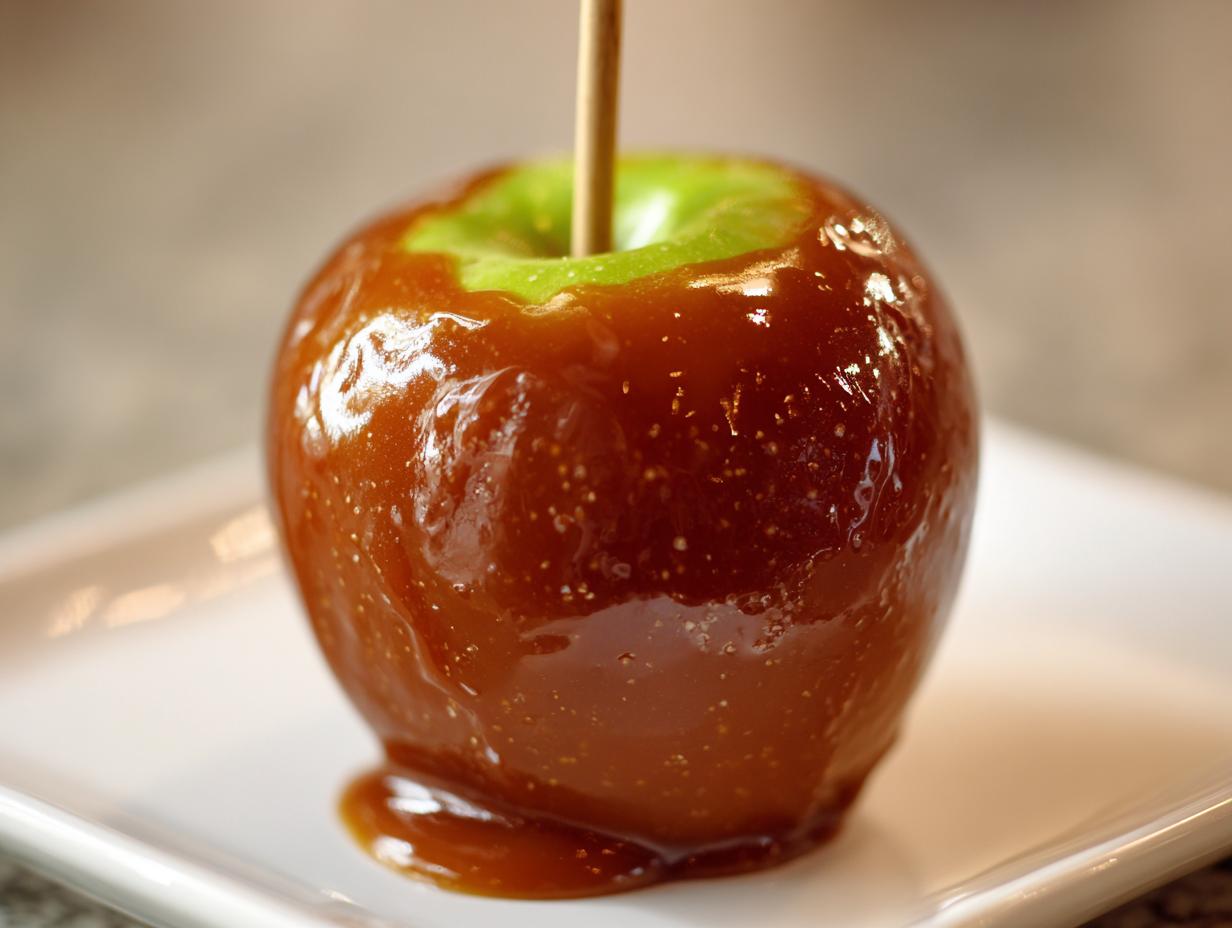
Remember our obsession with keeping things dry? It starts here! First things first: you need to get rid of that invisible layer of wax from the store. Grab a pot of boiling water, dip each apple for just about 10 seconds, and then pull it out. This strips the wax right off. After that quick bath, you absolutely must dry them completely. Use paper towels and pat, pat, pat! If they feel even slightly damp, the caramel won’t kiss the skin properly, and we’ll end up with sad, sliding caramel apples that stick to nothing!
Once they’re dry, just push those wooden sticks right into the core firmly. Have your lined baking sheet ready to go for the next step; you won’t have time to fumble around afterward.
Cooking the Caramel to the Perfect Temperature for Caramel Apples
Here is where you absolutely rely on your candy thermometer. Get a heavy-bottomed saucepan—this prevents scorching! Combine your butter, brown sugar, corn syrup, and condensed milk. Stir it constantly over medium heat until it’s all melted and smooth. Once it boils, stop stirring and attach that thermometer.
You are cooking this mixture until it hits 245°F. Period. If you want those best chewy caramel apples, that temperature is non-negotiable. It usually takes about 15 to 20 minutes after it starts boiling. Make sure you pull it off the heat the second it hits the mark because it keeps rising after you turn the burner off! For more details on hitting that perfect temperature, check out this guide on making gourmet caramel apples.
Dipping and Setting Your Homemade Caramel Apples
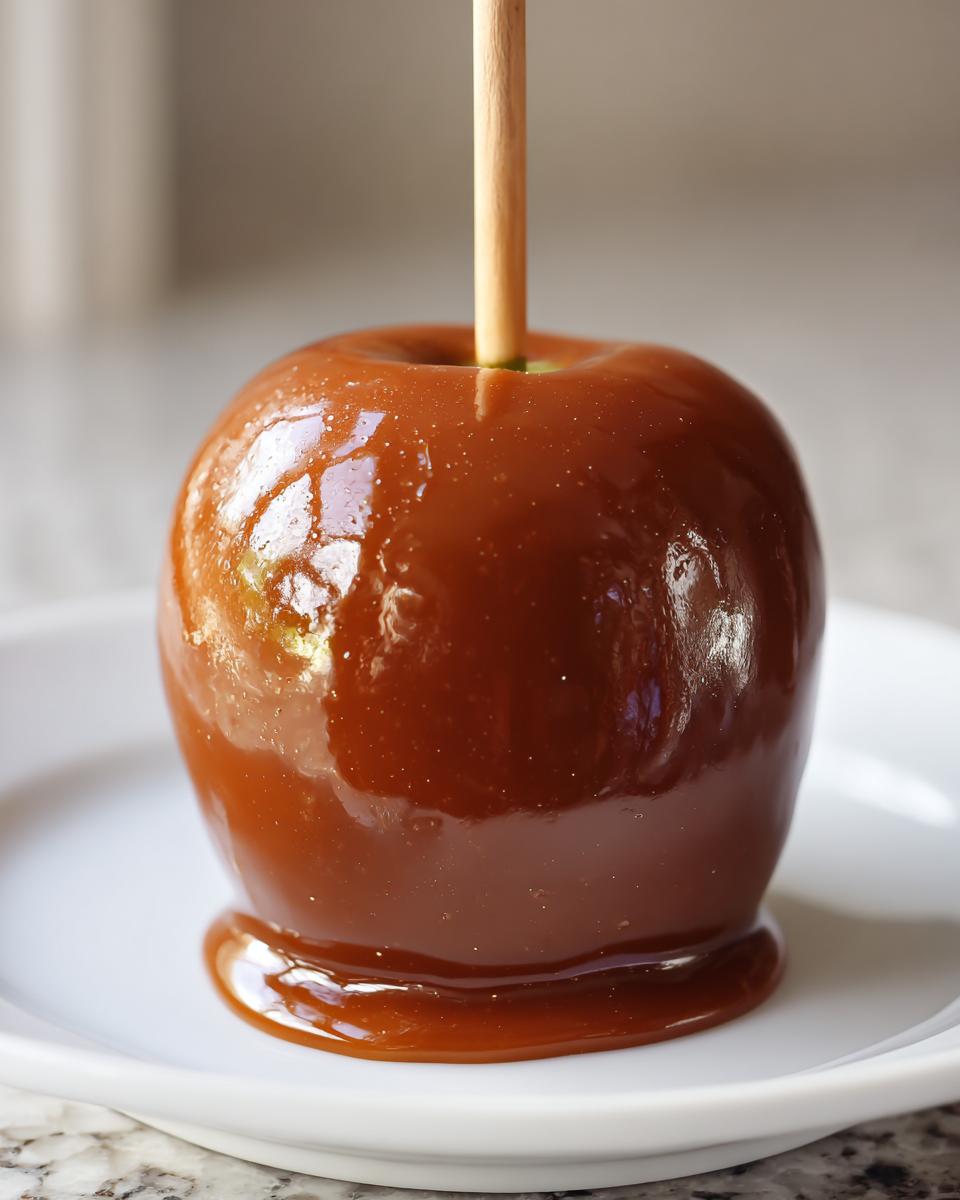
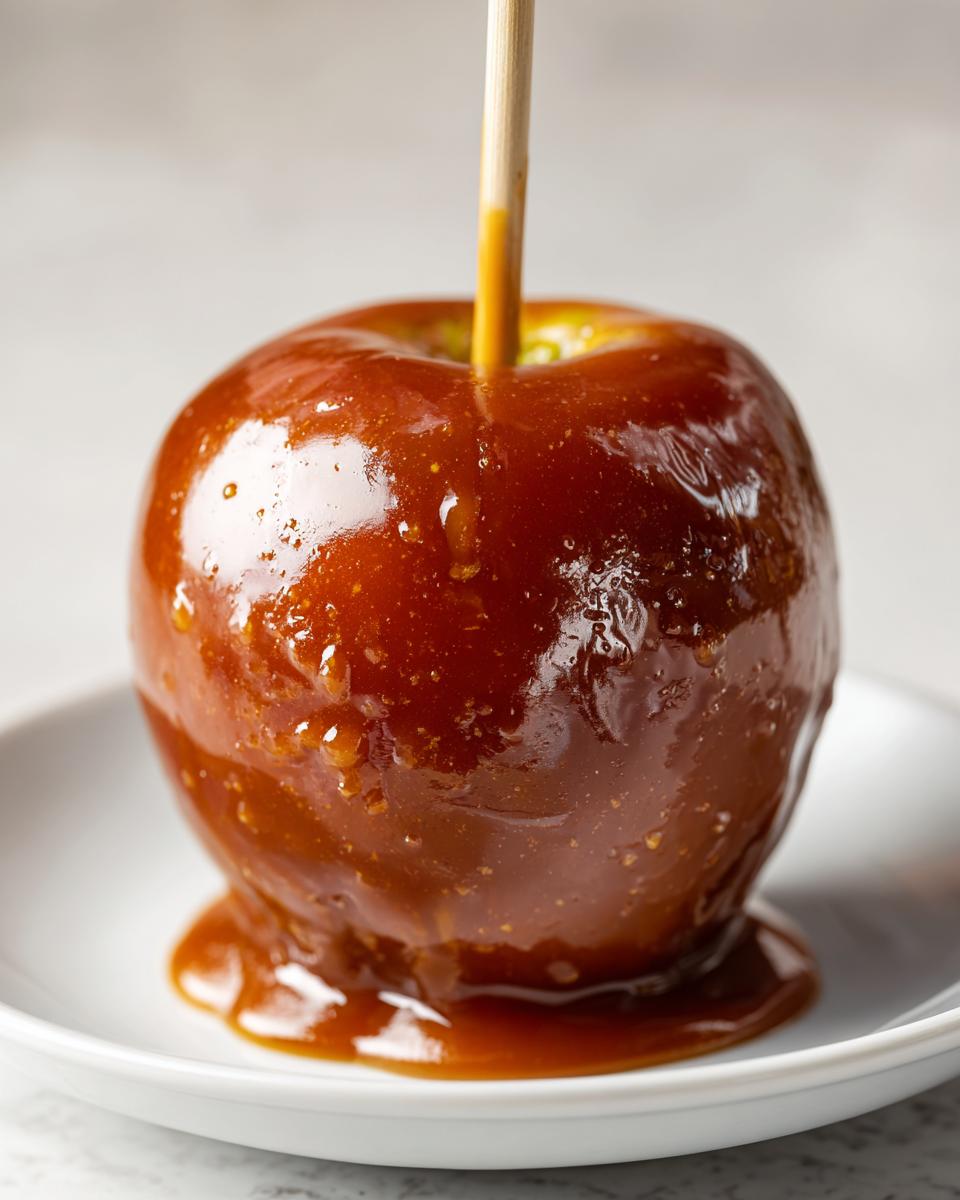
Once you’ve taken the pan off the heat, stir in your vanilla and salt. Now, here’s a small trick: let the caramel cool down for about 5 to 10 minutes. This slight cool-down period thickens it just enough so it grabs onto the apple beautifully instead of running right off. Tilt the pan, dip your prepared apples, and let the excess drip back in.
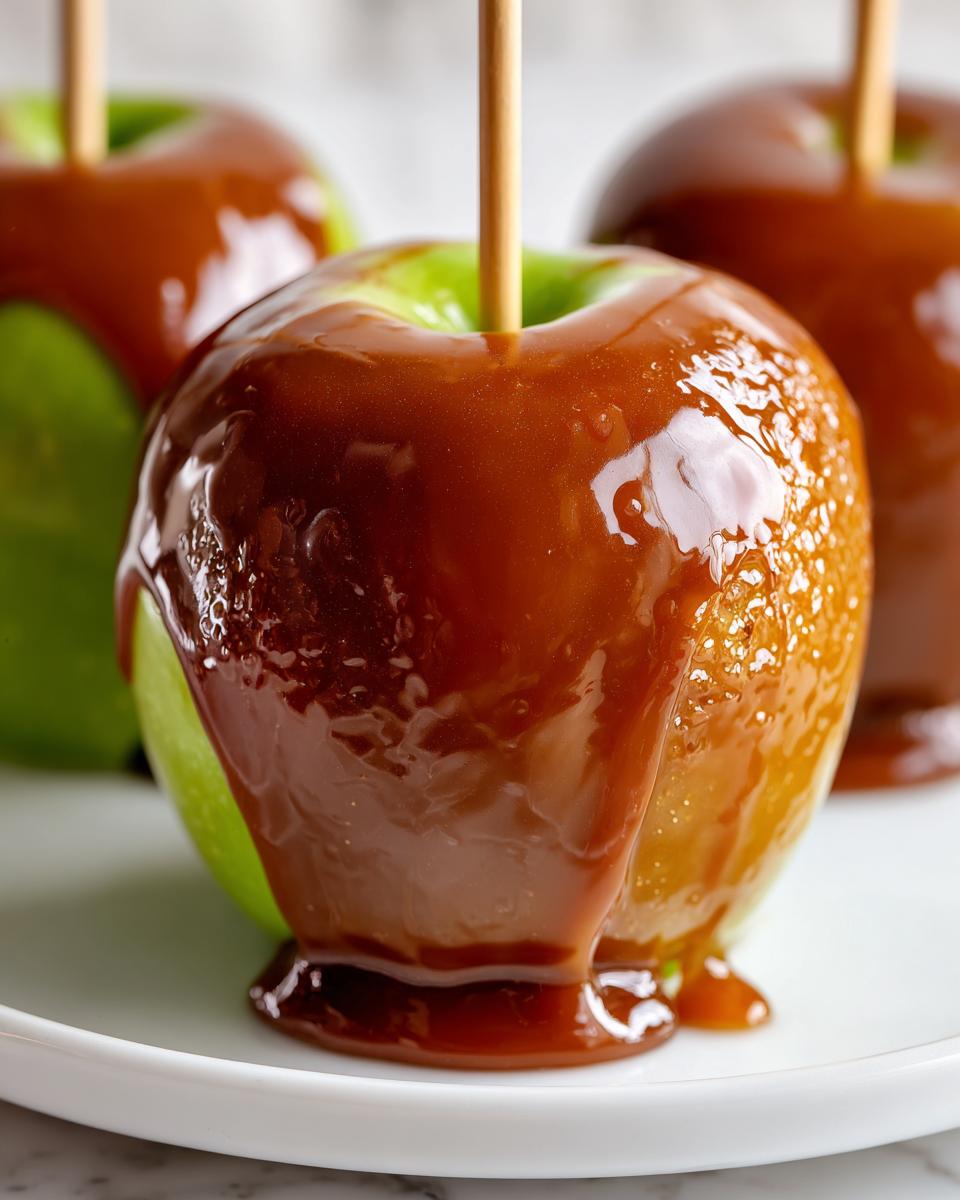
Right after dipping, roll the bottom edge in your chopped nuts or sprinkles! Then, place those beautiful treats on your lined sheet and let them sit undisturbed at room temperature for at least an hour until they are totally set. This waiting time is crucial for a firm coating on your homemade caramel apples!
Expert Caramel Apple Dipping Tips for Beginners
You’ve nailed the temperature, the apples are waxed-off dry, and you’re dipping—but what happens if things go rogue? Don’t panic! Mastering these little hiccups is what turns you from a beginner into someone who whips up caramel apples every autumn. If you keep these few caramel apple dipping tips in your back pocket, you’re golden.
If your caramel seems too thick while you’re working, just put it back on very low heat for a minute or two until it loosens up. Remember, never let it boil again! That throws off the chewy texture we worked so hard to achieve at 245°F.
Honestly, 90% of sliding caramel issues are cured by washing off that pesky wax coating and making sure the apples are completely dry before they ever see the caramel. For more great troubleshooting ideas, take a peek at these tips I found for perfect homemade caramel apples.
If you ever find yourself with extra caramel that gets too set up, don’t waste it! You can use the leftover flavor profile for amazing savory dishes, like my recipe for caramelized onions.
Gourmet Caramel Apples Tutorial: Variations and Toppings
Making basic caramel apples is wonderful, but why stop there when you can turn them into these show-stopping gourmet treats? This is where you get to really play and personalize them for holidays or just because you deserve something extra special! If you’re looking for some inspiration beyond just the classic look, I’ve got you covered with fun ideas and a crucial instruction for adding chocolate.
One of my favorite things to pair with this chewy caramel is chocolate. You cannot drizzle melted chocolate over the caramel right away, though! If you try that, the hot chocolate will thin out your perfect coating and make it slide everywhere. You have to let the caramel set completely—trust me on this one!
Once that chewy layer is firm to the touch (usually after an hour at room temp), you can drizzle melted milk, dark, or white chocolate right over the top. It looks so professional, like you bought them from a fancy street vendor. If you also want a salty kick, hit the chocolate drizzle with a tiny sprinkle of flaky sea salt before it sets. For even more unbelievable caramel apple toppings ideas, check out this awesome list I found: over 20 ideas for toppings!
- For that bakery style crunch: Roll the bottom in chopped pecans or walnuts.
- For a fun holiday look: Rainbow sprinkles or crushed peppermint candy canes!
- For a sophisticated treat: Drizzle with melted white chocolate and a tiny sprinkle of sea salt.
- For something totally different: Dipped in melted chocolate ganache followed by a dip in crushed chocolate wafer cookies. You won’t regret it!
- Don’t forget about my favorite crunchy cookies! You can even crumble up oatmeal lace cookies for texture!
Making Caramel Apple Slices Recipe for Easy Serving
Okay, sometimes you want the flavor without the commitment of dipping a whole apple, right? Or maybe you have little kids who can’t manage a giant stick. That’s where the caramel apple slices recipe idea comes from, and it’s super simple! You can cut your apples into wedges before you dip them. Just make sure you dip those wedges right away—like immediately after cutting—because once apples are exposed to air, they start browning fast.
Alternatively, if you have leftover caramel from one of these batches, you can just use the cooked caramel as a simple dip in a small bowl for the apple wedges. It’s the ultimate no mess caramel apples hack for sharing!
Storage and Reheating Instructions for Caramel Apples
So, you made the perfect batch of caramel apples! Now, how do we keep them pristine? Honestly, room temperature is best for the caramel texture. If you store them in the fridge, that sticky blanket can sweat or get weirdly hard due to condensation. Try to keep them airtight, wrapped individually in plastic wrap, at a cool room temperature for up to two days.
If you absolutely must refrigerate them, just let them sit out on the counter for at least an hour before serving so that chewy texture comes back. If you ever need an inspiration for quick baked goods later, check out my easy moist coffee cake!
Frequently Asked Questions About Making Caramel Apples
I know you’ve got questions floating around, because I sure did when I first started trying to make these beauties! It’s totally normal to worry about the sticky mess or getting the texture just right. These are the questions I get asked the most about making perfect caramel apples, so let’s clear up any last bits of confusion!
What temperature should I cook caramel for the best chewy caramel apples?
This is the most common, and most important, question! For those wonderfully **best chewy caramel apples** that give you that satisfying pull without breaking your teeth, you have to hit exactly 245 degrees Fahrenheit on your candy thermometer. That’s the Firm Ball Stage. If you let it go to 250°F or higher, you’re making hard candy! Since we want soft, gooey yumminess for our homemade caramel apples, stay locked onto 245°F.
How do I stop my caramel from sliding off the apples?
This is the number one disaster scenario, and it comes down to two things you have to do—no skipping! First, **you must wash the wax off the apples** with a quick dip in boiling water. Second, after washing them, they must be aggressively, completely, bone-dry before you dip them. If your apples are wet or waxed, the caramel has nothing to grab onto, and you’ll end up wishing you had watched my easy protein balls recipe instead because they are so straightforward!
Can I make a quick caramel dip for apples without sticks?
Absolutely, you can! If you just want that rich caramel flavor for dipping apple slices or wedges, you can totally use this exact caramel after it cools for 5-10 minutes—it makes an amazing dip! Just pour the cooled mixture into a small bowl instead of dipping whole fruits. If you’re looking for something even simpler for dipping fruits, you might want to search for a dedicated quick **how to make caramel dip for apples** recipe, but this one works perfectly for that purpose too!
Nutritional Estimates for Classic Caramel Apples
Now, I know we aren’t making these for health food reasons—they are a glorious, decadent fall treat! But because I come from a background where nutrition matters (hello, old nutrition degree!), I always like to give you a starting point for what’s in one of these beauties. We have to remember that these estimates are just for one single apple coated in our base caramel, without any added gourmet toppings we talked about earlier.
If you load it up with peanuts and chocolate drizzle, those numbers definitely go up, so count those as your bonus points for the day! But for the base recipe, here’s a ballpark figure for one of these fantastic caramel apples. If you’re looking for some lighter ideas for other parts of your day, check out my list of healthy breakfast ideas.
- Serving Size: 1 apple
- Calories: About 550
- Sugar: Around 85g (that’s where the magic is!)
- Fat: Roughly 22g
- Carbohydrates: About 90g
- Protein: 4g
Think of it this way: the apple itself is providing some great fiber, and the rest is pure, wonderful fall indulgence. That’s why we save these for special occasions, right? It’s a beautiful, traditional treat!
Share Your Homemade Caramel Apples Creations
Whew! You did it! You conquered the hot sugar, you stripped the wax, and now you have these absolutely gorgeous, chewy, bakery-style caramel apples sitting on your counter. I am seriously so excited for you right now!
The biggest joy for me, as Jess, seeing these recipes come to life isn’t just in the writing; it’s looking at your incredible photos online! When you take the time to make something that brings joy to your family or friends, I want to shout about it!
So please, when you finish setting these up, snap a picture! Tag me on social media—I want to see your gorgeous toppings, whether you went simple with sea salt or went all-out with chocolate drizzles. If you loved how reliable this recipe was, please hop back here and leave it a 5-star rating. It helps other bakers who are nervous about tackling hot sugar feel confident enough to try my foolproof method for homemade caramel apples.
If you have any questions that popped up while you were dipping, or if you just want to say hello, don’t hesitate to reach out through my contact page. Happy Autumn baking, everyone! I can’t wait to see what you create!
PrintFoolproof Chewy Homemade Caramel Apples: The Secret to a Perfect Coating That Sticks
Make bakery style caramel apples at home that stick perfectly every time. This easy recipe delivers a rich, chewy caramel coating ideal for fall parties and holiday gifting.
- Prep Time: 20 min
- Cook Time: 20 min
- Total Time: 40 min
- Yield: 6 servings 1x
- Category: Dessert
- Method: Stovetop Cooking
- Cuisine: American
- Diet: Vegetarian
Ingredients
- 6 large, firm apples (Granny Smith or Honeycrisp recommended)
- 6 wooden or paper lollipop sticks
- 1 cup (2 sticks) unsalted butter
- 2 cups light brown sugar, packed
- 1 cup light corn syrup
- 1 (14 ounce) can sweetened condensed milk
- 1 teaspoon pure vanilla extract
- 1/2 teaspoon salt
- Optional toppings: chopped nuts, sprinkles, coarse sea salt, melted chocolate for drizzling
Instructions
- Prepare the apples: Wash the apples thoroughly. Remove the wax coating by dipping them briefly (about 10 seconds) in a pot of boiling water, then dry them completely with paper towels. Insert a stick firmly into the core of each apple.
- Prepare your station: Line a baking sheet with parchment paper or a silicone mat. Set out your optional toppings in shallow bowls.
- Make the caramel: In a heavy-bottomed saucepan, combine the butter, brown sugar, corn syrup, and sweetened condensed milk. Stir constantly over medium heat until the butter melts and the sugar dissolves.
- Cook the caramel: Attach a candy thermometer to the side of the pan. Bring the mixture to a boil without stirring once boiling. Continue to cook until the mixture reaches 245 degrees Fahrenheit (Firm Ball stage). This usually takes 15 to 20 minutes.
- Finish the caramel: Remove the pan from the heat immediately when it reaches 245°F. Stir in the vanilla extract and salt. Let the caramel cool for 5 to 10 minutes; this slight cooling helps the caramel adhere better to the apples.
- Dip the apples: Tilt the saucepan slightly. Dip each apple into the caramel, rotating it to coat evenly. Lift the apple out and let excess caramel drip off back into the pan.
- Add toppings: If using toppings, immediately roll the bottom half of the apple in your chosen topping, or sprinkle them on top before the caramel sets.
- Set the apples: Place the coated apples on the prepared baking sheet. Let them cool completely at room temperature for at least 1 hour, or until the caramel is firm.
Notes
- For a no-slide caramel apple coating, ensure your apples are completely dry and free of wax before dipping.
- If the caramel becomes too thick while dipping, return the pan to low heat briefly to thin it slightly, but do not let it boil again.
- For a chewy texture, cook the caramel to exactly 245°F. Cooking higher will result in a hard candy shell.
- If you want chocolate covered caramel apples, wait until the caramel is fully set, then drizzle with melted chocolate.
Nutrition
- Serving Size: 1 apple
- Calories: 550
- Sugar: 85
- Sodium: 150
- Fat: 22
- Saturated Fat: 14
- Unsaturated Fat: 8
- Trans Fat: 0
- Carbohydrates: 90
- Fiber: 2
- Protein: 4
- Cholesterol: 75