
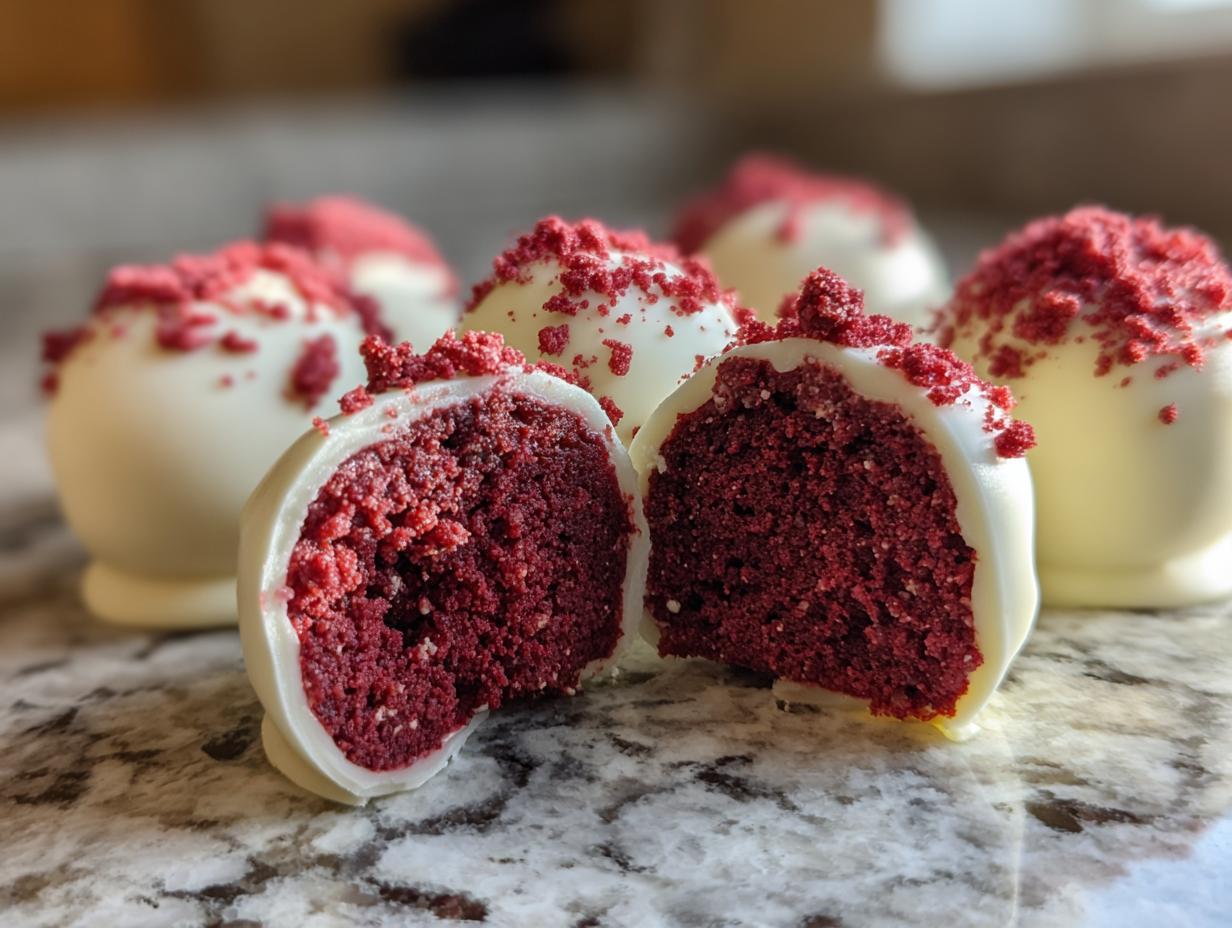
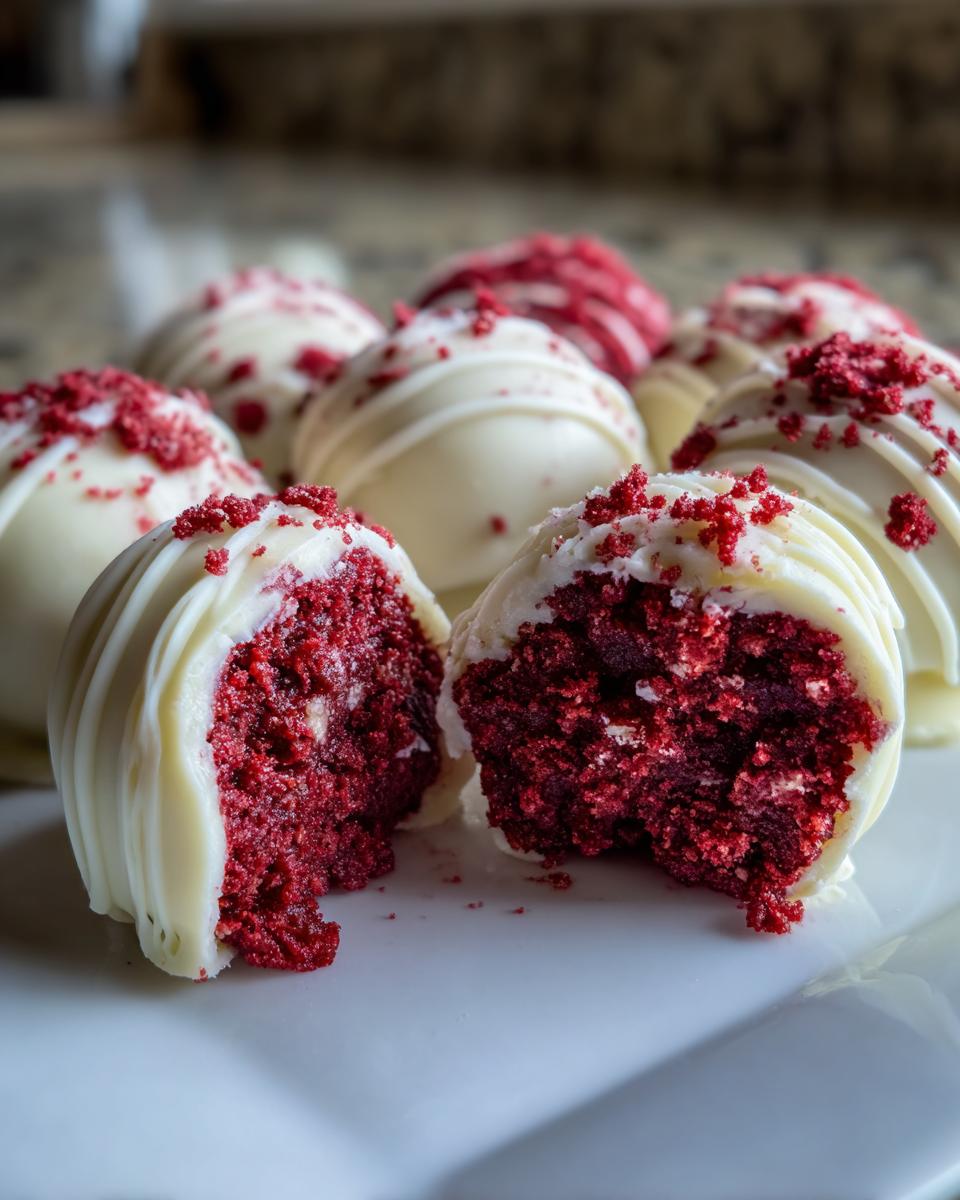
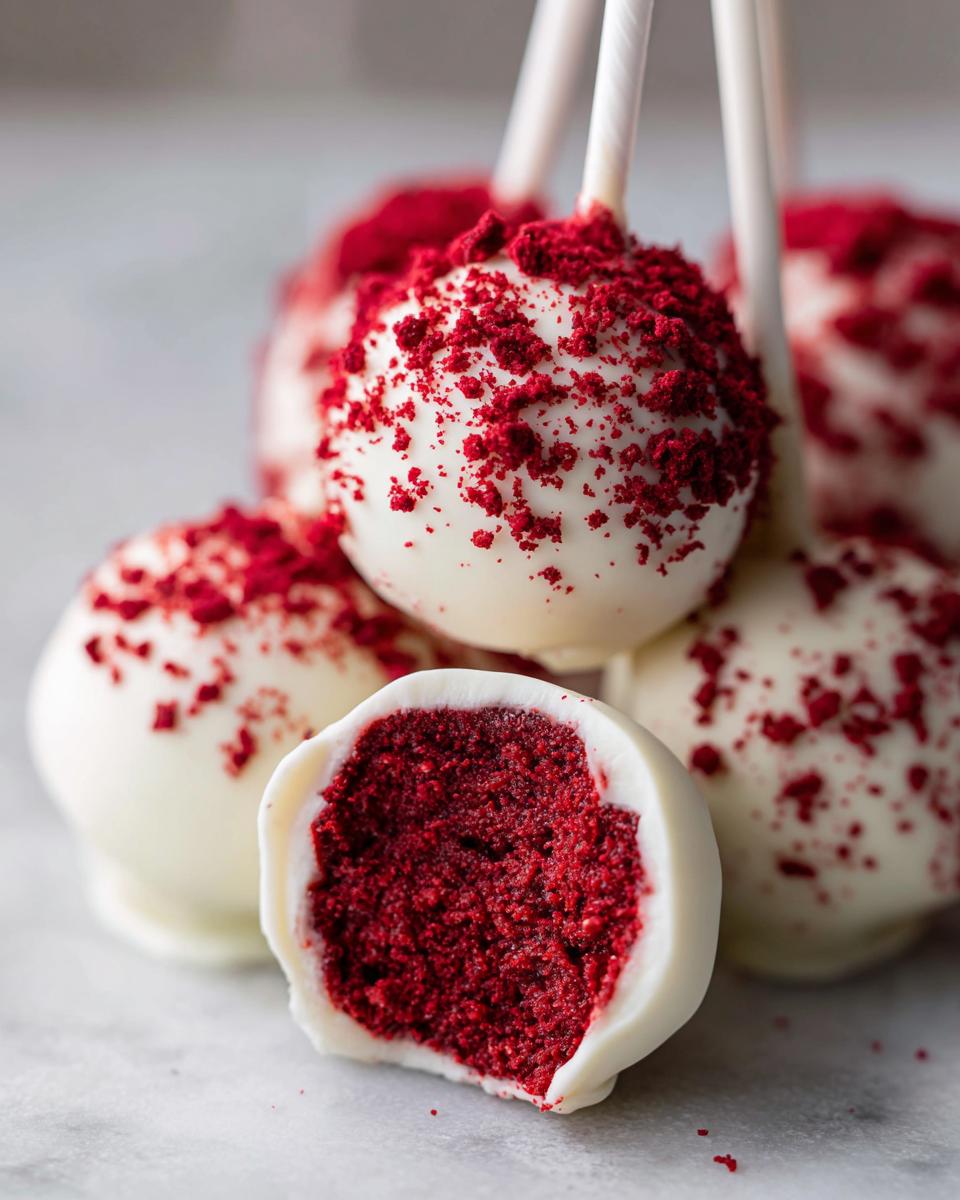
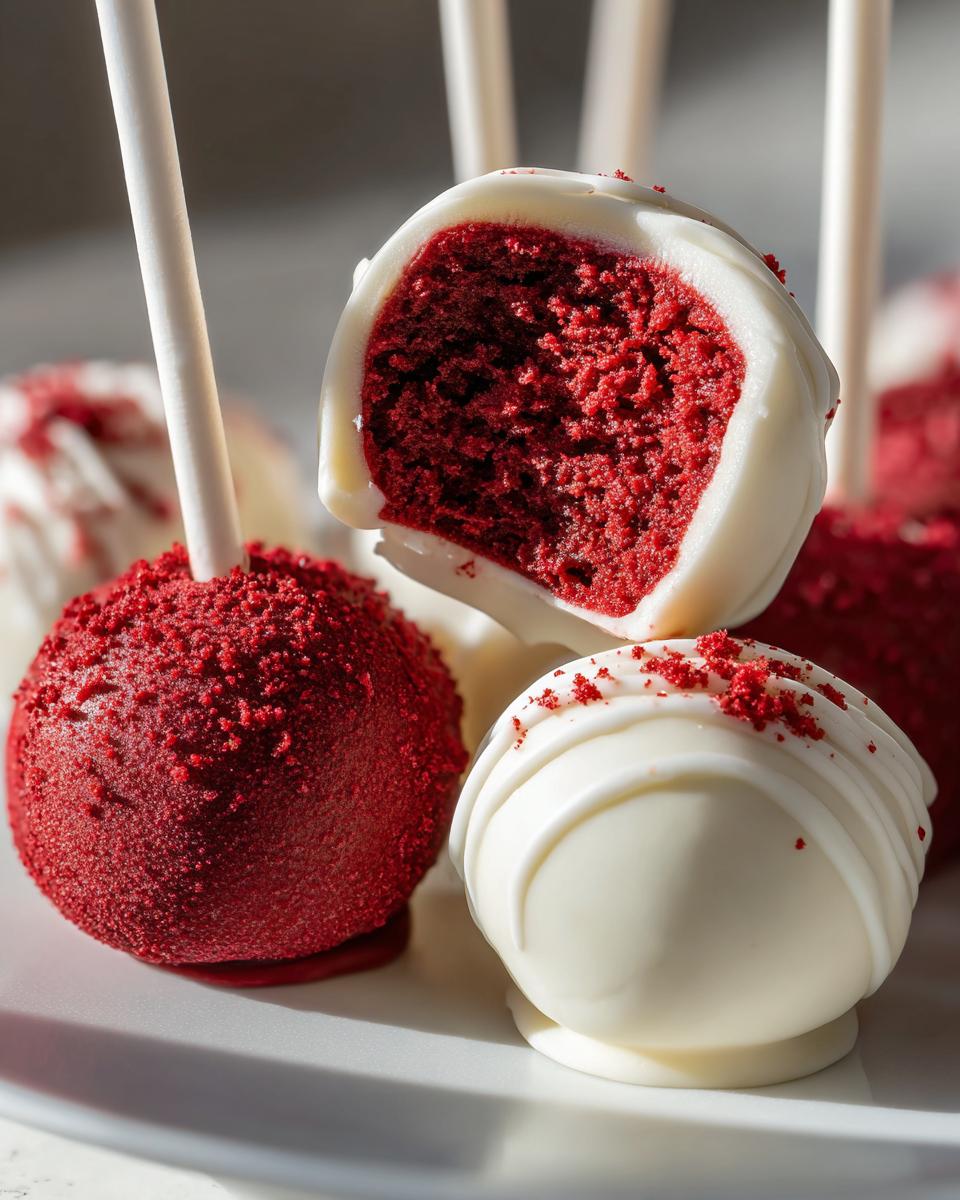
When the craving hits for something vibrant, shockingly flavorful, and perfectly portioned, nothing beats a gorgeous red velvet creation. Forget fussy layer cakes! I’m talking about my super easy, incredibly moist red velvet cake pops. Seriously, these are my go-to party food because we use a simple cake mix as the base, which cuts the fuss way down. They come out as perfect little bursts of red velvet deliciousness, all bound together with that tangy cream cheese goodness. These aren’t just desserts; they are tiny celebrations ready to go! I find that these $bite sized treats are perfect for every gathering, whether it’s a big birthday blowout or just a sweet Tuesday afternoon treat. You’re going to love how simple they are to pull together, trust me.
- Why You Will Love These Easy Red Velvet Cake Pops
- Gathering Ingredients for Your Red Velvet Cake Pops
- Step-by-Step Instructions: How to Make Red Velvet Cake Pops
- Expert Tips for Perfect Red Velvet Cake Pops
- Creative Variations for Red Velvet Confections
- Storage and Keeping Your Red Velvet Cake Pops Fresh
- Serving Suggestions for These Party Food Desserts
- Frequently Asked Questions About Red Velvet Cake Pops
- Nutritional Snapshot of These Festive Pop Cakes
Why You Will Love These Easy Red Velvet Cake Pops
I know you’re busy, so when I say a recipe is easy, I truly mean it! These pops come together quickly, especially since we’re leaning on quality mixes to get that beautiful red color and classic flavor without a fuss. Here’s why these are about to become your favorite party food desserts:
- They deliver maximum flavor for minimal time investment. Using the cake mix shortcut is a game-changer!
- Texture perfection! We achieve incredibly moist cake balls because we mix the cake crumb with cream cheese frosting—it’s sticky enough to hold shape but creamy enough to melt in your mouth.
- The look! That vibrant red against the smooth, clean white chocolate coating is just stunning for any holiday or celebration.
- They travel like a dream. Since they are already portioned perfectly, you don’t need serving plates or forks, making clean-up a breeze!
Gathering Ingredients for Your Red Velvet Cake Pops
Okay, let’s talk about what you need! I love that this recipe doesn’t require a pantry full of specialty items. We are leaning hard into simplicity here so you can get to the fun part—the dipping—sooner. Don’t fret about the cake; we’re starting with a box mix. It truly guarantees that beautiful, classic flavor and color every single time. Remember, blending the cake with the frosting is what turns this simple base into those heavenly moist cake balls, so make sure your frosting is just right!
Essential Components for Moist Cake Balls
For the actual cake pop dough, you generally need three things:
- That standard box of red velvet cake mix (prepare it according to the box but bake it in a 9×13 pan since we need easy crumbles).
- A full cup of cream cheese frosting. If you have a favorite homemade cream cheese frosting recipe, go for it! If not, a good quality store-bought tub works wonders here.
- The necessary additions called for on the cake mix box—usually eggs and oil.
Coating and Decoration Supplies for White Chocolate Coated Pops
This is where we get fancy! Don’t try to substitute regular chocolate chips for this coating, because that’s where things get messy for beginners. You truly want melting wafers for the smoothest finish on your white chocolate coated pops.
- You’ll need about 12 ounces of white chocolate melting wafers. Sometimes I keep a tiny bit of vegetable oil handy, just in case the chocolate gets too stiff—it helps thin it out beautifully.
- Don’t forget the cake pop sticks!
- Finally, grab any sprinkles you love. I usually go for classic red or white for that gorgeous final look. If you want to explore making your own coatings, check out my thoughts on $rich chocolate syrup; it can inspire some drizzle ideas!
Step-by-Step Instructions: How to Make Red Velvet Cake Pops
Alright, this is the fun part where we turn simple baked goods into something perfectly portable and adorable! Don’t panic about the steps; I’ve broken this down so clearly you’ll whip these up faster than you think. The key to success in any cake pop tutorial is patience, especially when we’re dealing with cooling and chilling times. Trust me on these cooling steps—they prevent so much heartache later on when you start dipping!
Baking and Creating the Red Velvet Cake Base
First things first, whip up that red velvet cake mix exactly as the box says, but please bake it in that 9×13 inch pan. We want a nice, thin layer so it cools down fast. Once it’s baked, you have to let it cool down completely—I mean, stone cold! Once it’s cool, the magic starts: crumble the whole thing up into fine crumbs in a big bowl. I always pick out any parts that look a little too dark or browned on the edges because we want these moist cake balls to be beautifully red all the way through, not brown and dry.
Forming and Chilling the Dough for Easy Homemade Cake Pops
Now, take your cup of cream cheese frosting and start adding it, little by little, to your red velvet crumbs. I usually switch to using my hands here because you really need to feel when it hits that perfect, thick dough consistency. You’re looking for something that holds together when squeezed but isn’t overly sticky. Once combined, start rolling! Aim for little balls that are about 1 to 1.5 inches—they need to be uniform so they look professional on the stick. Get them all onto a parchment-lined sheet and pop them into the fridge for at least 30 minutes. Seriously, don’t skip the chilling; that’s what keeps these from turning into messy puddles later!
Mastering the White Chocolate Coating for Red Velvet Cake Pops
While those balls are chilling, melt your white chocolate wafers. Use short bursts—like 30 seconds at a time—in the microwave and stir well between each session. If it looks a little stiff, stir in that tiny bit of optional oil to loosen it up so it flows nicely. The secret weapon here is the stick dip! Dip the tip of your cake pop stick straight into the chocolate and then stab it halfway into a chilled cake ball. Pop the tray back in the fridge for 10 minutes. This hardens the chocolate around the stick, locking it in place! Finally, dip the whole ball under the chocolate, pull it out, gently tap the stick on the side of the bowl to shake off the excess coating, and stand them upright to set. $Making cake pops requires this two-step chilling process, but it’s totally worth it for a professional finish!
Expert Tips for Perfect Red Velvet Cake Pops
Now that you’ve got the basic steps down, I want to share a few insider things I learned over the years making these for parties. These little secrets are what take your red velvet cake pops from good to absolutely unforgettable. It’s all about the little details, right? Getting the texture just right helps them hold their shape beautifully when you dip them, and preventing chocolate disasters saves you a serious headache!
Achieving the Right Dough Consistency
Remember that warning about the sticky paste? That’s the biggest trap! When you are mixing your cake crumbs and the cream cheese frosting together, you want it to feel like thick playdough—firm enough to hold its shape when you roll it between your palms. If you mix it too long or add too much frosting, it gets gooey. And when it’s gooey, it never chills properly, leading to sad, cracked shells later. Stop mixing right when you see that uniform texture—don’t keep going just because you can!
Troubleshooting Thick Chocolate Coating
The temperature of your kitchen or how long the chocolate has been sitting out can drastically affect your dipping process. If you notice your white chocolate coating starting to look stiff or dragging too much on the cake balls, don’t try to force it! Just pop it back into the microwave for ten or fifteen seconds more, just enough to loosen it up. A thinner coating looks nicer, and it keeps your pops from getting that thick, chunky look. For extra tips on getting a silky finish, you might find my notes on $icing that hardens smoothly helpful for future coat modifications!
Creative Variations for Red Velvet Confections
While the classic red velvet flavor is divine on its own, who doesn’t love a little custom flair, especially when you’re making these for a special event? These festive pop cakes are the perfect canvas for creativity. If you’re baking for Valentine’s Day, ditch the round mold for a second and gently press that chilled dough into a small heart-shaped silicone mold before you insert the stick. Isn’t that just the sweetest touch?
You can also play with the frosting binder if you want to shift the flavor profile a bit. Maybe you swirl in a *tiny* bit of peanut butter into that cream cheese mix, or perhaps some finely chopped pecans? And speaking of fun, if you’re looking for other wildly festive desserts, you absolutely have to check out my recipe for $Christmas tree cheesecake—it brings the same high-impact visual appeal!

The ultimate goal is to make them your own. Remember, these are Red Velvet Dessert Recipes that should reflect whatever celebration you’re prepping for!
Storage and Keeping Your Red Velvet Cake Pops Fresh
We’ve spent all this time making perfect, beautiful red velvet cake pops, so we absolutely need to store them correctly! The goal here is twofold: keep the cake inside moist, and keep that crisp white chocolate shell from getting sweaty or cracking.
The best way to keep these bite sized treats fresh is airtight, but you have to be careful about temperature. If you plan on serving them within 24 hours, you can just store them on the counter. Just make sure they are in a sealable container or a zip-top bag where they won’t touch each other. If you put sprinkles on them, you absolutely must keep them out of direct sunlight! A small amount of condensation can happen if you move them from a cold fridge straight to a warm room, so let them sit out for about 20 minutes before serving.
For longer storage, like if you’re prepping for a big Valentine’s Day party ahead of time, the refrigerator is your friend. Place the finished pops standing up in a foam block or sturdy container, cover it tightly with plastic wrap, and pop it in the fridge. They will keep wonderfully for up to a week this way. Just remember that crucial step: always let them come to room temperature for about 30 minutes before eating. That allows the cake center to soften up again so you get that wonderful, melt-in-your-mouth texture we worked so hard for!
Serving Suggestions for These Party Food Desserts
Making these incredible red velvet cake pops is only half the fun; the other half is showing them off! Presentation really makes these little treats memorable, whether you’re hosting a huge birthday bash or just spoiling the family on Valentine’s Day. Since these are so easy to handle, they work perfectly in almost any setting. I always try to match the presentation to the event to make it feel extra special.
For Valentine’s Day, like the lovely ones mentioned over at $The Cooking Sisters say, you absolutely have to lean into the red and white theme. I use a block of Styrofoam—you can cover it neatly with festive red foil or velvet ribbon—and stand the pops up in there. Stick some tiny edible heart sprinkles on the white chocolate while it’s wet, and bam! Instant gift or centerpiece.
When I make these as dessert for celebrations like birthdays, I think taller and brighter. Ditch the Styrofoam for a minute and stand them up in a decorative glass jar or a rustic bucket filled with colorful paper shreds or even dry beans to hold them steady. Kids especially love that they can just grab one and run off for more fun.
If you are serving them alongside savory snacks—maybe my famous garlic butter breadsticks, which you can find the recipe for $right here—keep a small, multi-tiered serving tray handy. Putting the pops on a high tier leaves room for other party food desserts on the main table. They look elegant, taste divine, and everyone loves grabbing this vibrant little bite!
Frequently Asked Questions About Red Velvet Cake Pops
I know when you’re trying a new recipe, especially one as cute and vibrant as these $red velvet cake pops, you’ve got questions! Dealing with the consistency and the coating can feel tricky at first, but once you nail the technique, you’ll be making these for every holiday. Here are the things people ask me most often about achieving perfect bite sized treats.
Can I use a homemade cream cheese frosting recipe instead of store-bought?
Oh goodness, yes! If you have a great cream cheese frosting recipe you love, definitely use that! Homemade is usually richer in flavor, which is always a win. Just know that when you use it as the binder for your red velvet cake pops, it needs to be quite thick. If your homemade frosting seems a little loose or soft, chill the frosting itself in the fridge for about 15 minutes before mixing it with those cake crumbs. We want that doughy texture, not a sticky stew!
What is the best way to get a smooth white chocolate coating?
This is perhaps the most important question! You need two things for smooth dipping: cold cake balls and thin chocolate. Make sure those cake balls have been chilling for a good half hour, minimum. When you’re melting your white chocolate wafers, if they look thick or seize up even a tiny bit, stir in about half a teaspoon of neutral oil—like vegetable or canola—and heat for 10 more seconds. That little bit of oil lowers the viscosity immediately, giving you that beautiful, thin shell that sets up perfectly without looking chunky or heavy on your finished pops.
Nutritional Snapshot of These Festive Pop Cakes
I always get asked if these vibrant little bites are surprisingly healthy, and while I use real ingredients, these festive pop cakes are definitely a decadent treat! Since nutrition facts can swing wildly depending on the brand of cake mix or frosting you grab, I wanted to give you a rough estimate based on the standard recipe provided. This is just a general guideline, so please don’t stress too much about it!
Knowing what’s in our food helps us make better choices, even when it comes to something fun like these red velvet cake pops. Here is what you can generally expect for one standard, delicious cake pop:
- Serving Size: 1 pop
- Calories: Around 210
- Sugar: Roughly 22g
- Fat: About 12g, with roughly 7g being saturated fat.
- Carbohydrates: Approximately 25g
- Protein: About 3g
Remember, these values account for the cake, the cream cheese frosting binder, and the white chocolate coating, which is often where most of the sugar and fat comes from. Keep them stored correctly, and enjoy these perfect little portions!
PrintEasy, Moist Red Velvet Cake Pops with White Chocolate Dip

Make these vibrant red velvet cake pops using a simple method. They feature a moist cake ball mixed with cream cheese frosting, coated in smooth white chocolate, perfect for any celebration.
- Prep Time: 30 min
- Cook Time: 35 min
- Total Time: 1 hour 45 min
- Yield: 24 pops 1x
- Category: Dessert
- Method: No Bake Assembly
- Cuisine: American
- Diet: Vegetarian
Ingredients
- 1 box (15.25 oz) red velvet cake mix
- Ingredients called for on cake mix box (usually eggs, oil, water)
- 1 cup cream cheese frosting (store-bought or homemade)
- 12 oz white chocolate melting wafers or candy coating
- 1 teaspoon vegetable oil (optional, for thinning chocolate)
- Cake pop sticks
- Red or white sprinkles (optional, for decoration)
Instructions
- Prepare the red velvet cake according to the package directions, substituting water with the amount specified on the box. Bake the cake in a 9×13 inch pan. Let the cake cool completely.
- Crumble the cooled cake into fine crumbs in a large bowl. Discard any overly browned edges.
- Add the cream cheese frosting to the cake crumbs. Mix thoroughly with your hands or a sturdy spoon until a uniform, dough-like consistency forms.
- Roll the mixture into small, uniform balls, about 1 to 1.5 inches in diameter. Place the balls on a parchment-lined baking sheet.
- Chill the cake balls in the refrigerator for at least 30 minutes. This step helps them hold their shape during dipping.
- Melt the white chocolate wafers according to package instructions, typically in a microwave-safe bowl in 30-second intervals, stirring between each interval. Stir in the optional vegetable oil for a smoother consistency.
- Dip the tip of a cake pop stick into the melted chocolate, then insert the stick about halfway into a chilled cake ball. Return the sheet to the refrigerator for 10 minutes to set the stick.
- Dip each cake ball completely into the melted white chocolate, gently tapping the stick against the side of the bowl to remove excess coating.
- Immediately add sprinkles, if using, before the chocolate sets.
- Place the finished cake pops upright in a styrofoam block or a dedicated cake pop stand to dry completely.
Notes
- For the best texture, avoid over-mixing the cake crumbs and frosting. You want a moist dough, not a sticky paste.
- If the white chocolate coating becomes too thick while dipping, microwave it for another 10-15 seconds to loosen it up.
- If you prefer a richer red velvet flavor, use a homemade cream cheese frosting recipe instead of store-bought.
- To make heart-shaped cake pops for Valentine’s Day, press the chilled dough gently into a small heart-shaped silicone mold before inserting the stick.
Nutrition
- Serving Size: 1 pop
- Calories: 210
- Sugar: 22
- Sodium: 180
- Fat: 12
- Saturated Fat: 7
- Unsaturated Fat: 5
- Trans Fat: 0.2
- Carbohydrates: 25
- Fiber: 0.5
- Protein: 3
- Cholesterol: 15